Tamiya Marder III Ausf. M 7.5cm Pak 40 auf Gw.38t Sdkfz 138 (2007)

Bill Plunk
Posts: 1245
Joined: Wed Sep 28, 2022 10:18 pm

WIP 07-22-2007

Post by Bill Plunk »

Not a lot of progress today, several errands throughout the day took up most of the available build time, however I did make some inroads on the details department.

I removed the masking tape on the interior compartment and was pleased to see that most of it had survived intact. Only a little bit of touch-up was needed on the rain guard over the radio and to a couple of the ready ammo rounds.

For the exterior, I did the same thing, touching up some spots here and there that the work with the AB had overlooked. I also cleaned up most of the remaining over spray in the camo patterns by dry-brushing the corresponding colors to blend them back in. I also installed the main support bar for the canvas foul weather cover and then turned to the suspension.

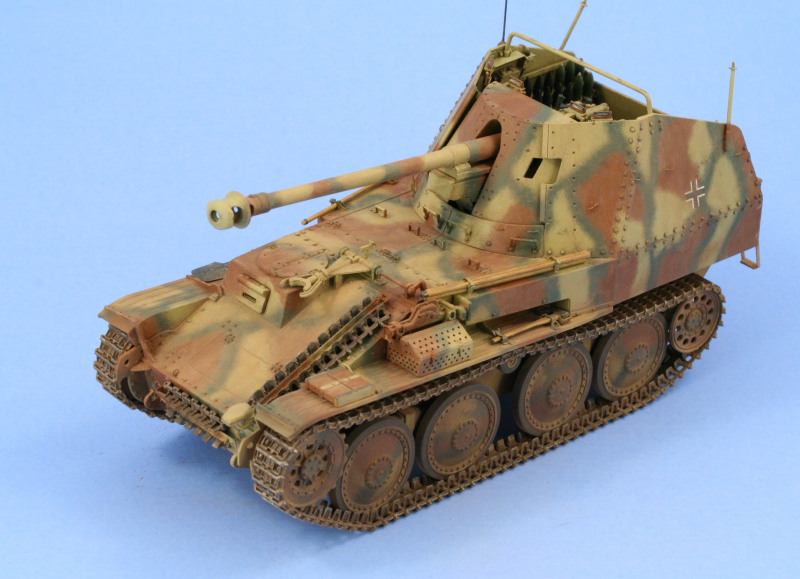
In preparation for installing the road wheels, I laid out the sets and mixed/matched them in order to get a good set for each side that more or less corresponded to the scheme patter on that side. The areas under the fenders and the lower hull were treated with some dry brushed Burnt Umber as a foundation for weathering and the same was done to all the road wheels. The sprockets and idlers were also dry brushed with Steel on their teeth and track contact points before the Burnt Umber was applied. The contrast is somewhat strong at this point but further weathering in later stages will mute this somewhat and blend it all back in together. The road wheels and idlers were glued in place and the sprockets, due to the insert grommets, were pressed onto their mount arms and are able to turn freely.

Image

The paint will get a chance to cure for a week or so before next weekend rolls around. In the course of the week I'll likely start in on the MK tracks just because they're the perfect thing to work on in front of the TV to break up the tedium of their assembly.
Bill Plunk
Posts: 1245
Joined: Wed Sep 28, 2022 10:18 pm

WIP 07-28-2007

Post by Bill Plunk »

Throughout the course of the week and also today, I worked on the Model Kasten replacement tracks. I've used this set before on my Flakpanzer Gepard, so I knew that the recommended count of 95-96 links is designed for the 38(t) or Hetzers, not for the Ausf M chassis with only one return roller. These only need 93 links per side, any more than that and it will produce too much sag.

The MK set comes as indy links on their own individual sprues and sets of pins to secure them together to make them workable. The tracks aren't handed, so the pins are all the same unlike other track types.

Image

The links each have 4 sprue points and these require some care to remove and also cleanup. I recommend using a new/sharp #11 blade for this in order to cleanly remove the sprue nubs and not damage the pin sockets in the process. I worked on these for about an hour or two each night in front of the TV, cleaning up all the links for one track side first before assembly. Assembly of the tracks is straightforward, the MK set includes a jig that will hold 8 links, however I pin the links one at a time and build up a section of 8 that way to avoid spilling links every time a pin is inserted. The pins come on their own little handles for easy installation, just touch a bit of glue to the head of the pin and insert using the jig.

Image

Once all 8 of the links were pinned, the handles were gently twisted off the link pins to create the run. Then the last link is inserted in the jig and another set of links added until the whole single run is constructed. The fit to the sprockets is tight, requiring some gentle pressure with tweezers to get them to sit all the way down, but since the sprockets are removable, this is easy to do prior to fitting the track to the suspension. The 93 links produces just the right look on both sides with sufficient slack to easily pin the ends together.

Image

The MK set also contains enough extras to construct the spare track runs for the hull front and glacis. I assembled 6 for the front and 11 for the glacis and the fact that they are workable comes in very handy, allowing them to be slipped in under the already installed holders easily.

Image

And of course, as is usual with MK sets, there's a lot of debris left over at the end!

Image


Just need to detail the pioneer tools and install, paint and install the periscopes, and add some other small details and it will be time to begin the final weathering and finish stages.
Bill Plunk
Posts: 1245
Joined: Wed Sep 28, 2022 10:18 pm

WIP 07-29-2007

Post by Bill Plunk »

Today's efforts started off with the periscopes. I painted these using Italian Dark Brown to simulate the Bakelite housing and then detailed their frames with the same color as the interior to get them to match. I painted their glass faces with some Silver and then applied Tamiya Clear Smoke over that once dry. Installation was a bit tricky and I had to get creative with the tweezers due to the inability to use the fighting compartment sides as a hand-hold at this stage.

Then it was on to the pioneer tools. The molded on tool clamps were carefully removed and each tool brush painted prior to installation in their respective clamps. For the wood items, I used my own mix of "wood" color and then lightly brushed some burnt umber and black artist pastels to give them some depth. The shovel had the kit's incorrect head design removed in favor of the Eduard head, otherwise all the tools were used as supplied in the kit. The hardwood jack block was painted with a base coat of Leather and then had my "wood" mix dry-brushed over it to bring out some of the molded on wood grain detail. The handles on the wire cutters were given the same treatment as the periscopes since they also were made of Bakelite. Last but not least, I carefully dry-brushed some Steel around the wheel rims to simulate wear from contact with the track guide horns. At the moment these are very shiny but will get toned down some in the follow-on weathering stages.

Image

Image

Next up were the tracks themselves. These were painted first with Metalizer Gunmetal then dry-brushed with Steel. A wash of Rust followed by a wash of Raw Umber were liberally applied and then the tracks were installed on both sides without any major issues. The spare runs were installed on the hull front and glacis as well.

Image

Next order of business will be applying a coat of Future and getting the markings on in preparation for the weathering stages.
Bill Plunk
Posts: 1245
Joined: Wed Sep 28, 2022 10:18 pm

WIP 08-05-2007

Post by Bill Plunk »

This update actually covers yesterday's and today's activity, I just didn't have the time to post up the progress for Sat., so today's a 2-for-1!

The entire model received a foundation coat of Future sprayed through the AB and allowed to dry for a couple of hours before the decal markings were added. Since this vehicle is from an "unknown" unit in Belgium, 1944, the markings are pretty simple, just a set of balkenkreuze for the hull sides and rear. The Tamiya decals went on without any major problems and I used some Walther's Solvaset to get them to snug down tight. Once dry, a second coat of Future was applied to seal everything in prior to the weathering commencing.

Image

This was allowed to dry another couple of hours and the first round of weathering applied using the "dot method" for applying filters. This method involves applying small dots of paint to the vehicle surface and then using a brush dampened with clean thinner, blending the dots in, creating streaks, etc. to achieve the desired result. The first filter consisted of dots of Raw Umber applied randomly over all three colors with a spotter brush.

Image

The second filter of Raw Sienna was then applied. I used fewer dots of this color because the main intent was to introduce some subtle variations to the previous filter and not put them in direct competition with each other.

Image

The third and final filter consisted of dots of the 80/20 lightened Dunkelgelb mix used as the base coat and applied only to the red-brown and green areas. The purpose here is to again compliment the other filters but also introduce some fading specifically to those areas vs. the patches of base coat.

Image

The net effect of all three filters produces some nice subtle paint variations and ties together all three elements of the camo scheme.

Image

With that accomplished, the final step was to apply a pin wash of Burnt Umber around all the raised detail and panel lines. Up until this step, all of the weathering was applied to the upper hull only, but in this step the running gear also received the same pin wash in preparation for their own weathering process.

Image

I let this sit for a couple of hours and then came back to it, looking for spots where the washes were a little too heavy or out of balance and used a small detail brush dampened with thinner to make adjustments where needed. I also added some additional Burnt Sienna artist pastels to the wood handles of all the tools to deepen their tones a bit and applied a light dusting of Black pastel to the inside surfaces of the muzzle brake. Satisfied with that, I applied an overall coat of Lusterless Flat via spray can to all the surfaces to knock down any remaining shine from the Future and unify all the weathering into one layer.

Image

The only remaining step will be to apply some weathering pigments to the running gear and this one will be complete.
Bill Plunk
Posts: 1245
Joined: Wed Sep 28, 2022 10:18 pm

Completion 08-08-2007

Post by Bill Plunk »

Work finished up on this project over the last couple of days with the final steps coming in the weathering of the running gear and vehicle in general via Mig pigments. I mixed up a batch of Dry Mud, Dark Mud, and African Earth and applied it heavy and wet to all the running gear surfaces.

Image

This was then removed using a series of stiff-bristled brushes in order to fine tune the final result along with some moistened q-tips on the wheels and hull sides. Once satisfied with that, I took a highly diluted mix of the same pigments and applied it as a thin "dust" coat all over the upper surrfaces and hull. This was then very carefully adjusted using the same brushes but taking great care around the PE items to avoid damage.

Image

The final step was to install the antenna mast, using scale plans to get the mast height and cutting a length of brass rod and installing it with CA gel and painting to match the rest of the vehicle. Then it was off to the photo booth for the final photos!

Image

Image

Image

Image

Image

Image
Bill Plunk
Posts: 1245
Joined: Wed Sep 28, 2022 10:18 pm

Publication May 2008

Post by Bill Plunk »

This build project is also featured in the May 2008 issue of FineScale Modeler Magazine.

Image
Post Reply