Dragon Imperial Series Pzkpfw III Ausf. G Afrika Korps (2010)

Bill Plunk
Posts: 1245
Joined: Wed Sep 28, 2022 10:18 pm

WIP 01-03-2010

Post by Bill Plunk »

Made more progress this weekend and am getting this one oh-so-close to the finish line. The first order of business was to prep the lower hull for the track installation. I dry brushed the contact teeth on the sprocket with Steel and stippled some Panzer Schwarzgrau on the lower hull to simulate some scuffing/scrapes there that would've exposed the original Panzer Gray paint a bit. I also did the same, very lightly, on the turret side hatches and commander's cupola.

Image

The tracks were painted by airbrush with a primer coat of Flat Black laid down first to protect the bare plastic from the "hotter" lacquer based Non-buffing Metalizer Gunmetal main coat. The tracks were then heavily dry brushed with Steel and given a wash of enamel Raw Umber. Once the wash had dried, the tracks were installed along with the idlers on both sides. For the idler's contact surface, I gave it the same treatment as the tracks without the primer coat of Flat Black. The idler mount itself is still positionable since I haven't yet locked that down even though the idler itself is now glued to the mount.

Image

The spare track run for the front hull as well as the added-armor tracks were also painted and installed. They were basecoated with the non-buffing Metalizer Gunmetal and lightly dry brushed with Steel before given a wash of enamel Raw Umber followed by a wash of enamel Rust. Once those had dried, I dry brushed some additional enamel Burnt Umber to deepen their look and tone before gluing them into position. There are a couple of points that are still a little too reddish for my taste, I'll add some artist pastels to them later on in the weathering stage to tone them down a bit more.

Image

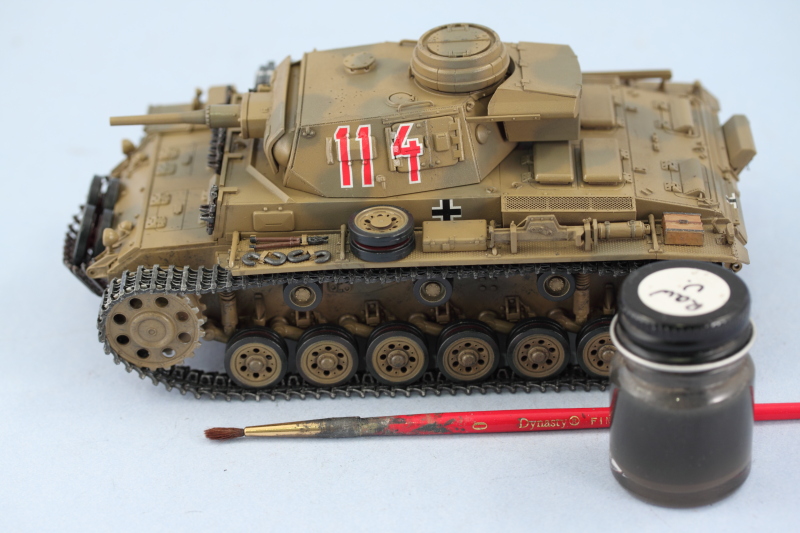
Those were the last details to add before proceeding to the markings, so the entire vehicle was given a sealing coat of Future applied by airbrush and allowed to dry overnight...mostly because I ran out of time yesterday than anything else.

The kit-supplied decals needed some work/modifications to be usable since the turret numbers are provided as one continuous detail with a large clear section between the middle 1 and the 4...and there's no way you could actually install it that way without some trimming and cutting. Using a pair of scissors, I carefully trimmed out all three numbers for each turret side set and also modified the rear turret bin number by removing the 4 and trimming down it's clear section to allow for a more contiguous look there. The kit-supplied crosses were also replaced since they were the white-outline only variety and the reference pic of #114 clearly shows a black-center-white-outline style of cross. The replacements came courtesy of some spares from a previous Tristar build that were the right size.

All of the decals were treated with Walther's Solvaset with the turret side numbers requiring multiple careful doses to get them to lie down and conform to the very complex turret side surfaces. Once the markings were dry, I applied a 2nd coat of Future to seal them in and protect them from the later weathering steps.

Image

Image

Image

The weathering will have to wait until next weekend however as my extended Christmas/holiday vacation comes to a close today and it's back to the grindstone tomorrow!
Bill Plunk
Posts: 1245
Joined: Wed Sep 28, 2022 10:18 pm

WIP 01-10-2010

Post by Bill Plunk »

I made a lot of progress with the weathering stages but didn't quite get this one across the finish line. Work started with an overall wash of enamel Raw Umber applied with a round 0 sable brush to the entire vehicle. This darkens the finish at first but provides a nice foundation for the additional steps and layers to follow.

Image

The next step was the application of dot filters. I chose enamel Light Gray, Armor Sand, and Raw Sienna and applied small dots with a pointed brush to small sections at a time. The dots are then blended together with a square tip brush that is dampened with thinner, a condition achieved by dipping into clean thinner and then touching it several times to a paper towel to wick away the excess thinner and avoid "flooding" the surface where the dots are.

Image

As a kind of "before and after", you can see in the pic below that the front part of the turret has received the filters while the cupola and storage bin are still in their unfiltered state. This process was applied to the entire model, working slowly one section at a time and all while wearing a breather mask due to the high concentration of thinner fumes.

Image

Next up was the application of a pin wash of enamel Burnt Umber using a pointed detail brush. The pin wash was applied to all the raised detail and panel lines. I then went back over the same areas with the same brush and clean thinner and removed or adjusted any excess wash as needed.

Image

At this stage I took a series of walk around photos looking for any problem areas or unblended dots from the filter stage. The camera sees things far more clearly than I can with the naked eye and a couple spots were cleared up and some adjustments made before I applied an overall coat of Testors Lusterless Flat in the spray can.

Once that had dried, I applied a wet mix of Mig Pigments Gulf War Sand using regular tap water mixed with a drop of liquid dish soap to break the surface tension. This was allowed to air dry and then the excess pigment carefully removed with stiff bristled brushes. I made further adjustments using wet and dry q-tips to get it to this point. I also used the dry q-tips that had accumulated pigment to apply a light dusting to the upper surfaces and fenders. I'm about 95% done with adjusting the pigments on the tracks and lower hull as I still see some spots where it's a little heavier than I would like...but will have to make those adjustments along with a few other small details later before I can say this one is done. Almost there!

Image
Bill Plunk
Posts: 1245
Joined: Wed Sep 28, 2022 10:18 pm

Completion 01-11-2010

Post by Bill Plunk »

I made a few adjustments to the pigment treatment applied yesterday and installed the missing radio antenna. I also fine tuned the tracks for the sag and it was off to the photo booth for the final shots.

Image

Image

Image

Image

Image

Image
Bill Plunk
Posts: 1245
Joined: Wed Sep 28, 2022 10:18 pm

Publication December 2011

Post by Bill Plunk »

This build is featured in the Dec 2011 Issue of FineScale Modeler Magazine on pp 25-31.

Image
Post Reply