Dragon Sdkfz 166 Stu.Pz. IV Brummbar Mid Production (2012)

Bill Plunk
Posts: 1245
Joined: Wed Sep 28, 2022 10:18 pm

WIP 07-08-2012

Post by Bill Plunk »

The latest round of effort focused on the tracks and beginning the weathering process for the exterior. First step with the tracks involved airbrushing a base coat of MM enamel Burnt Umber and letting that thoroughly set up and cure before proceeding with the next steps. This is something I had done last week, so they had a full week to sit before work began with them.

Next step involved dry-brushing MM enamel Steel with a 00 round sable brush. This adds a metallic look to the links and replicates the contact wear from the idlers, return rollers, and sprocket teeth.

Image

Track on the left has been fully dry-brushed, track on the right is in the base coat only to show the contrast.

Image

Next step involves applying a wash of enamel Raw Umber using the same 00 brush. The wash isn't applied too heavily but is used to blend in the Steel from the previous step and provide a more subtle look/feel to the track.

Image

Track on left after wash, track on right pending wash application to show the contrast.

Image

This gets the tracks ready for pigment weathering in later steps, I also dry-brushed Steel on the track faces but didn't apply the Raw Umber wash there as there's no real point to that and it runs the risk of getting thinner into the pins, which can make the runs brittle potentially.

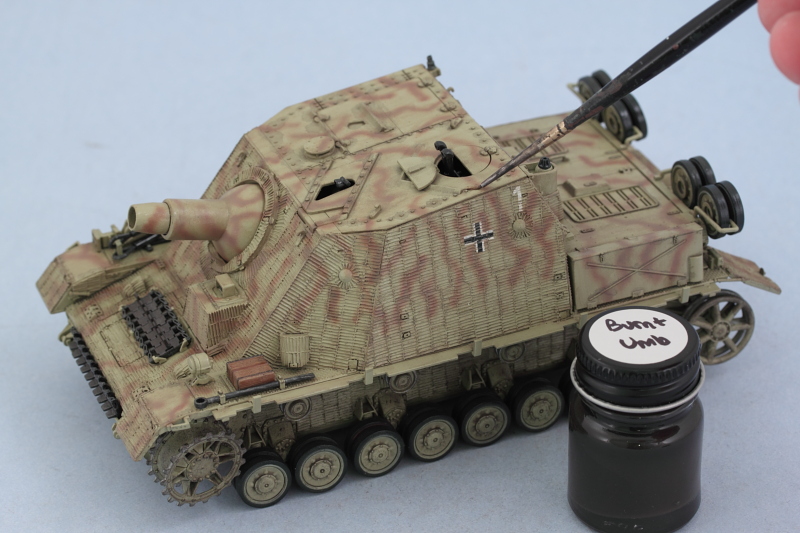
I turned to the exterior and started the weathering process with the application of an enamel Raw Umber wash. This is only a foundation for the later dot filtering steps and will get blended in with that process.

Image

In the course of applying the wash I noticed something strange going on around the barrel sleeve. At first I thought a small hair had gotten left behind by one of the brushes but closer examination revealed it was a series of hairline cracks.

Image

I hadn't dropped the vehicle and it hadn't taken any damage, so I can only assume this is a legacy from the fit issues I had earlier with the ball mantlet. A quick check on the other side revealed similar cracks appearing there also. These didn't show up during the assembly process or during painting, but we have had a lot of rain lately and perhaps the increased humidity caused it to flex and reveal the cracks.

Image

I had to give this some thought as to how best to repair and settled on liquid glue to fill the cracks and restore some integrity to the sleeve. I used finger pressure to help seal the cracks but that alone wasn't enough, so some added putty work was necessary. I used small amounts of Squadron White putty rolled over the cracks with a round toothpick and carefully sanded down with a sanding twig. The liquid glue application revealed the extent of the damage was greater than I had originally thought.

Image

Image

Some careful work with a detail brush and some light dry-brushing restored the finish.

Image

Image

I'm going to let that sit and fully cure and then will have to re-seal the barrel sleeve with Future before the weathering can proceed. Didn't get as far as I wanted to as a result of the repairs but glad they surfaced now instead of later on when it would've been much harder to fix!
Bill Plunk
Posts: 1245
Joined: Wed Sep 28, 2022 10:18 pm

WIP 07-15-2012

Post by Bill Plunk »

Didn't quite get as much done as I'd hoped...my wife forgot to put our outside cat who spends the night in the garage out on Friday and he must have fallen asleep in the engine. I went out in the afternoon to run an errand and started up the car and the engine belt must've caught him as he tried to get out...he lost quite a bit of fur (has a naked strip down one full side of his body!) but no serious injury and the fur caused the belt to come off...so I spent Saturday getting the car repaired instead of at the bench. Friday the 13th and a cat combined in a bizarre way!

Today had no such incidents and some progress can be reported. I started in on the weathering with the application of a dot filter using MM enamel Flat White, Raw Sienna, and Panzer Dunkelgelb. Since this finish has large zimmed surfaces, the dot filter approach has to be done a bit differently. Instead of downward strokes with a square tip brush, I applied the strokes in the direction of the zim pattern.

Image

This takes more time and patience to get the desired result, so lots of time wearing the breather mask and working with clean thinner is required. The process blends the previous paint work together and also creates some shadows/depth to the zim and dirt/grime accumulations here and there in the pattern.

Image

This process was repeated working in small sections at a time across the entire vehicle except for the lower hull. That area doesn't need dot filters since it will be weathered with pigments in a future step.

Image

Image

Next up will be a pin wash to bring out some of the details before sealing it up and getting ready for the pigment process.
Bill Plunk
Posts: 1245
Joined: Wed Sep 28, 2022 10:18 pm

WIP 07-22-2012

Post by Bill Plunk »

My goal of getting the Brummbar complete this weekend wasn't quite realized as I often underestimate just how much time some steps will take when this close to the finish line...but better to get it done right than rush things too quickly!

Picking up from the last update, the weathering continued with the application of a pin wash using thinned enamel MM Burnt Umber and a pointed detail brush.

Image

Because of the flat finish surface that the dot filters created, the pin wash has a tendency to "bloom", so that meant coming back with the same detail brush and some clean thinner to tighten things up.

Image

With that step done, the entire vehicle received a sealing coat of MM Lusterless Flat in the spray can. I let that set for about an hour in the spray booth with the vent fans running to dry thoroughly before moving on to the pigment weathering.

Image

The pigment weathering for the lower hull began with a wet application of Mig Dark Mud pigments. I use regular tap water with a drop of liquid Dawn dish washing soap added to break the surface tension and apply the mix with a medium round brush.

Image

After the met mix has air dried, I use a stiff bristled brush (while wearing a dust mask to avoid inhaling the particles) to remove any loose/excess pigment. More pigment is removed and adjusted using wet q-tips until I get the look I want.

Image

Image

This process was applied to the lower hull and running gear on both sides as well as the hull front and rear. Next up will be giving the tracks their treatment and getting them ready for installation.
Bill Plunk
Posts: 1245
Joined: Wed Sep 28, 2022 10:18 pm

WIP 07-28-2012

Post by Bill Plunk »

Today was one of my more-productive sessions in a while. I started in on the pigment weathering for the tracks and this is where using a set of workable tracks really pays off in my view. I used the same water-and-dish soap approach here but used Mig Dry Mud pigments. It's a lighter pigment that works well with the dark color of the tracks and I applied it only to the bottom surfaces of the links. The intent here is to get it into the faces of the tracks but not as heavy an application as when I was working on the lower hull.

Image

This is allowed to air dry, the result is much lighter than the wet mix would lead you to think, and I used a round stiff bristled brush to remove most of the pigment.

Image

The reason I don't apply the wet mix to the top side of the track is that it's not necessary. The process of dealing with the bottom side translates into a light coating of fine pigment ending up on the top side due to the action of the stiff bristled removal from the bottom. Sounds a bit counter-intuitive but it is the result. Some adjustments with the same round brush on the top side and this is how the track run ends up.

Image

I installed the tracks on both sides and glued the sprockets into position. Once the sprockets had set up, I used some dry Mig Dry Mud pigment to lightly dust the wheels and suspension as well as the hull side to create an additional layer effect and tie them in with the tracks.

Image

Front hull received some dusting as well as did the spare track runs. I also applied some black artist pastels inside the muzzle of the 15cm gun to improve its look.

Image

The rear hull and spare wheels were dusted along with the exhaust. Then I added the radio antennas using 2m brass rods from RB Models. I cut the rod down for the star antenna to the proper length and used CA gel and the kit-supplied "star" portion to assemble.

Image

The fun part with the antennas was getting the tilt and alignment right on the different antennas. The impulse is to have them both straight and upright but that's not how they were due to the different bases and points of installation.

Image

There are just a couple small things left to clean up like adding a little bit of bare metal wear to the track faces on the sprockets and idlers since the pigments largely removed what I'd put in place earlier. Tomorrow will see this one in the photo booth for the walk-around completion pics!
Bill Plunk
Posts: 1245
Joined: Wed Sep 28, 2022 10:18 pm

WIP 07-29-2012

Post by Bill Plunk »

As promised, here are the walk-arounds of the finished build.

Image

Image

Image

Image

Image

Image
Bill Plunk
Posts: 1245
Joined: Wed Sep 28, 2022 10:18 pm

Publication May 2013

Post by Bill Plunk »

This build has been published in the FineScale Modeler May 2013 issue.

Image
Post Reply