Tamiya Marder III Sdkfz 139 7.62cm Pak36(r) (2009)

Bill Plunk
Posts: 1245
Joined: Wed Sep 28, 2022 10:18 pm

WIP 03-06-2009

Post by Bill Plunk »

Throughout this week I'd been working a little bit here and there on the different details. The first area that got attention was the fighting compartment. Since the deck is essentially where the gun crew would sit, stand, and operate the gun, it needed some additional wear and tear to reflect that. All of the Marder IIIs started out life in Panzer Gray so even though I've modeled this one as a later-war veteran in 3-tone, it stands to reason that scrapes and scuffs would reveal Panzer Gray underneath. So, using Testors Model Master enamel Panzer Schwarzgrau, a paper towel, and an old round 0 sable brush, I proceeded to add the wear.

Image

As you can see above, the brush is not in pristine condition and that's just fine for this use. The brush is dipped into the paint and then the paint blotted off just like you would for dry-brushing but instead of dry-brushing, I used a stabbing/stippling motion to randomly add the desired level of scuffing.

Image

Some areas come out heavier than others using this approach and to blend things back in a bit and not make it so harsh, I repeated the stippling but with the 50-50 Light Gray/Dunkelgelb base coat mix.

Image

The end result provides a foundation for further weathering which will come later in the form of pin washes and pigments. I tried to use some logic and deliberately added more wear to the loader's side vs. the gunner since it would tend to get more foot-traffic. The spent shell basket also got some wear added and a couple of spare shells will reside there before it's all said and done.

Image

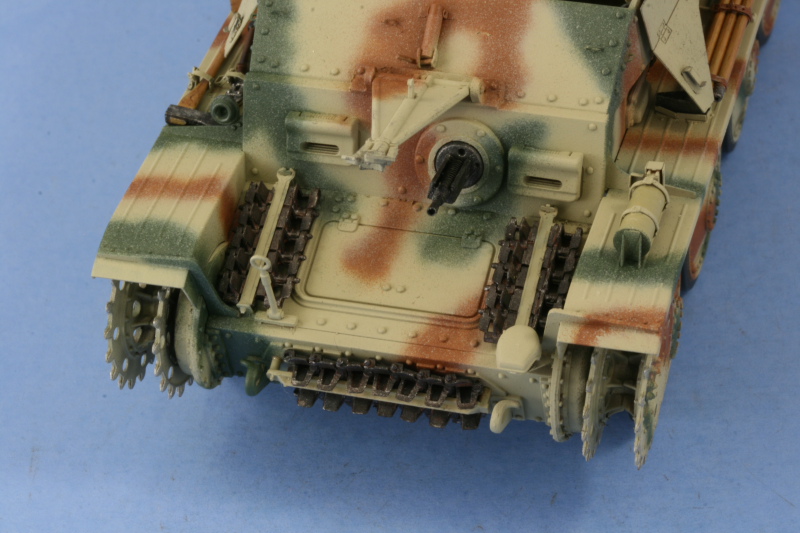
Continuing on with the details, I turned next to the gun shield equipment. The gas masks were pained with a mix of Panzer Schwarzgrau and Russian Armor Green more or less in a 50-50 mix and the straps detailed with Leather. The periscopes were painted with Italian Dark Brown for their Bakelite surfaces and the lenses painted with Silver followed by a treatment of Tamiya Clear Smoke. The various surfaces received the same wear-and-tear treatment as the fighting compartment.

Image

The gun itself also received some detail attention. Aside from the wear-and-tear, the breech block and shell loading area were painted with Silver and the recoil tray tops dry-brushed with Steel for the bare-metal look. The optical and open sights were painted with Non-buffing Metalizer Gunmetal and lightly dry-brushed with Steel. The wood handles on the elevation and traverse wheels were painted with my own special "wood" color and then dusted with burnt umber artist pastels.

Image

The gun shield and gun were then joined to make things permanent.

Image

Turning to the rear hull, the muffler/exhaust was base coated with Non-Buffing Metalizer Gunmetal and then given 2 successive washes of highly thinned Rust. Once that had dried, I dry brushed Burnt Umber to tone down some of the Rust effects a bit. The rear Notek lenses were painted with Tamiya Clear Green and the straps on the right side tray detailed with Leather and dry brushed with lightened Dunkelgelb and Gunmetal to give them some highlights. The details on the external fire extinguisher were also added and the FE repainted with a darker shade of Dunkelgelb/Light Gray to provide a little variety.

Image

Moving around the vehicle, the left side received a suitably weathered folded over crew seat. The antenna base mount was painted with Gunmetal to simulate its rubber look and the sledge hammer and unique cleaning rods for the Pak 36(r) installed. I added the Eduard PE leather straps and painted them with Leather and detailed them the same way as the other straps. The lower hull was pre-weathered as well and the springs base coated with Non-Buffing Metalizer Gunmental, dry brushed with Steel, and then given a light wash of Rust. The hull MG was also painted at this time and the gun sight added, it too was base coated with the metalizer Gunmetal and then lightly dry brushed with Steel.

Image

The right hand side had the wire cutters repainted since it was suffering from some severe over spray from the camo application. The crew seat was also added and the jack block and the axe installed in their proper positions.

Image

Next up will be dealing with the hull front in terms of the spare track runs and holders and then installing the running gear and working on the main tracks.
Bill Plunk
Posts: 1245
Joined: Wed Sep 28, 2022 10:18 pm

WIP 03-08-2009

Post by Bill Plunk »

Even with the change in Daylight Saving Time this weekend robbing me of an hour of sleep...I was still able to get quite a bit done yesterday and today. There are a lot of pics in this update so my apologies in advance to those on dial-up.

First order of business was to install the running gear and get the tracks sized to the right length. I dry brushed Steel on the contact surfaces of both the sprockets and the idlers and installed permanently the road wheels and return rollers. The road wheels were positioned to more or less correspond with the hull camo pattern and the sprocket and idler are able to rotate freely to facilitate the installation of the tracks. The test fits revealed that I needed to add 3 more links to get to 93 on both sides to get the desired look and sag. I used small strips of blue painter's tape to hold the runs together for the test fit.

Image

Image

Now that I knew exactly how many links I needed on the hull sides, I checked to see if there were enough links left over in the MK set to handle the spare track runs on the hull front and glacis. The Tamiya supplied parts lack detail on the guide horns and has them molded plain/solid instead of with the accurate indentations, so that was the main driver in wanting to replace them. Enough links were available to supply the 17 needed (5 each for the two runs on the glacis and 7 for the hull front), so these were constructed. They were base coated with Non-buffing Metalizer Gunmetal and then given a wash of Rust and dry brushed with Burnt Umber. Once dry, they were carefully glued into position and the Eduard retaining bars used for the glacis runs and the Tamiya part for the hull nose to secure them into position.

Image

With that out of the way, it was time to seal the model and prepare for the decal application. To protect the underlying enamel paint work and also provide a smooth surface for the decals, I use Future acrylic floor wax applied by airbrush and Windex ammonia-based cleaner to clean out the airbrush after I'm done. I've had both of these bottles for over 3 years now, so a little bit goes a long way!

Image

The Future sprays perfect right out of the bottle and I use a wide-bore tip on my airbrush to create a wide mist pattern. I will typically hold the airbrush about 6"-12" away from the model surface and spray in quick sweeping passes. The goal is not to apply a thick, heavy/wet coat but rather several very light mist coats to achieve the barrier but not obscure detail in the process.

Image

The Future air dries fairly quickly and I typically will let the model sit for 1 hour before proceeding to the next steps of adding decals. The model will have a slight sheen to it but shouldn't be mirror-like or you've overdone it.

Image

Now comes the decals, I use ordinary tap water in a glass bowl. The decals are dipped into the water for 10-20 seconds and then set on a piece of paper towel to drain away excess water and allow them to soften on the backing paper.

Image

The model surface is then wet with water using a nylon bristle brush (about the only thing those cheap brushes are good for!) and, using the same brush, the decal is slid off the backing paper and placed on the model surface.

Image

Excess water is wicked away with the torn edge of a paper towel. The decal is carefully pressed down using the paper towel and allowed to dry for about 30 seconds or so before the next step.

Image

The next step is the application of Walther's Solvaset using a different clean brush from the one used with the water. I prefer the nylon brush vs. the one in the Walther's bottle because it allows more control and uses less liquid since it's a smaller brush. The decal is thoroughly coated and excess carefully wicked away again with the paper towel.

Image

Initially the Solvaset will cause the decal to wrinkle up slightly, don't panic! This is normal and is part of the softening process that gets the decal to conform to the underlying surface. It takes about 1 hour for the Solvaset to dry thoroughly and during that process I will check the edges and reapply Solvaset where needed. Once dry, a 2nd coat of Future is sprayed through the air brush and allowed to dry. The result is a seamless decal that's perfectly blended into the underlying Future coat and sealed with the 2nd coat to protect it from the weathering process.

Image

The markings for this particular Marder are quite simple...just the balkenkreuze on the hull sides and the rear on the smoke candle rack.

Image

Image

While the decals were drying, I also put in some effort on the tracks. These were base coated by airbrush first with Flat Black to prime and protect the tracks from the next coat of Non-Buffing Metalizer Gunmetal. The metalizer is lacquer-based and a little "hot" as a result, so the Flat Black is sprayed to protect the pins and avoid damage. Once those had dried, I dry brushed Steel to enhance the metallic look and then gave the runs front and back a wash of Burnt Umber to blend in the Steel and finalize the look before weathering.

Image

Next weekend the weathering process will begin, almost to the finish line!
Bill Plunk
Posts: 1245
Joined: Wed Sep 28, 2022 10:18 pm

WIP 03-14-2009

Post by Bill Plunk »

Today was a long day but produced a lot of progress. I started in on the weathering and the first step was the application of an overall wash using a mix of 90/10 Thinner/Raw Umber and a square #2 sable brush. The wash will serve as the foundation for all the follow-on steps and while it darkens the surface considerably, this is now how the final tones will look.

Image

I used to incorporate dots of Raw Umber into the dot filter process but have discovered that it's just easier to apply it as a wash/filter first and then use the dots to modify it. For this particular color scheme I choose to incorporate dots of Model Master enamel Flat White, Deep Yellow, Panzer Olivegreen, and regular Testors enamel Flat Red. These were applied with various small spotter brushes, targeting the different colors to the areas that I wanted to add that particular shift to. I recently expanded my brush collection to include several sizes of shader/blender brushes and because of the tight spaces, I used a square #2 Flat Shader dampened with clean thinner and blotted on a paper towel to blend the dots with downward strokes.

Image

Once the color specific tones had been added, I applied a second dot filter using the same methods but this time employing Military Brown as an earth tone. By varying the amount of thinner and the length of the strokes, some dust/dirt streaks were introduced to compliment the previous fading effects.

Image

Image

The same process was applied to the gun shield which I'd kept separate to make it easier to handle the hull and the gun to avoid damage.

Image

The next step was the application of a pin wash of 90/10 Thinner/Burnt Umber. For this I used a pointed 3/10 sable brush and applied the pin was to the numerous rivet heads and raised detail. I should note that since all of these steps involve working with thinner, I wear a paint breather mask during the whole process, have a fan going and a window open, and take frequent breaks to avoid overexposure and to also give my eyes and hands a break!

Image

Even with the pointed detail brush, some "blooming" and tide marks appear, this is normal but something that I personally don't like to leave in place unless I'm going for a staining effect...so the next step involved tightening up the pin wash. To do this, I use the same 3/10 brush along with clean thinner and a paper towel and carefully remove the excess wash until I've got the look I want.

Image

This clean up process was applied to essentially the entire vehicle since the pin was was added to the wheels, all the detail on the lower hull, the interior and exterior of the gun, etc. The gun is still only dry-fit as I'm not finished with the fighting compartment just yet.

Image

Speaking of the fighting compartment, this is where it stands after receiving the same overall Raw Umber wash, Burnt Umber pin wash, and clean thinner adjustments as the rest of the vehicle.

Image

I'm going to let this sit overnight and look at it with a fresh pair of eyes tomorrow and make any adjustments. Then it will be on to the pigment weathering for the tracks and lower hull and fighting compartment...almost there!
Bill Plunk
Posts: 1245
Joined: Wed Sep 28, 2022 10:18 pm

Completion 03-15-2009

Post by Bill Plunk »

Picking up from yesterday's efforts, I made some additional minor adjustments here and there and found a couple of spots I'd missed, something not uncommon when there's so much raised detail on a kit like this. Once that was out of the way, I sealed everything with Testors Lusterless Flat lacquer and let it dry for an hour or so before moving on.

Image

Next step was the addition of some pigment weathering to simulate dirt/dust accumulation from the crew, this was added in the form of some Mig Europe Dust. This was added first as a dry powder and then worked into position with different sized brushes. I also used some dry q-tips to pick up some of the excess powder and then fixed the pigment with water mixed with a drop of dish washing soap to break its tension.

Image

The tracks received a similar treatment but instead of a dry powder I applied the pigments as a wet mixture. Once air dry, I used several stiff bristled brushes to remove the excess and work the pigment into the track faces.

Image

The road wheels and suspension received their pigment treatment and then the tracks and idlers were installed. The loose ends of the tracks were joined and the sag adjusted. Once everything was in the right position, I used some liquid glue to secure the tracks to the return rollers and the road wheels so it wouldn't shift around during further handling.

Image

The last order of business was the installation of the gun. I used the rear travel lock to help hold the gun in an elevated position and then carefully applied some liquid glue into the mount pins so it would remain fixed in position due to the weight of the aluminum barrel. The missing antenna rod was added courtesy of an Armorscale brass 2m rod glued in place with some CA gel.

Image

The antenna was painted with Non-Buffing Metalizer Gunmetal and then it was time for the walk-around shots.

Image

Image

Image

Image

Image

Image

Hope you enjoyed the ride along with me! There's a couple of minor little things I will likely adjust after looking at these photos but this one's 99.44% complete all the same.
Bill Plunk
Posts: 1245
Joined: Wed Sep 28, 2022 10:18 pm

Publication June/July 2009

Post by Bill Plunk »

This build has been featured in SAM Publications Scale Military Modeler International as a two-part feature in the June (pp. 66-68 ) and July (pp.62-64) 2009 Issues.

Image

Image

Image

Image
Post Reply