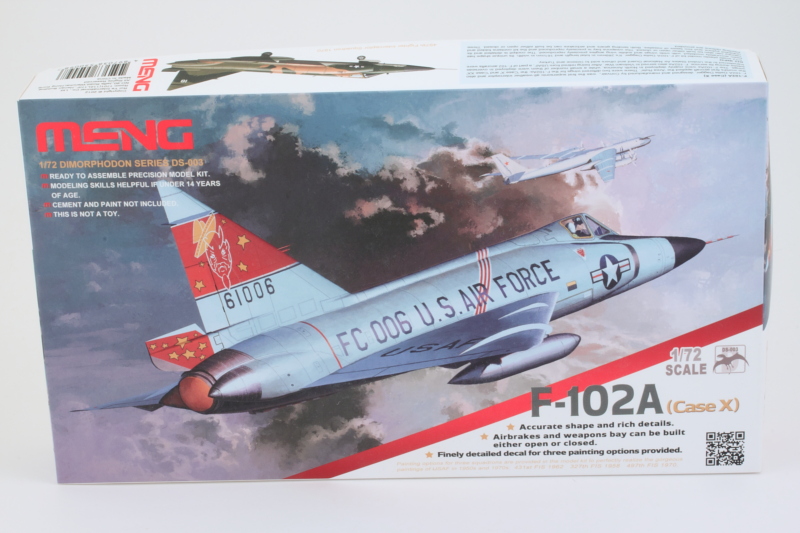
Meng 1/72 F-102A (Case X) (2015)
-
Bill Plunk
- Posts: 1245
- Joined: Wed Sep 28, 2022 10:18 pm
Meng 1/72 F-102A (Case X) (2015)
Build log for Meng's 1/72 kit #DS-003 F-102A Case X Delta Dagger.
-
Bill Plunk
- Posts: 1245
- Joined: Wed Sep 28, 2022 10:18 pm
WIP 12-04-2015
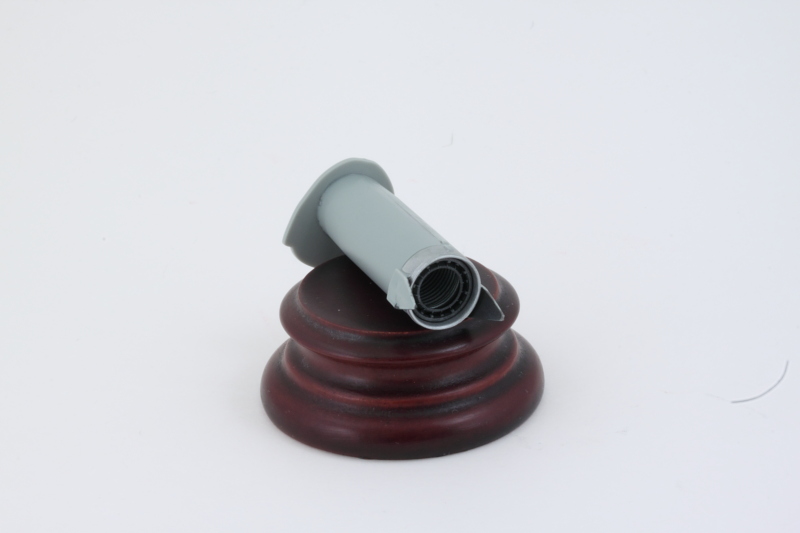
Kicked things off with this little project in the usual place starting in Step 1 with the cockpit. The pilot's ejector seat was assembled and the tub, seat, and panel were airbrushed with Model Master enamel Aircraft Gray per the instructions directions. The instrument panel received the decal for the gauge faces and the radar scope was detailed with Tamiya Clear Yellow. The seat was detailed by hand as were the cockpit side switch and throttle panels. Then the whole cockpit was assembled.
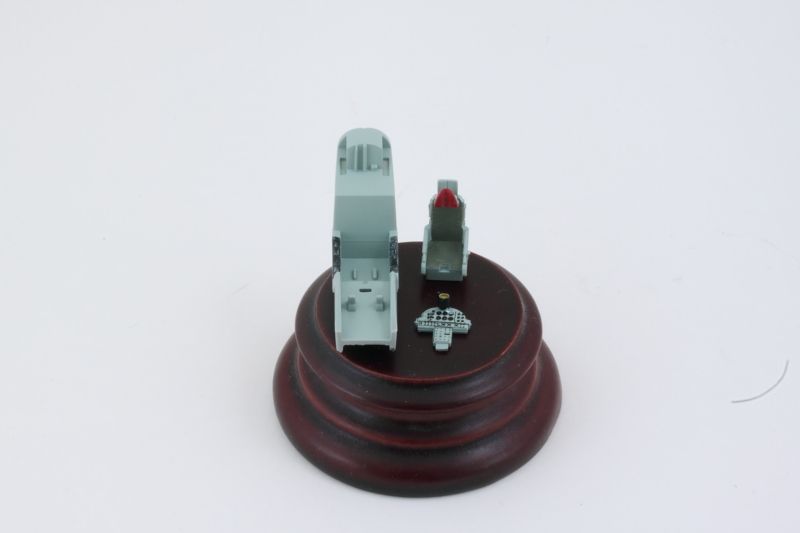
The intent is to model this one with the canopy closed so there's not a whole lot of concern over missing details like the pilot's harness. The canopy on the F-102 won't leave very much visible but just in case the canopy does need to be left open, I did enough details to leave that option possible when we get there.
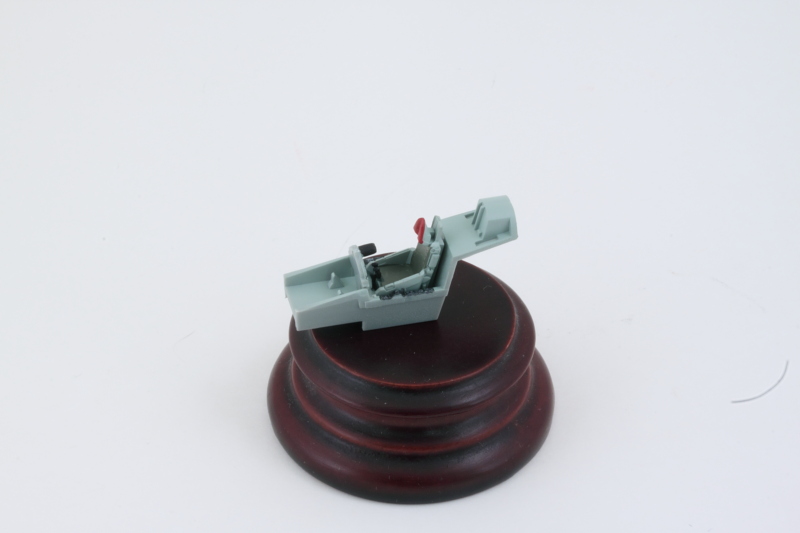
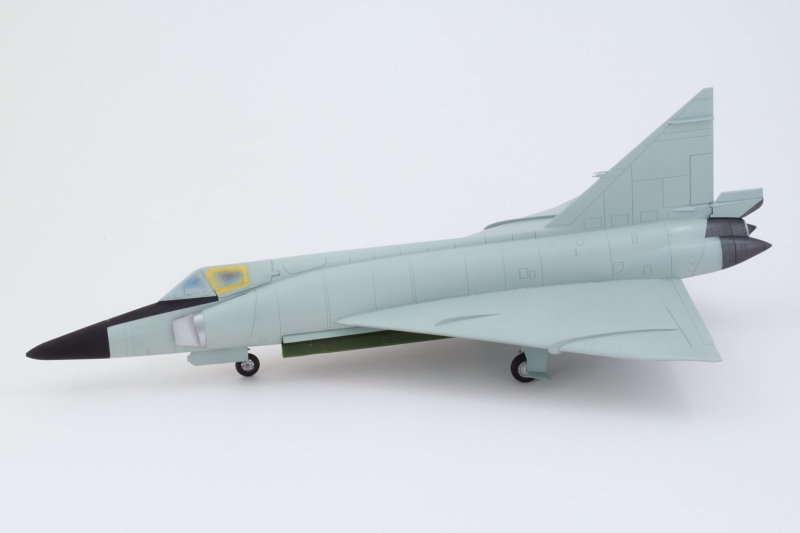
While I had the airbrush out, I also applied the Aircraft Gray to the visible areas around the cockpit section. All of the unnecessary antennas were removed as called out in Step 4 since I'm not doing the SEA scheme version that is the 'C' choice on the finishing guide.

Next up will be working on the engine components in Step 3, I'll come back to the landing gear stuff in Step 2 later on.
The intent is to model this one with the canopy closed so there's not a whole lot of concern over missing details like the pilot's harness. The canopy on the F-102 won't leave very much visible but just in case the canopy does need to be left open, I did enough details to leave that option possible when we get there.
While I had the airbrush out, I also applied the Aircraft Gray to the visible areas around the cockpit section. All of the unnecessary antennas were removed as called out in Step 4 since I'm not doing the SEA scheme version that is the 'C' choice on the finishing guide.
Next up will be working on the engine components in Step 3, I'll come back to the landing gear stuff in Step 2 later on.
-
Bill Plunk
- Posts: 1245
- Joined: Wed Sep 28, 2022 10:18 pm
WIP 12-05-2015
Working on an aircraft often requires bouncing around a little bit at the beginning and this one's no exception. I got the parts for the tailpipe all cleaned up as called for in Step 3. MM non-buffing Metalizer Steel did the job for the insides of the pipe and the bulkhead along with the end section. MM non-buffing Metalizer Gunmetal was used for the afterburner can.
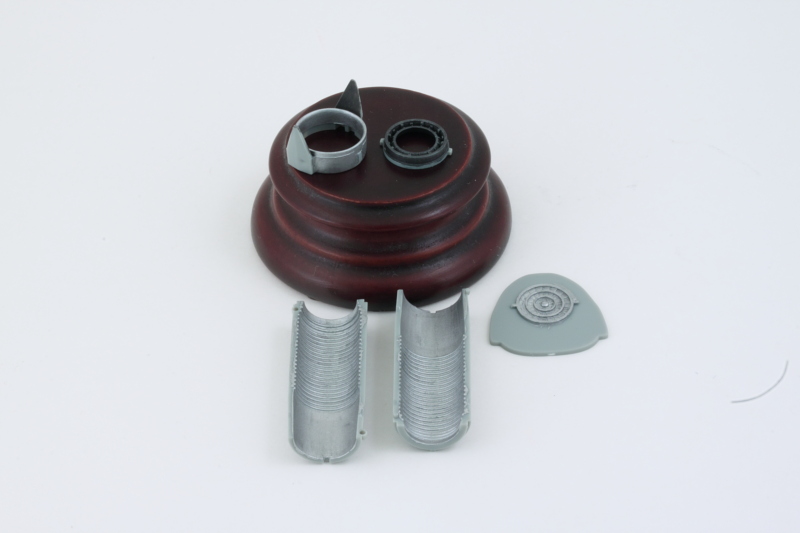
Then the whole thing was assembled. Not a whole lot visible of the tail pipe when fully built unless you stick a penlight in there.
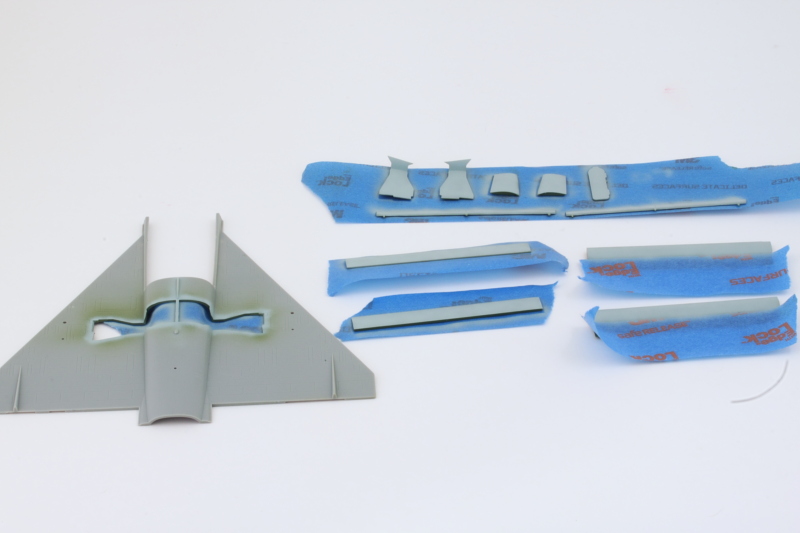
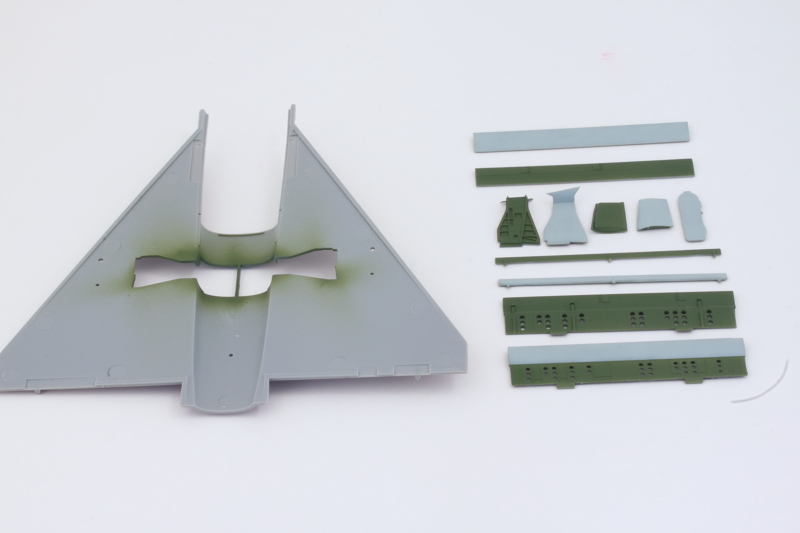
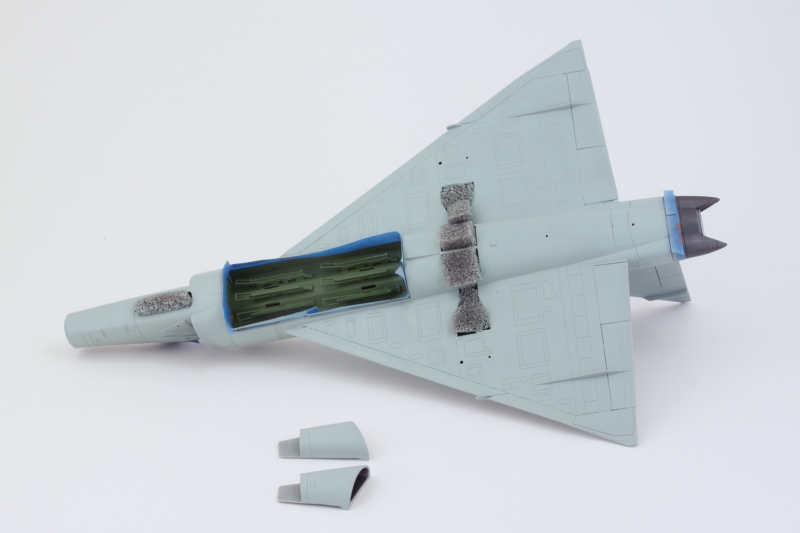
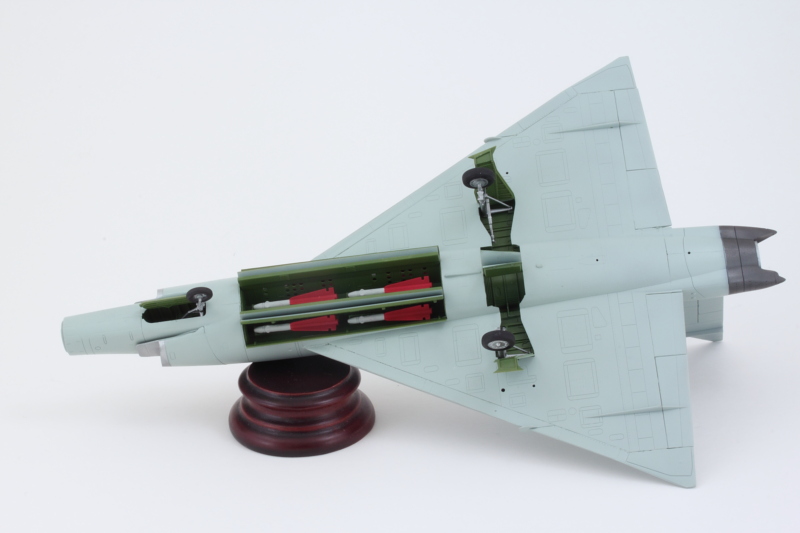
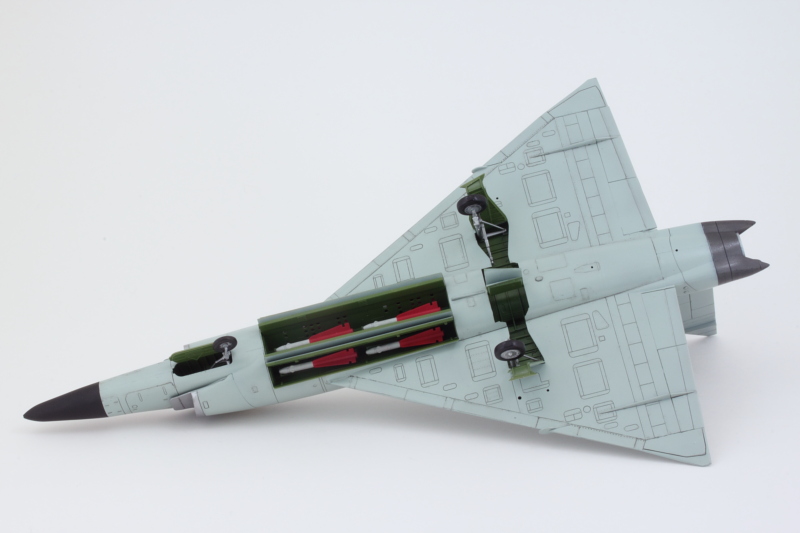
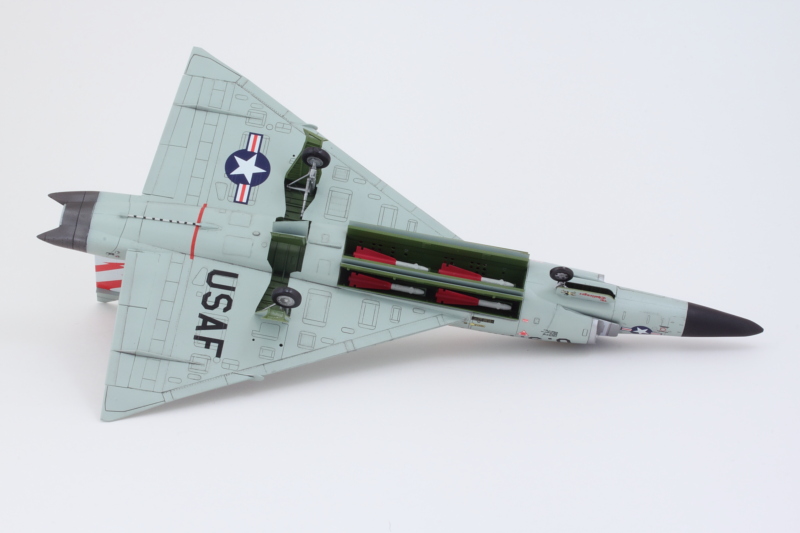
With that out of the way, I shifted my focus to the components that will need some Interior Green treatment. The biggest chunk is the internal weapons bay for the AIM-4 Falcon missiles, so I installed the 6 launch rails for them under the Weapons Option A variation in Step 10 in the instructions.
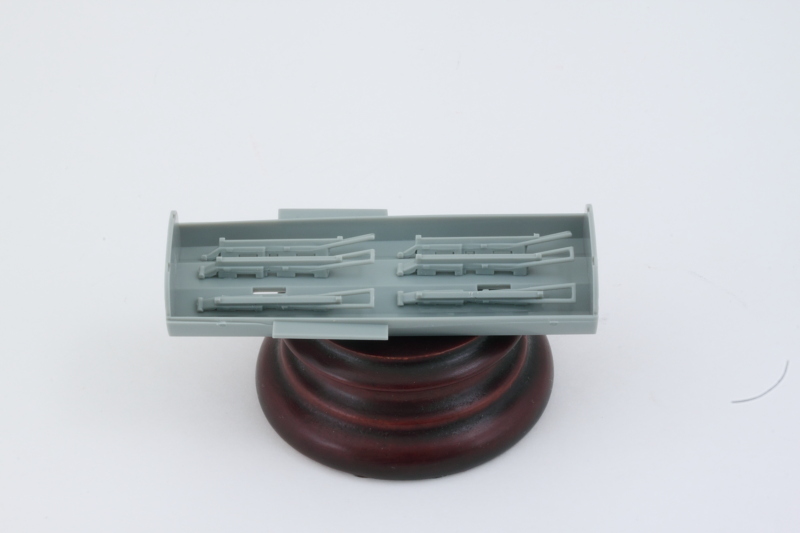
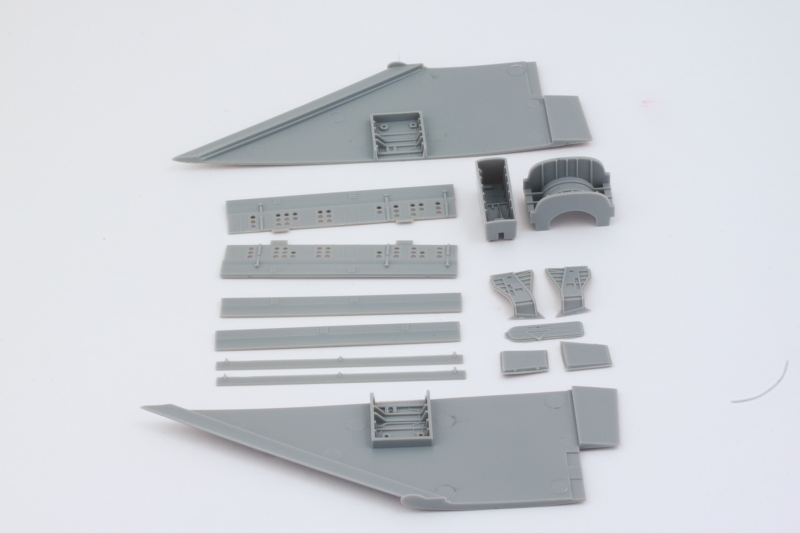
Next batch of stuff involved all the gear bays, the gear doors, and the complicated set of doors that make up the open configuration for the weapons bay.
Model Master enamel Interior Green was airbrushed into all the nooks and crannies to get things rolling.
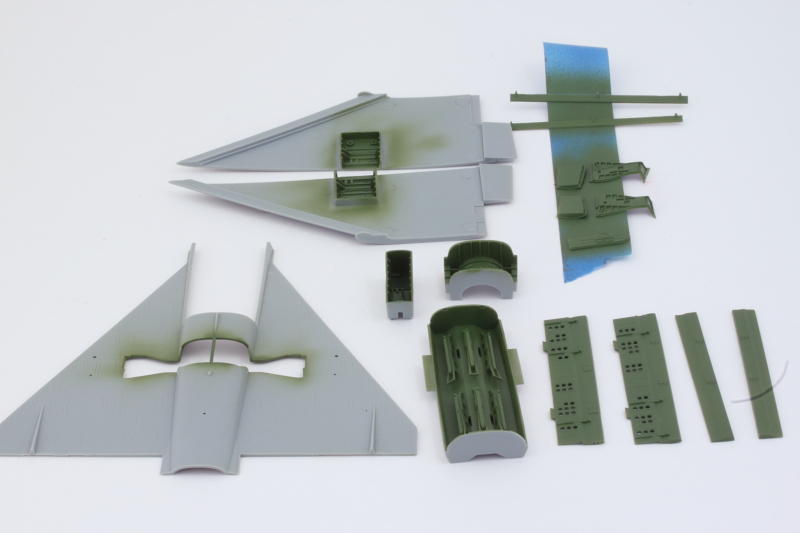
All of the doors needed to have Aircraft Gray on their exteriors, so some quick masking was in order. I airbrushed the gray at an angle to preserve the Interior Green on all of the exposed edges. For the interior pair of doors on the weapons bay, the doors are integrated into the bay dividers. This called for specific masking on the interior portions but nothing too fancy.
At the end of things, a nice set of two tone doors with the Interior Green and Aircraft Gray confined to their respective arenas.
That will clear the way for getting the fuselage halves together and the wings assembled next.
Then the whole thing was assembled. Not a whole lot visible of the tail pipe when fully built unless you stick a penlight in there.
With that out of the way, I shifted my focus to the components that will need some Interior Green treatment. The biggest chunk is the internal weapons bay for the AIM-4 Falcon missiles, so I installed the 6 launch rails for them under the Weapons Option A variation in Step 10 in the instructions.
Next batch of stuff involved all the gear bays, the gear doors, and the complicated set of doors that make up the open configuration for the weapons bay.
Model Master enamel Interior Green was airbrushed into all the nooks and crannies to get things rolling.
All of the doors needed to have Aircraft Gray on their exteriors, so some quick masking was in order. I airbrushed the gray at an angle to preserve the Interior Green on all of the exposed edges. For the interior pair of doors on the weapons bay, the doors are integrated into the bay dividers. This called for specific masking on the interior portions but nothing too fancy.
At the end of things, a nice set of two tone doors with the Interior Green and Aircraft Gray confined to their respective arenas.
That will clear the way for getting the fuselage halves together and the wings assembled next.
-
Bill Plunk
- Posts: 1245
- Joined: Wed Sep 28, 2022 10:18 pm
WIP 12-06-2015
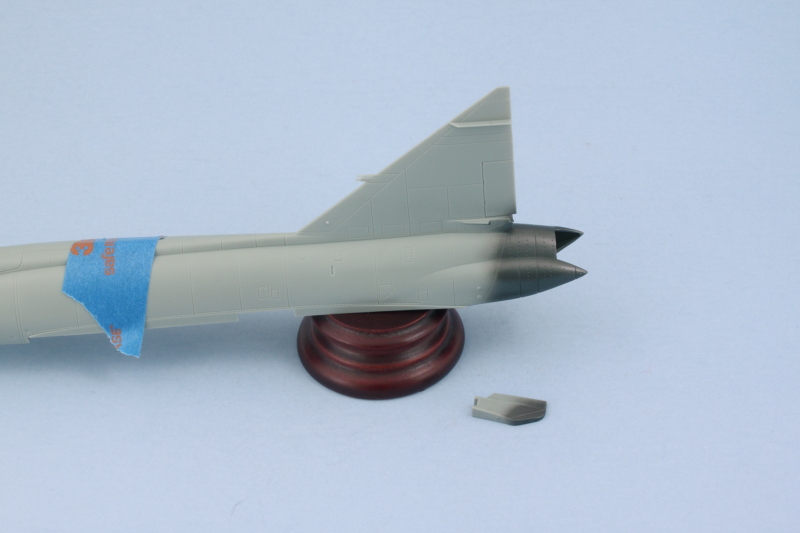
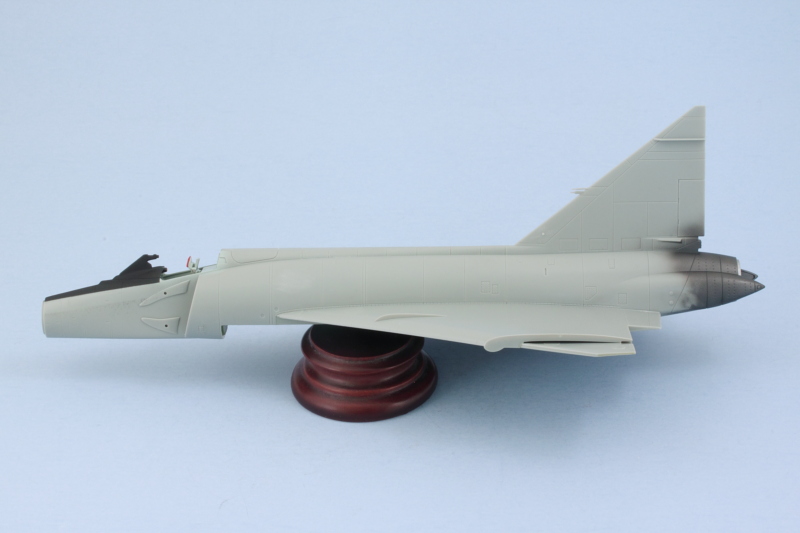
I tried out something new today on the F-102, the MM metalizer Gunmetal that is buffable. Airbrushed some on the tail cone area as well as the bottom part of the speed brake, waited the requisite 10-15 minutes, then buffed it lightly with a soft cotton cloth. It produces an interesting shine/result that's different from its non-buffing cousin of course.
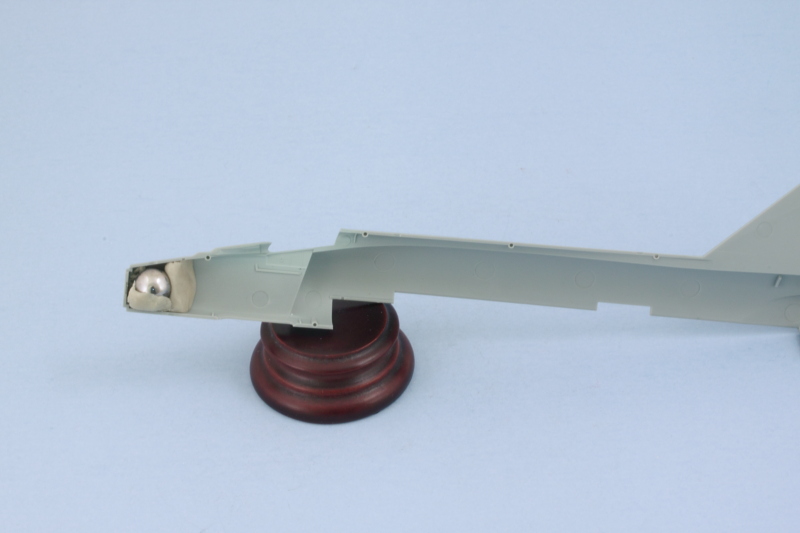
With that out of the way, I decided to add some weight to the nose area to avoid any tail-sitting issues with the big delta wing configuration. I happened to have a ball bearing laying around that was the perfect size and diameter to fit nicely into the area forward of the landing gear bay. I glued it in place first with some CA and then added some Aves Expoy-sculpt putty to ensure it didn't shift around in the future. The putty has the added advantage of upping the weight in addition to securing the bearing permanently, a two-for-one!
With that taken care of, it was time to join the fuselage halves together. I used liquid glue for this as the join is pretty tight to begin with due to some nice engineering for the kit parts. Just a couple of smooth jaw copper clamps towards the tail end were needed and the rubber band at the nose was more of an extra precaution than an absolute requirement.
Once the glue has thoroughly set, I'll take care of the slight join seam and move on to adding the wings.
-
Bill Plunk
- Posts: 1245
- Joined: Wed Sep 28, 2022 10:18 pm
WIP 12-07-2015
A lot done at the bench today, the fuselage join seam was sanded down and then the nose masked for the Flat Black anti-glare strip. I had hand painted the portion that sits inside the canopy first so that I wouldn't run the risk of over-spray into the cockpit. Then MM enamel Flat Black was airbrushed and the nose cone taken care of since it will get attached later.
I also airbrushed some Flat Black inside the front air intakes since the area behind them is mostly empty/blank.
Step 5 in the instructions has you install the weapons bay into the lower wing half and then attaches the upper wings, but I decided to add the upper wings later to help ensure they mated up properly with the fuselage. The wing section fits pretty snugly into place at the rear but relies heavily on the weapons bay for the front attachment, making things a little trickier in terms of getting it all lined up and sitting correctly.

For the top halves of the wings, I opted for a two-stage approach. First I glued them in place with the bottom wing element and let that set up. Some small clamps helped out a bit with that.
For the top join into the fuselage, I used liquid glue and finger pressure to coax the wings into contact to get a seamless join. I did one wing side at a time and deliberately left off the wing tips to give me plenty of leverage to work with until the glue set. There wasn't any way to use rubber bands or similar as different sections of the wing top need to be either slightly pushed down or inward (or both in some spots) to get the join together. Good old patience and a solid grip provided the solution.
Once the wings were set, the tips and ailerons came next. Same drill as the wing tops, I did one side at a time and used liquid glue and small clamps where necessary to get everything to line up.
I also discovered throughout this process that the buffable Metalizer is a lot more fragile and intolerant of much handling versus its non-buffing cousin. A quick trip to the spray booth patched up a couple of spots where it had rubbed off or gotten nicked/scratched but otherwise it's all back where it should be.
Next up will be getting the intakes together and then doing the major paint work on the body.
I also airbrushed some Flat Black inside the front air intakes since the area behind them is mostly empty/blank.
Step 5 in the instructions has you install the weapons bay into the lower wing half and then attaches the upper wings, but I decided to add the upper wings later to help ensure they mated up properly with the fuselage. The wing section fits pretty snugly into place at the rear but relies heavily on the weapons bay for the front attachment, making things a little trickier in terms of getting it all lined up and sitting correctly.
For the top halves of the wings, I opted for a two-stage approach. First I glued them in place with the bottom wing element and let that set up. Some small clamps helped out a bit with that.
For the top join into the fuselage, I used liquid glue and finger pressure to coax the wings into contact to get a seamless join. I did one wing side at a time and deliberately left off the wing tips to give me plenty of leverage to work with until the glue set. There wasn't any way to use rubber bands or similar as different sections of the wing top need to be either slightly pushed down or inward (or both in some spots) to get the join together. Good old patience and a solid grip provided the solution.
Once the wings were set, the tips and ailerons came next. Same drill as the wing tops, I did one side at a time and used liquid glue and small clamps where necessary to get everything to line up.
I also discovered throughout this process that the buffable Metalizer is a lot more fragile and intolerant of much handling versus its non-buffing cousin. A quick trip to the spray booth patched up a couple of spots where it had rubbed off or gotten nicked/scratched but otherwise it's all back where it should be.
Next up will be getting the intakes together and then doing the major paint work on the body.
-
Bill Plunk
- Posts: 1245
- Joined: Wed Sep 28, 2022 10:18 pm
WIP 12-10-2015
Today's efforts focused on getting the major paint work out of the way. I used some small amounts of flexible foam to stuff up the landing gear bays and masked off the tail pipe and weapons bay areas with blue painter's tape. Airbrush got quite the workout in applying the Aircraft Gray where needed to get the base coat on. The front air intakes were painted separately so they would match but have yet to be installed since it's much easier to paint them off the airframe first.
I deliberately allowed some overspray of the Aircraft Gray onto the Flat Black areas for the anti-glare panel so that it would be easier to firm up the lines instead of trying to mask the Black perfectly. I knew I was going to need to spray Flat Black for the landing gear wheels anyhow so I took care of two birds with one stone. The wheels were airbrushed with ordinary Testors enamel Silver in the little square bottle for their hubs as were the bare metal portions of the air intakes.
That will all get a chance to dry thoroughly overnight and then it will be time to add the intakes and start working on getting the weapons bay populated.
-
Bill Plunk
- Posts: 1245
- Joined: Wed Sep 28, 2022 10:18 pm
WIP 12-11-2015
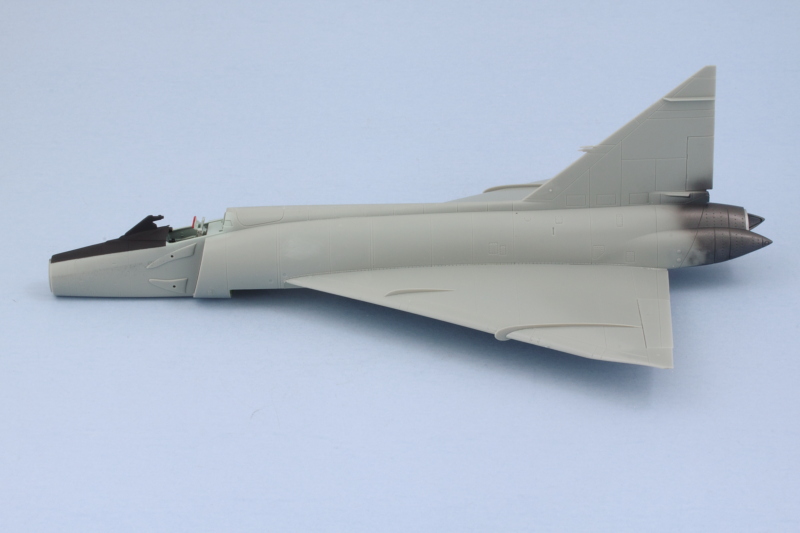
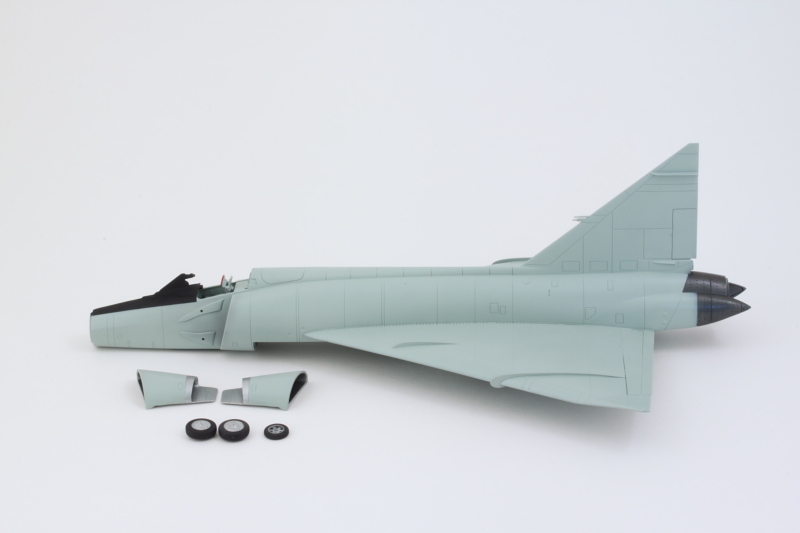
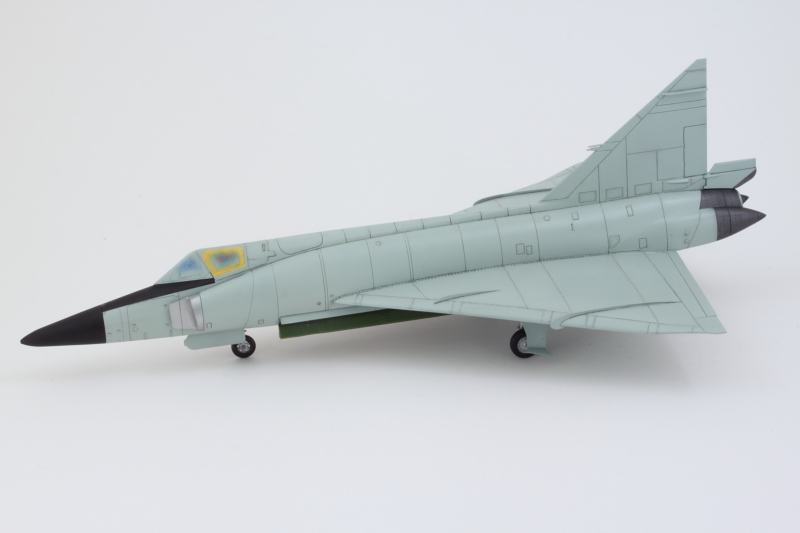
All of today's effort was taken up in the details department. First order of business was getting the air intakes installed. Once they were set, I airbrushed some of the Aircraft Gray over the join as I had deliberately left that area unpainted previously so I wouldn't have to fight it for gluing purposes.
I also spent some time on the canopy parts. The clear parts were given a coat of Future applied with a regular brush on both the inside and outside surfaces and left to dry. Some quality time with the masking tape followed and it then got some Aircraft Gray treatment as well.
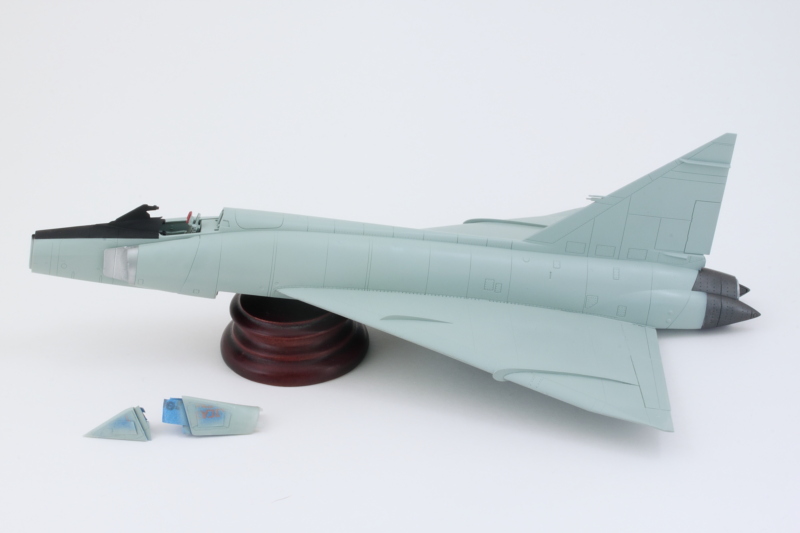
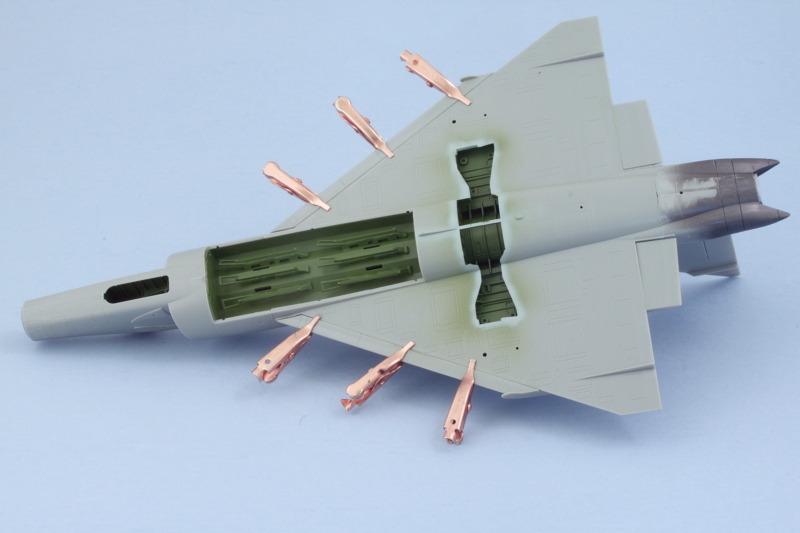
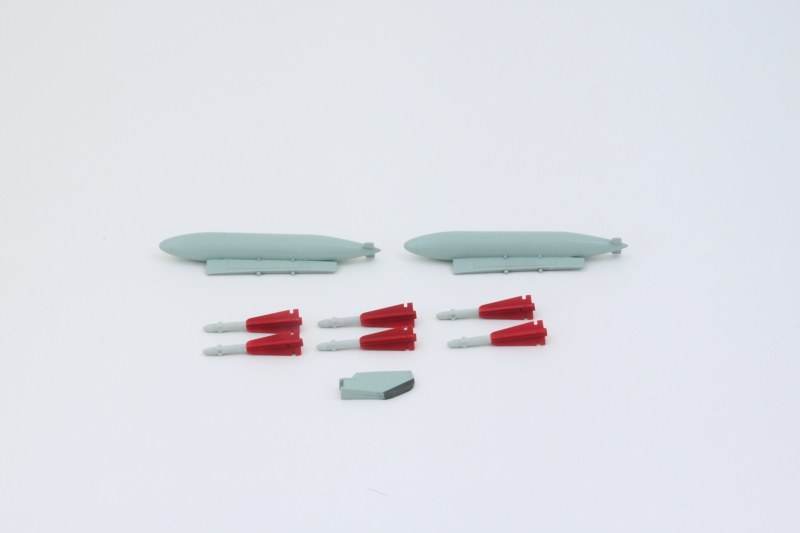
Next up were all the stores. I assembled the fuel tanks and sanded down their join then added the pylons so I could paint them together as a single unit. For the 6 AIM-4D Falcon missiles for the weapons bay, I first airbrushed some MM enamel Light Gray, masked that off, then airbrushed some Insignia Red to complete their two-tone appearance. The speed brake had been feeling neglected for a while so it got its turn as well with the Aircraft Gray to complete the day's efforts.
Next up will be getting this bird up on her legs and then stocking all the goodies on the underside.
I also spent some time on the canopy parts. The clear parts were given a coat of Future applied with a regular brush on both the inside and outside surfaces and left to dry. Some quality time with the masking tape followed and it then got some Aircraft Gray treatment as well.
Next up were all the stores. I assembled the fuel tanks and sanded down their join then added the pylons so I could paint them together as a single unit. For the 6 AIM-4D Falcon missiles for the weapons bay, I first airbrushed some MM enamel Light Gray, masked that off, then airbrushed some Insignia Red to complete their two-tone appearance. The speed brake had been feeling neglected for a while so it got its turn as well with the Aircraft Gray to complete the day's efforts.
Next up will be getting this bird up on her legs and then stocking all the goodies on the underside.
-
Bill Plunk
- Posts: 1245
- Joined: Wed Sep 28, 2022 10:18 pm
WIP 12-12-2015
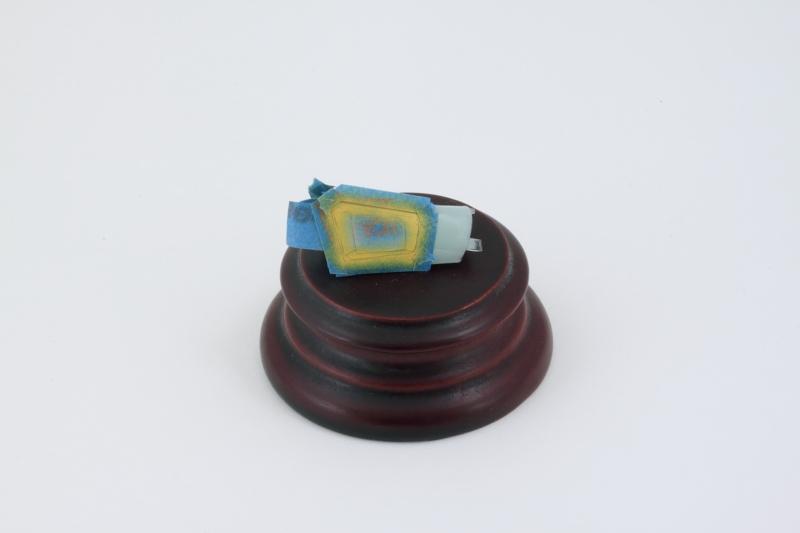
After letting the canopy set overnight, I masked off the small rectangular yellow rescue portions for the sides and airbrushed some MM enamel RLM 04 Gelb that I had handy.
Some slight trimming was needed on the rear tabs of the main canopy to ensure it would fit properly, but everything behaved nicely other than that. Both canopy elements were permanently installed and a couple of touch-ups here and there to complete the process.

Now the real fun began with getting the landing gear installed. For the main struts, I had assembled them previously and had them waiting for paint and install until now. A quick dose of non-buffing Metalizer Steel and they were ready to go. The tricky part is getting the main doors and the two different braces to work together with the strut, but with a little patience it all comes together.

With that out of the way, I added the weapons bay doors and the AIM-4s to populate the undersides. I deliberately am leaving off the wing tanks in order to give myself more room to work with the decals and will add them later after the markings are on.
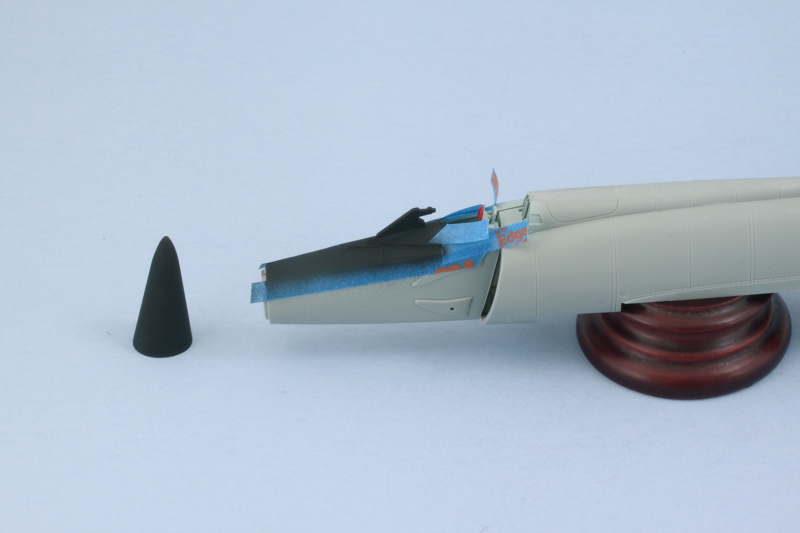
Last but not least, I did a quick test with the landing gear to be sure it wouldn't tail sit and then added the nose cone to round out the day's efforts.
Next up will be starting in on the substantial number of decals that this baby calls for.
Some slight trimming was needed on the rear tabs of the main canopy to ensure it would fit properly, but everything behaved nicely other than that. Both canopy elements were permanently installed and a couple of touch-ups here and there to complete the process.
Now the real fun began with getting the landing gear installed. For the main struts, I had assembled them previously and had them waiting for paint and install until now. A quick dose of non-buffing Metalizer Steel and they were ready to go. The tricky part is getting the main doors and the two different braces to work together with the strut, but with a little patience it all comes together.
With that out of the way, I added the weapons bay doors and the AIM-4s to populate the undersides. I deliberately am leaving off the wing tanks in order to give myself more room to work with the decals and will add them later after the markings are on.
Last but not least, I did a quick test with the landing gear to be sure it wouldn't tail sit and then added the nose cone to round out the day's efforts.
Next up will be starting in on the substantial number of decals that this baby calls for.
-
Bill Plunk
- Posts: 1245
- Joined: Wed Sep 28, 2022 10:18 pm
WIP 12-13-15
After studying the markings and their placement on the aircraft, it occurred to me that quite a few of them pass over and around major panel lines. Since these aircraft were constantly maintained as alert interceptors, they typically stayed fairly clean while in service, so weathering was always going to be kept to a minimum on the finish. That, combined with the markings revelation, led me to apply the pin wash to all the panel lines before adding the markings. After applying an airbrushed coat of Future, I spend the full day's session picking out all the lines and details with a Burnt Umber enamel pin wash treatment.
It's a tedious process of working with the wash and then following up with clean thinner to remove excess and tighten things up in places but produces a nice result in the end. Now it's time for all those decals!
It's a tedious process of working with the wash and then following up with clean thinner to remove excess and tighten things up in places but produces a nice result in the end. Now it's time for all those decals!
-
Bill Plunk
- Posts: 1245
- Joined: Wed Sep 28, 2022 10:18 pm
WIP 12-14-2015
Day of Decal Destiny...no way to escape it when it comes to an aircraft build!
The kit-supplied decals are pretty good quality. The only ones I had some minor issues with were the large tail fin flashes. These were oversized so I had to apply them one side at a time, wait for them to dry, then trim off the excess at the rear of the fin before I could do the other side. I also had cut off the small spade extensions that go over the speed brake so I could line them up and apply them as separate decals since they also had a large amount of clear film around the edges that needed to be trimmed away first. Fortunately, I had saved the tail markings to the very end since I needed the tail fin to stay clean as a hand hold while I applied all of the other markings.
Lots of Solvaset employed to make sure all the markings snugged down tight to the fuselage. There's only one case where I had to apply decals over other decals and that involved the red-white-blue-yellow band, so it was applied as the first decal and given plenty of time to thoroughly dry before I added the US Air Force markings over them. Then it was just a matter of skipping around applying different items as others dried to make the most of the bench time and get them all in place.
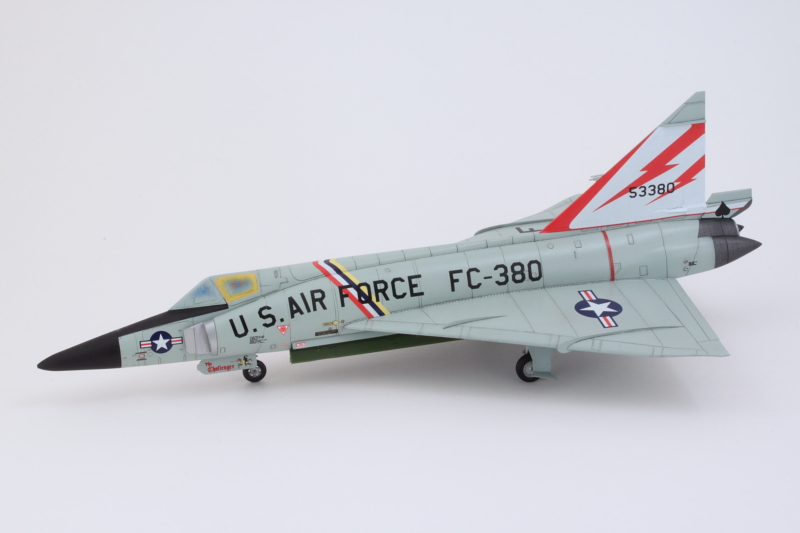
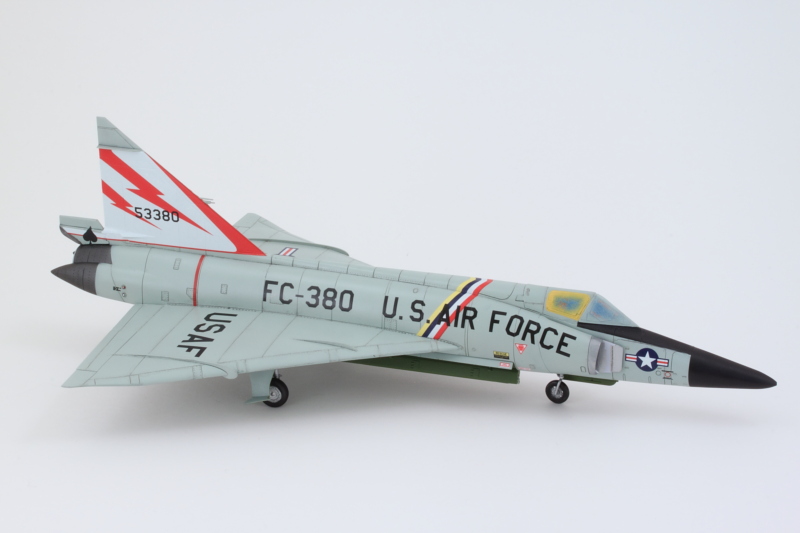
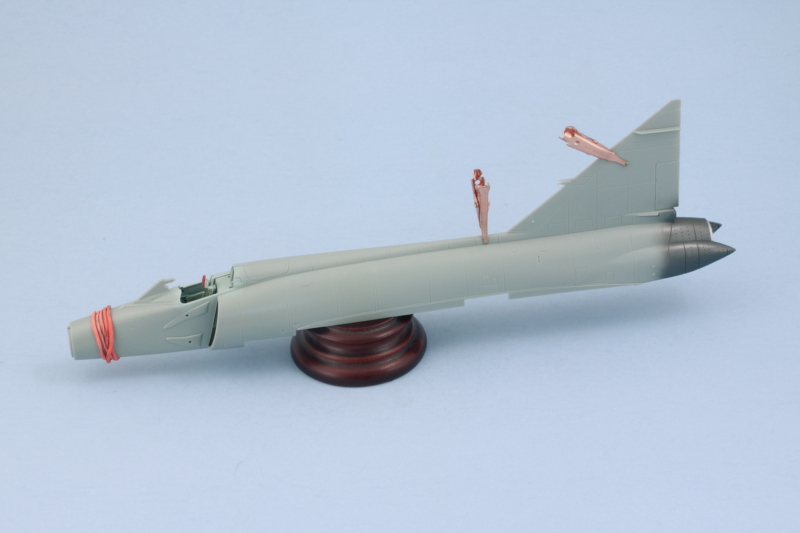
After I had applied the underside markings, I hand painted the white-black banded antenna that I had left off until now. It would've been virtually impossible to correctly apply the red band that goes underneath it if I had installed it before the decals were added.
These will get a chance to completely set overnight before I apply another coat of Future to protect them further and tie everything in before heading into the final couple of steps to finish this one.
The kit-supplied decals are pretty good quality. The only ones I had some minor issues with were the large tail fin flashes. These were oversized so I had to apply them one side at a time, wait for them to dry, then trim off the excess at the rear of the fin before I could do the other side. I also had cut off the small spade extensions that go over the speed brake so I could line them up and apply them as separate decals since they also had a large amount of clear film around the edges that needed to be trimmed away first. Fortunately, I had saved the tail markings to the very end since I needed the tail fin to stay clean as a hand hold while I applied all of the other markings.
Lots of Solvaset employed to make sure all the markings snugged down tight to the fuselage. There's only one case where I had to apply decals over other decals and that involved the red-white-blue-yellow band, so it was applied as the first decal and given plenty of time to thoroughly dry before I added the US Air Force markings over them. Then it was just a matter of skipping around applying different items as others dried to make the most of the bench time and get them all in place.
After I had applied the underside markings, I hand painted the white-black banded antenna that I had left off until now. It would've been virtually impossible to correctly apply the red band that goes underneath it if I had installed it before the decals were added.
These will get a chance to completely set overnight before I apply another coat of Future to protect them further and tie everything in before heading into the final couple of steps to finish this one.