Encore 1/232 Protected Cruiser USS Olympia Premium Edition (2016)

Bill Plunk
Posts: 1245
Joined: Wed Sep 28, 2022 10:18 pm

WIP 06-20-2016

Post by Bill Plunk »

After fiddling around with the stacks and checking the layouts for the boats and the various details for the walkways, I decided the best course of action was to add all the PE details first to maximize the room I had to maneuver with the tweezers. My focus was in particular on the walkway areas, so I added the railings, access ladders, and the searchlight platforms to both sides. The bridge deck and crossover walkway will, of course, get more railing detail attention in the near future, but one thing at a time first!

Image

Both the funnels were installed with the help of some regular Testors black bottle glue since they had a slight tendency to wobble a bit inside their housings on the deck. I also added the railings and installed the searchlights onto their platforms. Will let that set up overnight and then will go about adding the bracing wires for the funnels since they have to anchor on the inboard sides of the walkways and also not interfere with the boats in their racks.

Image

More fun to come!
Bill Plunk
Posts: 1245
Joined: Wed Sep 28, 2022 10:18 pm

WIP 06-21-2016

Post by Bill Plunk »

More progress in the mid-ships detail areas to report. After confirming that the rigging needed for the masts wasn't going to cause a conflict with the funnel stays, I went ahead and added those to the smoke funnels. I used EZ Line (fine) and CA for this, drilling small holes in the wood deck areas with a #78 finger drill to provide a little extra contact surface for the line to grab onto. Place a dot of CA, dip or brush the line end with CA accelerator, and voila! Or close enough, sometimes I still had to hold it for a few seconds before the glue fully grabbed.

I also added the railings to the top of the pilothouse and the back sides to the bridge deck so they would connect up with the railing work done yesterday. I'm leaving off the rest of the railings in this area until after I've run the signal line rigging from the mast to give me the most flexibility and room to maneuver.

Image

The line between the stacks that also connects down to the water tank was a bit of a challenge as the spaces involved at the funnel tops is pretty tight. I did a test fit with the boats that go into this area as well to make sure that wouldn't be a problem and it was just barely possible to run the central vertical bracing line. Good thing I did that now instead of later!

Image

Some familiar lines are starting to appear on Olympia as a whole, the masts are what are really going to complete her look I think once they are in place.

Image
Bill Plunk
Posts: 1245
Joined: Wed Sep 28, 2022 10:18 pm

WIP 06-22-2016

Post by Bill Plunk »

Today's efforts focused on getting the masts built and installed. The masts themselves had some flash and mold seams that had to be dealt with first before I could add the searchlight platforms and 1-pounder/crows nest elements. Those platforms rely on supports or tabs to hold them in place on the masts but those also need to be removed and replaced with PE angled supports. I decided to glue the platforms in place first and then trim down the support tabs after the glue had set and then install the PE supports in their place. This approach worked out pretty well but the fit of the platforms wasn't uniformly perfect, so I used some styrene rod to fill in gaps on the floor bottoms in places so that it could do double-duty by also providing additional support to the platform in the process.

Image

The yardarms and schooner rig sail masts were installed next and the masts sent off to the paint booth. Primer coat of Flat Black followed by Gunship Gray did the trick nicely. I drilled out the faces of the searchlights and detailed the 1-pounder guns by hand before adding them in place on their respective platforms.

Image

Masts were installed fore and aft and this, of course, makes the model significantly taller as a result.

Image

This clears the way for Round 2 of the rigging saga to begin!
Bill Plunk
Posts: 1245
Joined: Wed Sep 28, 2022 10:18 pm

WIP 06-23-2016

Post by Bill Plunk »

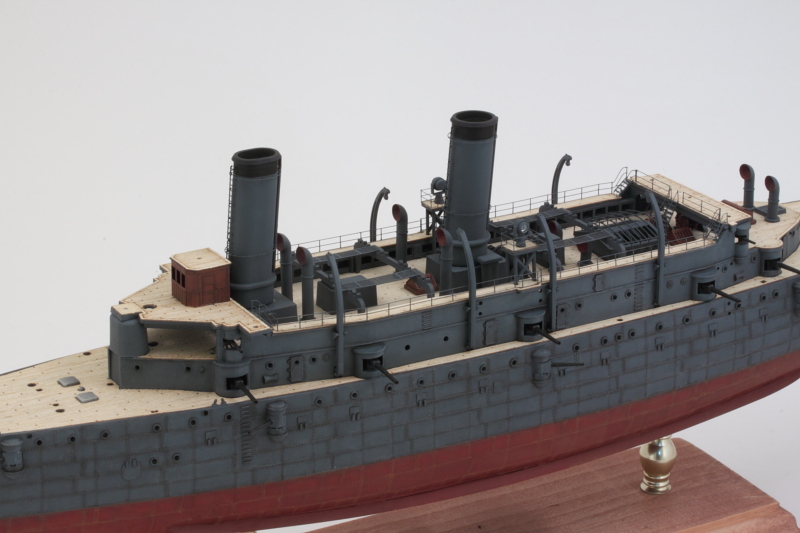
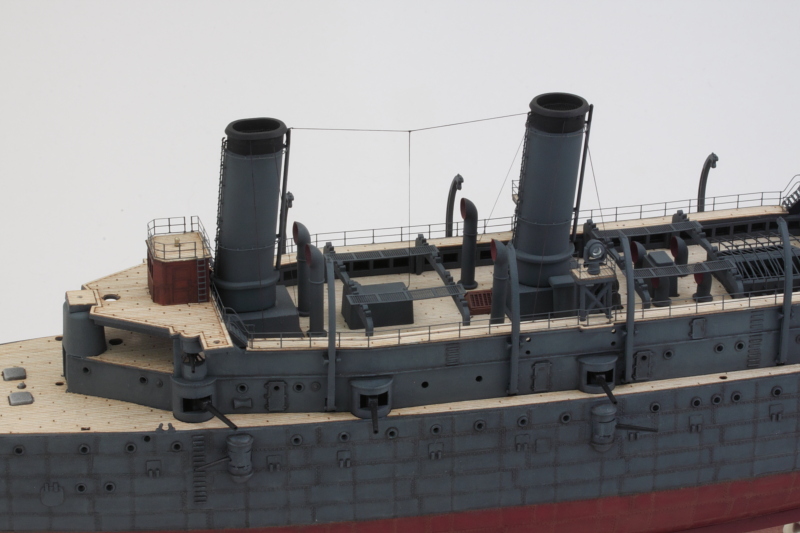
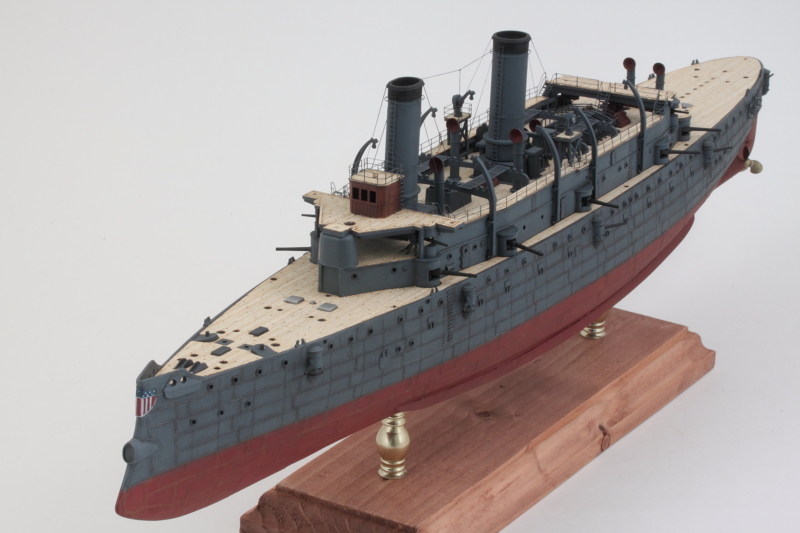
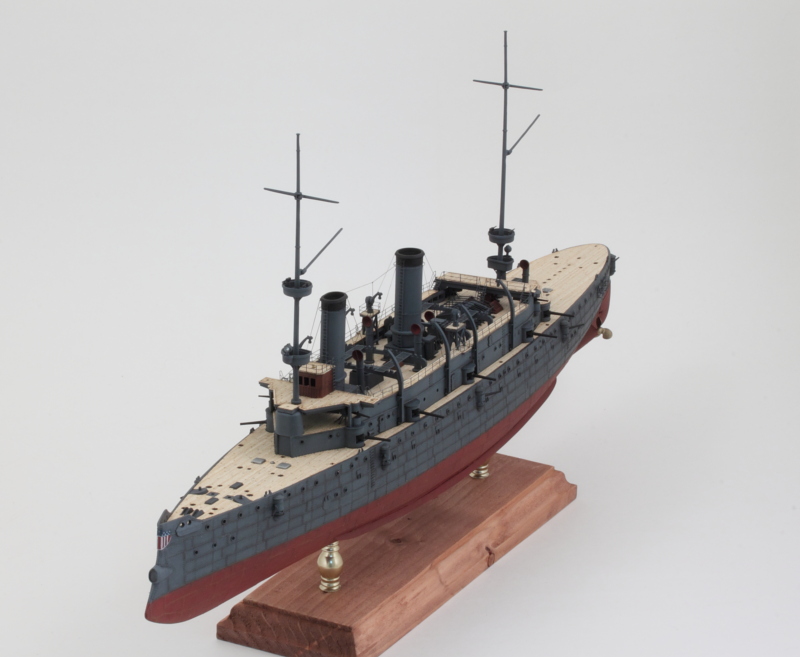
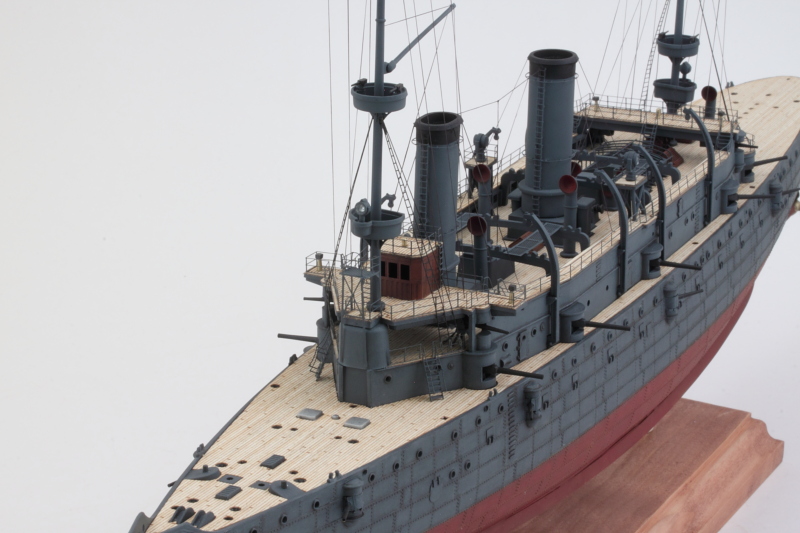
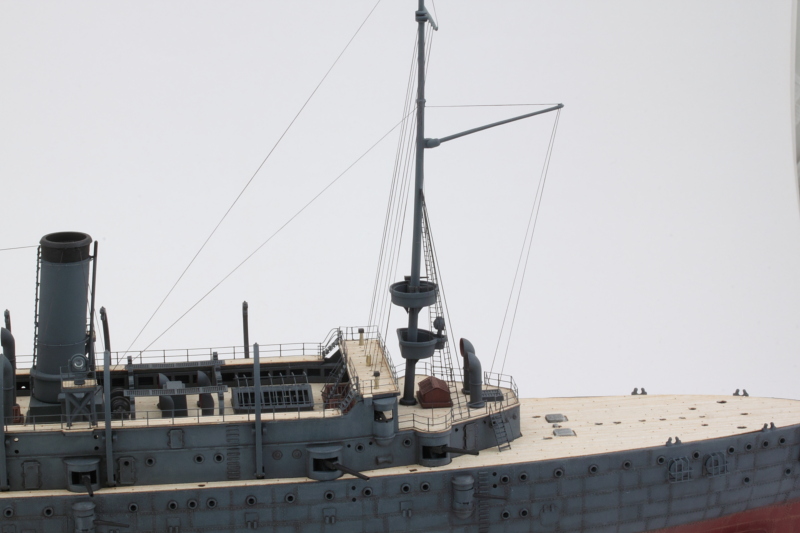
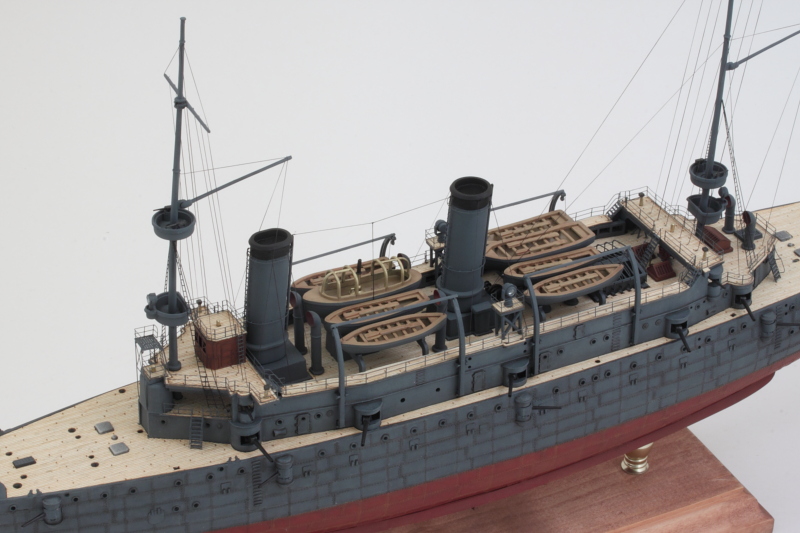
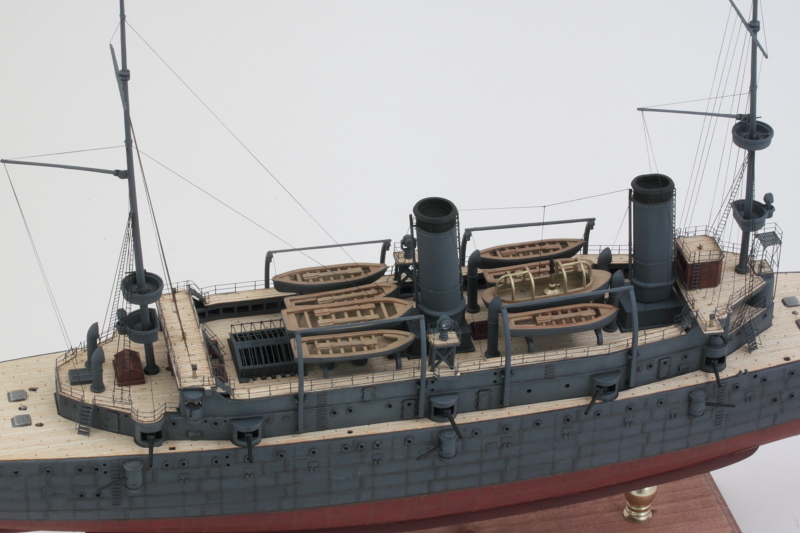
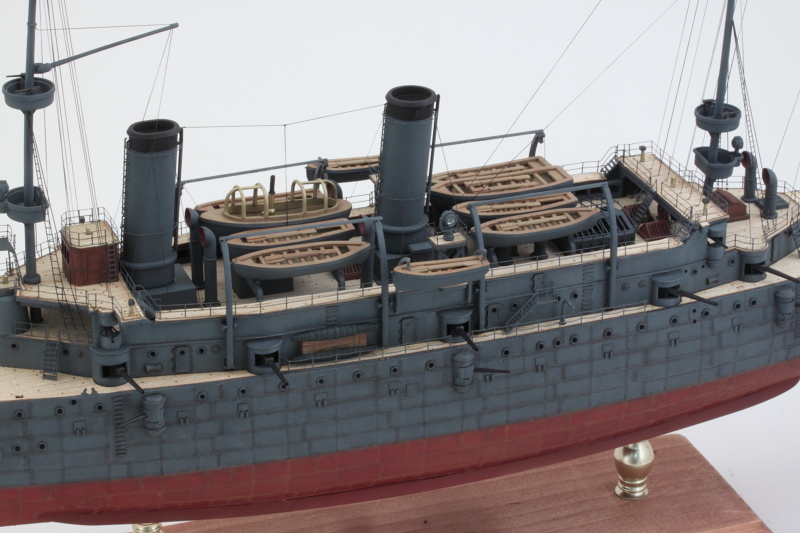
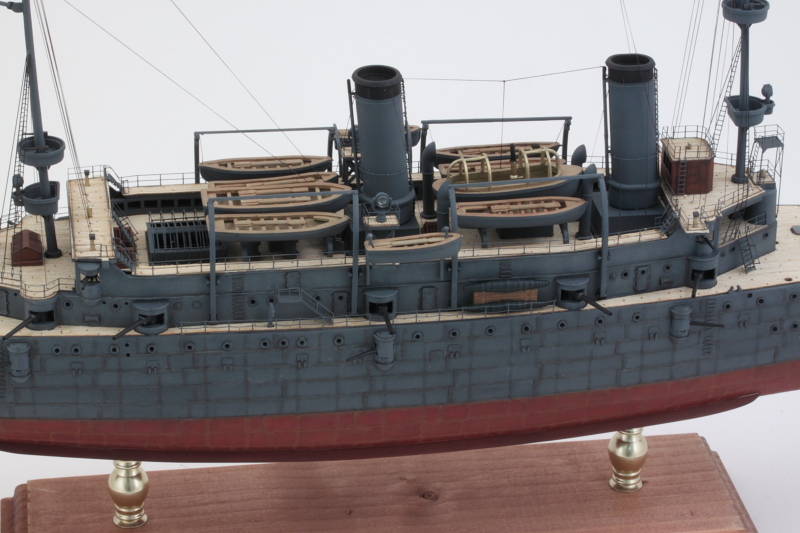
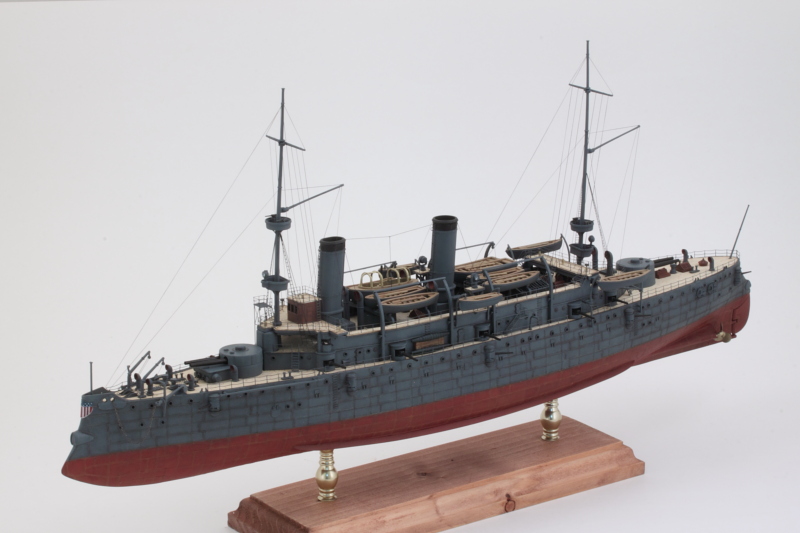
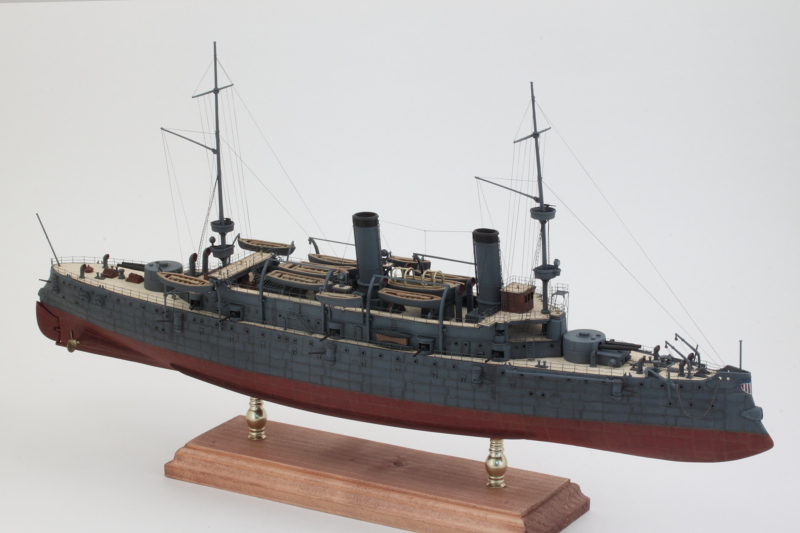
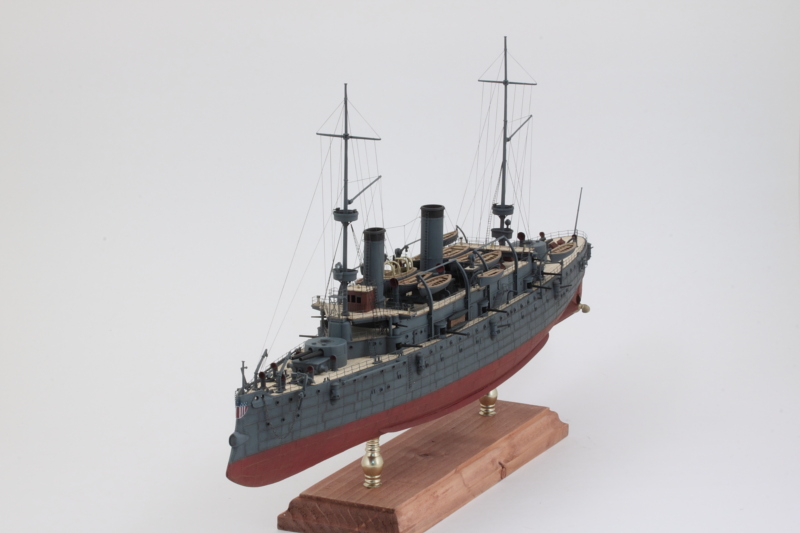
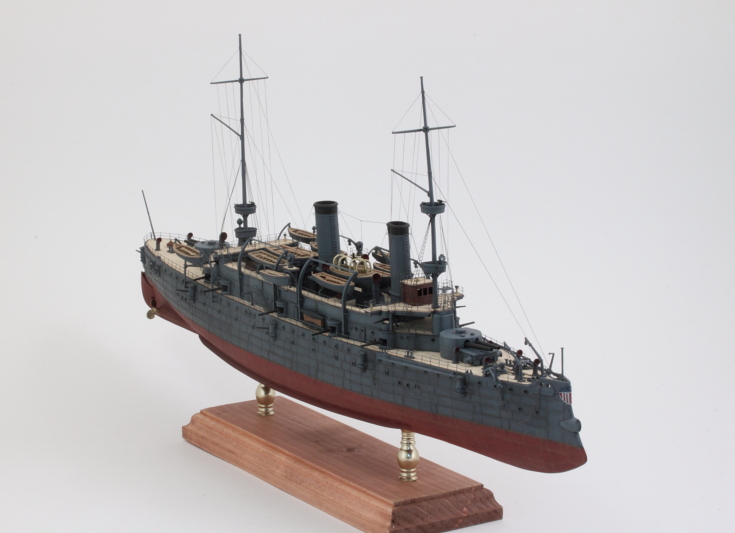
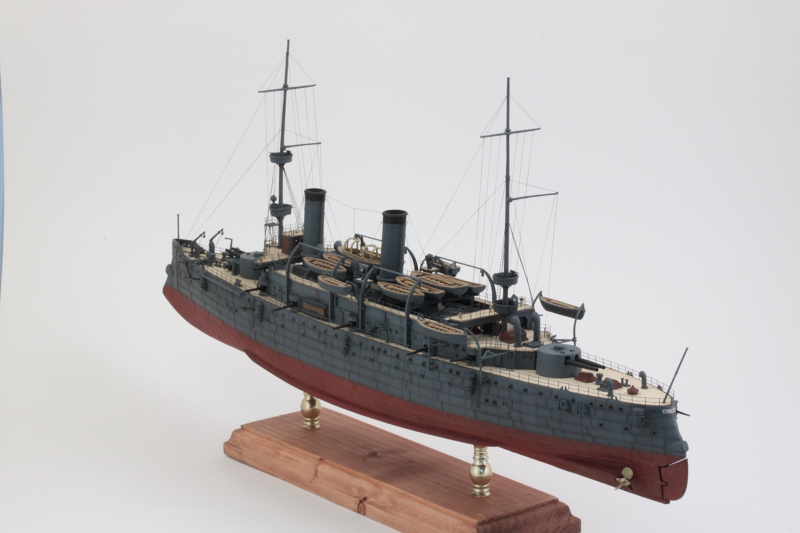
With the masts installed yesterday, the way was cleared for me to add the rigging required. I started with the foremast and added all of its lines with the exception of the bracing lines that connect to the bow since I didn't want them to be in the way when I work on the rest of the details still to come. EZ Line, CA, and accelerator plus enduring the full day working without the fan running (airflow makes it really hard to handle the superfine EZ line thread!) made for a successful effort. I'm really glad I held off adding the bridge deck railings as that would've made for some really tight spaces if I hadn't.

Image

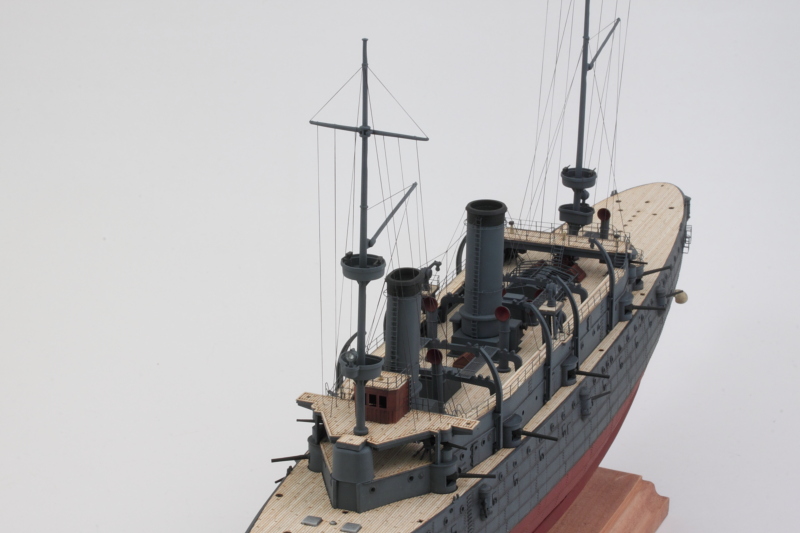
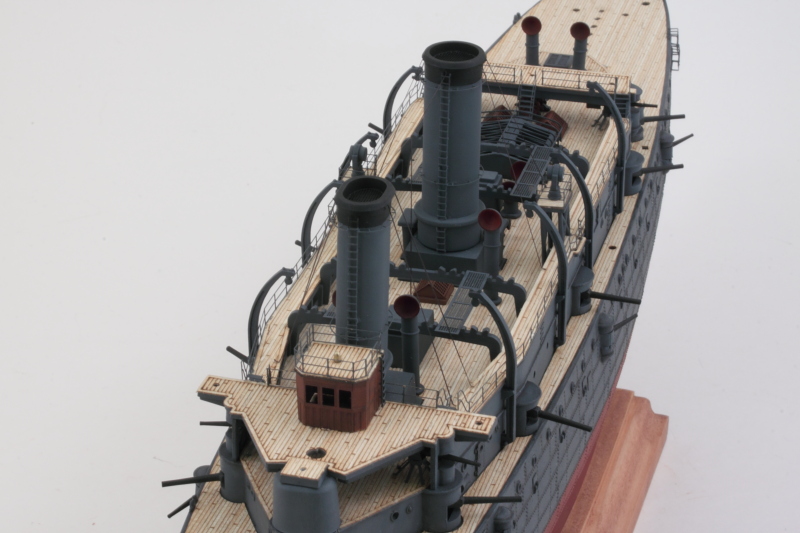
The mainmast also got its dose of rigging as well. I almost painted myself into a corner by adding all of the signal flag lines before I added the aft railing for the walkway section. Fortunately, I had just enough room to fit it in around the lines without disturbing them but it was a close call. Learning my lesson, I shaped the boat deck level railings first and checked their fit and placement before I added the bracing stays and lines for the sail boom. Once I was sure I had the necessary room and clearance, I added those lines, installed the railings, and added the access ladders down to the main deck level.

Image

Image

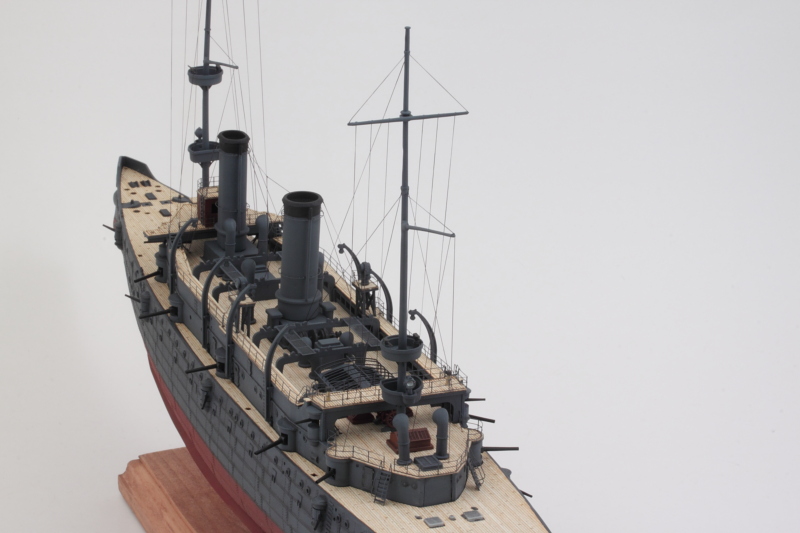
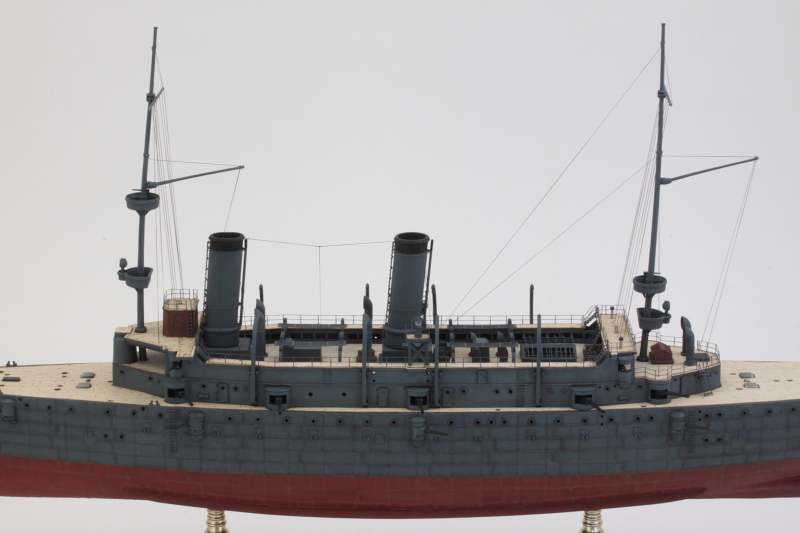
It's worth noting that the instructions include a rigging diagram and it's helpful up to a point...but there were a couple of cases where the rigging they were calling out just wasn't physically possible, so I used a little creative license in a couple of spots to get things as close as I could given the spaces available.

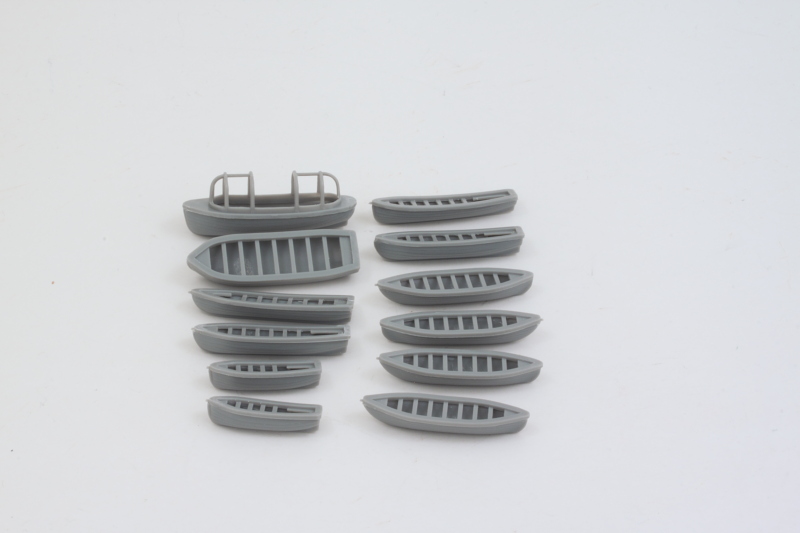
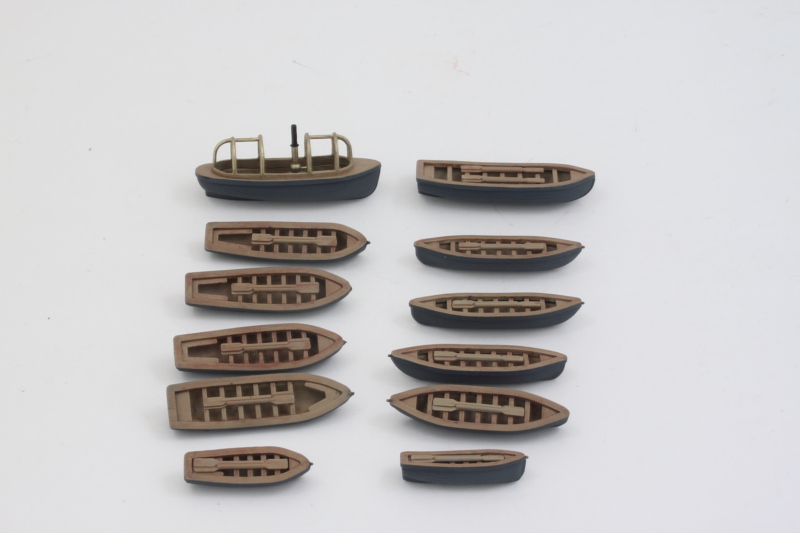
Next up will be tackling the ship's boats so I can populate the racks now that I don't need access to those areas any longer.
Bill Plunk
Posts: 1245
Joined: Wed Sep 28, 2022 10:18 pm

WIP 06-25-2016

Post by Bill Plunk »

With all the time I spent today working on the bridge, I might as well have been in a dentist's office! :) I completed all the remaining bridge details and installed the remaining railings and ratlines for the foremast. It was necessary to be a little strategic in the choice of order of shaping, painting, and installing the different railings sections to ensure everything would play nice. This was particularly true for the ratlines as they required a curve to clear the bridge deck railing and mate up with the mast under the crow's nest platform. It all worked out in the end! The instructions failed to call out the railing section on top of the small elevated platform at the front of the bridge deck but I figured it out after triple-checking that the one section of railing unaccounted for on the fret wasn't used anywhere else and was the right size.

Image

Ratlines were also installed on the mainmast. These were a little trickier in that the spaces available are tighter but no bending required, so that was a plus.

Image

Rounding things out, I assembled the ship's complement of 12 boats. These had varying degrees of flash with the frame for the steam launch getting the worst of it. They cleaned up nicely though and will get painted first before I add the oars and the boiler for the steam launch.

Image

Making good progress! Getting closer to the finish line.
Bill Plunk
Posts: 1245
Joined: Wed Sep 28, 2022 10:18 pm

WIP 06-27-2016

Post by Bill Plunk »

I've been working on getting the boats finished and ready for install. To that end, they were airbrushed with a primer coat of MM Flat Black followed by a basecoat of MM enamel Gunship Gray for the exteriors. Once that had cured a bit, I masked off the exterior and airbrushed a custom mix of 70/30 Afrika Grunbraun and Light Gray to provide a wood tone base. I applied a couple of doses of highly thinned MM enamel Leather over that to create more of a finished wood look. The steam launch boiler and the canopy support frames received a dose of MM Metalizer Nonbuffing Brass and the top of the smoke stack MM Flat Black to round things out there. The oars were detailed separately to provide some variation and then glued in place where needed on the different boats.

Image

Time to populate the boat deck racks! I changed up the order slightly vs what is called out in the instructions due to the large lifeboat cutter fitting a little too tightly with the whaleboat that the instructions wanted sitting next to it. The whaleboat was swapped out with one of the smaller cutters from the forward group and that did the trick nicely. I used EZ line to provide some support ropes to the 4 boats on the davit stations and then installed the davit top frame bars.

Image

Image

I realized too late that the steam launch could probably have benefited from the addition of some bench seats but I literally missed the boat on that one! :) The remaining four boats go on davits that mount on the exterior of the boat deck structure so I'll work on getting them done next along with the other remaining details.
Bill Plunk
Posts: 1245
Joined: Wed Sep 28, 2022 10:18 pm

WIP 06-28-2016

Post by Bill Plunk »

More progress in the details department today. The midships section received its remaining elements in the form of the small dinghies and their davits, the main-to-boat deck access ladders and platforms, the small loading cranes, and the large rafts that attach to the superstructure. Once all of that was in place, I added the railing section and had to modify it slightly by removing the top chain section underneath the 5-inch gun as that was the only way the barrel could clear the railing properly.

Image

Image

I can't install the remaining 2 whaleboats and their davits until after I have the stern railings in place due to the way they overhang and interact, so next up will be getting the rest of the stern details squared away before I come back to the last of the boats.
Bill Plunk
Posts: 1245
Joined: Wed Sep 28, 2022 10:18 pm

WIP 06-29-2016

Post by Bill Plunk »

Heading down the homestretch now on this one, managed to square away a few more details today. I assembled the turrets for the 8-inch guns and test fit them to make sure the barrels wouldn't droop due to the weight of the brass barrels. Sure enough, they needed some help to stay at the proper elevation so I braced the barrels in position with some blobs of blue tack while the glue grabbed and set. Once that was done, a quick dose of Future, a dot filter treatment followed by a pin wash, and voila! Both were ready to take their place on the hull.

Image

I managed to get all of the stern main deck details installed as well along with the rear turret. Then the railings were shaped, painted, and installed followed by the remaining whaleboats and their davits.

Image

All that's left is the bow section details and railings and she will be ready to hit the high seas. End is near! :)
Bill Plunk
Posts: 1245
Joined: Wed Sep 28, 2022 10:18 pm

Completion 06-30-2016

Post by Bill Plunk »

Yesterday was the stern, today it was the bow! First order of business involved getting the kit-supplied anchor chains properly threaded underneath the 8-inch turret and set to equal lengths. I used some Gator Grip Thin Blend glue to secure the chain on the inside of the turret housing and then installed the turret in position on the main deck. Some small pieces of masking tape held the ends against the hull so there would be enough tension in the chains while the glue set.

Image

That cleared the way for the installation of the rest of the bow fixtures. Once they were in place, I ran the bracing lines for the foremast that I'd left off previously to avoid them being in the way and creating a snag hazard.

Image

The final lap involved adding the railings and hooking up the anchors to the chains. The chain isn't large enough to fit in the eyes of the anchors, so I used black sewing thread to secure them in place along with a drop of CA to lock it down. Then the anchors were placed and the natural droop of the chain created with the slack left over as a result of the previous care in lining things up. Last but not least, I added the lower booms for the schooner rig in their mount holes as the final detail. Bow's quite the crowded space!

Image

And, with that, Olympia was ready for her walk-around shots.

Image

Image

Image

Image

Image

Image
Bill Plunk
Posts: 1245
Joined: Wed Sep 28, 2022 10:18 pm

Publication September 2018

Post by Bill Plunk »

This project was featured in the FineScale Modeler September 2018 issue.

Image

Image
Post Reply