
Trumpeter 1/700 USS West Virginia BB-48 1941 (2016)
-
Bill Plunk
- Posts: 1245
- Joined: Wed Sep 28, 2022 10:18 pm
Trumpeter 1/700 USS West Virginia BB-48 1941 (2016)
Build log for Trumpeter's 1/700 kit #05771 USS West Virginia BB-48 1941 combined with an Artwox wood deck, Master turned brass barrels, Tom's Modelworks PE railings, Blue Ridge cage masts, and 3D Model Parts fighting tops.
-
Bill Plunk
- Posts: 1245
- Joined: Wed Sep 28, 2022 10:18 pm
WIP 07-04-2016
Even though the kit instructions leave the hull bottom decision to the very final step of the build, I flipped that around and decided from the get-go that I would build this one as full hull. To that end, the first order of business was cleaning up the hull bottom where needed including sanding down some mold seams in various spots.

The above water portion of the hull is separate and that makes life a little easier in dealing with it as well when it comes to drilling out the portholes. I used a #72 micro drill and pin vise to open up the 128 portholes per hull side, making a grand total of 256 holes. Repetitive and tedious for sure, but definitely adds to the look when done. I spread it out over a couple of days to give my hand a break but it still took a good 4 hours or so total when all said and done.

With that out of the way, I cleaned up the two main deck sections and did a test fit to see how everything would work together. The fit is pretty good, so I decided to use them to help with joining the hull top and bottom together so that the rubber bands wouldn't distort things in the process. I used some regular Testors black bottle glue along the mating surface on the gray portion first then joined the two halves with liquid glue along the seam in sections. Once the glue had grabbed, a rubber band was slapped on to keep it together as I moved down the hull. The deck plates are just dry fit at this point.

After about an hour to ensure the glue had set solid, I removed the rubber bands and set to work with a sanding stick to smooth out the hull join. It was pretty tight to begin with, so just some light sanding was required for the most part.

The four propeller shafts and the rudder were cleaned up next and installed in place. These are dealt with in Step 13 but I need them in place now so it will all match up when the hull is airbrushed. The rudder is a tight fit into the mount hole and friction is enough to hold it in place, so I'm leaving it movable to make life a little easier there as well for the time being.

So after all that, the hull is now together as a full-hull presentation.

The above water portion of the hull is separate and that makes life a little easier in dealing with it as well when it comes to drilling out the portholes. I used a #72 micro drill and pin vise to open up the 128 portholes per hull side, making a grand total of 256 holes. Repetitive and tedious for sure, but definitely adds to the look when done. I spread it out over a couple of days to give my hand a break but it still took a good 4 hours or so total when all said and done.
With that out of the way, I cleaned up the two main deck sections and did a test fit to see how everything would work together. The fit is pretty good, so I decided to use them to help with joining the hull top and bottom together so that the rubber bands wouldn't distort things in the process. I used some regular Testors black bottle glue along the mating surface on the gray portion first then joined the two halves with liquid glue along the seam in sections. Once the glue had grabbed, a rubber band was slapped on to keep it together as I moved down the hull. The deck plates are just dry fit at this point.
After about an hour to ensure the glue had set solid, I removed the rubber bands and set to work with a sanding stick to smooth out the hull join. It was pretty tight to begin with, so just some light sanding was required for the most part.
The four propeller shafts and the rudder were cleaned up next and installed in place. These are dealt with in Step 13 but I need them in place now so it will all match up when the hull is airbrushed. The rudder is a tight fit into the mount hole and friction is enough to hold it in place, so I'm leaving it movable to make life a little easier there as well for the time being.
So after all that, the hull is now together as a full-hull presentation.
-
Bill Plunk
- Posts: 1245
- Joined: Wed Sep 28, 2022 10:18 pm
WIP 07-07-2016
More progress to report in getting the major components squared away in order to make the most of the first round of airbrush work to come. First up were the 16-inch gun turrets and barbettes. I opted for the blast bags scenario and had picked up the Master brass barrel replacements suitable for that choice. The plastic barrels were cut away from the blast bag portion of the parts and a #72 micro drill used to create the mount holes for the barrel pegs along with some CA glue. The new barrel and blast bag combos were then mounted into the turrets with liquid glue so I could adjust their angle and placement as needed. I did discover that the tabs on the blast bags were a little too big to fit the openings in the turrets, so those were cut down a bit so they would fit. The C turret will get the seaplane catapult added later after painting since it creates a pretty tight space to work in if it's in place. The turrets are also dry-fit on the barbettes at this stage.

After doing some test fits, I decided to go ahead and mount the midships deck connection, part C1, that is called out in Step 2 to the front half of the main deck so I could work with it as a single piece for painting. I was careful with the glue, attaching the two parts together separate from the hull and then using the hull and aft half of the main deck to ensure it all lined up properly. The 02 level deck was also cleaned up and the secondary battery 5-inch gun casemates assembled. These come in 3 parts each vs. just 1 part, so I used the outlines molded into the main deck to ensure the three parts all sat at the right angles to each other. I also opened up the portholes with a #72 micro drill to get them ready for airbrushing.

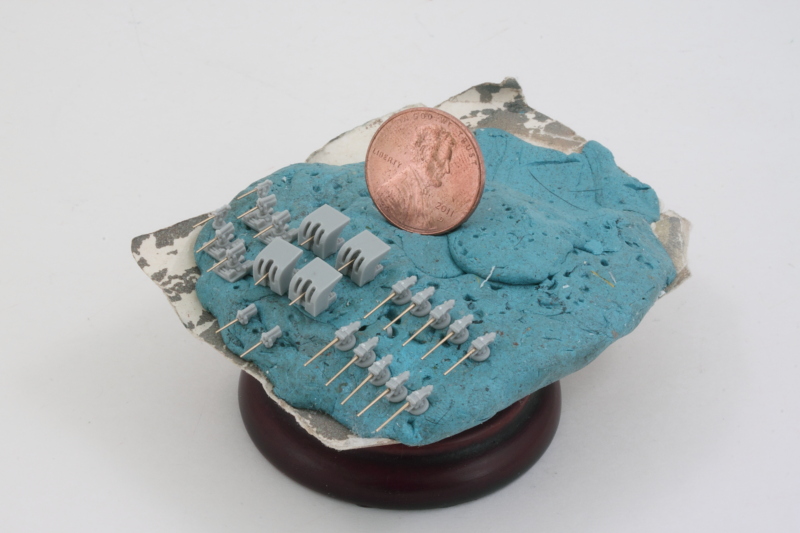
The next act involved replacing all of the plastic barrels on the 5-inch/51 secondary guns, 5-inch/25 AA guns, and the two 3-inch AA guns that the West Virginia mounted due to a shortage of quad 1.1-inch guns at the time of Pearl Harbor. The Master barrel sets provide 22 barrels for the /51 guns, but only 10 are needed so the rest will be spares should I need them for the future. The /25 set had 14 barrels and 12 were needed since I cheated a bit and used 5-inch barrels on the pair of 3-inch guns and just drilled their mount holes deeper to reflect the shorter barrel length vs. their larger cousins. Lots of patient work with the Optivisor spread out over a couple of days to avoid hunchback syndrome! I used a #78 finger drill on the /51 guns and a #80 finger drill on the smaller AA guns.
Other builders have reported fit issues of the 5/51 guns into the casemates but the brass barrels are not nearly as thick/large as the kit parts and they fit perfectly with no modifications needed when I test fit them with the casemate frames assembled earlier although the mount holes in the main deck did need to be enlarged a bit with the tip of a #11 blade. It's also worth noting that the instructions are a little confusing in that one of the sub-diagrams in Step 3 calls for 6 of the V6-R17 5-inch gun assemblies but only 4 are actually needed.
That should be enough to get me started on a good round of airbrush work I think!
After doing some test fits, I decided to go ahead and mount the midships deck connection, part C1, that is called out in Step 2 to the front half of the main deck so I could work with it as a single piece for painting. I was careful with the glue, attaching the two parts together separate from the hull and then using the hull and aft half of the main deck to ensure it all lined up properly. The 02 level deck was also cleaned up and the secondary battery 5-inch gun casemates assembled. These come in 3 parts each vs. just 1 part, so I used the outlines molded into the main deck to ensure the three parts all sat at the right angles to each other. I also opened up the portholes with a #72 micro drill to get them ready for airbrushing.
The next act involved replacing all of the plastic barrels on the 5-inch/51 secondary guns, 5-inch/25 AA guns, and the two 3-inch AA guns that the West Virginia mounted due to a shortage of quad 1.1-inch guns at the time of Pearl Harbor. The Master barrel sets provide 22 barrels for the /51 guns, but only 10 are needed so the rest will be spares should I need them for the future. The /25 set had 14 barrels and 12 were needed since I cheated a bit and used 5-inch barrels on the pair of 3-inch guns and just drilled their mount holes deeper to reflect the shorter barrel length vs. their larger cousins. Lots of patient work with the Optivisor spread out over a couple of days to avoid hunchback syndrome! I used a #78 finger drill on the /51 guns and a #80 finger drill on the smaller AA guns.
Other builders have reported fit issues of the 5/51 guns into the casemates but the brass barrels are not nearly as thick/large as the kit parts and they fit perfectly with no modifications needed when I test fit them with the casemate frames assembled earlier although the mount holes in the main deck did need to be enlarged a bit with the tip of a #11 blade. It's also worth noting that the instructions are a little confusing in that one of the sub-diagrams in Step 3 calls for 6 of the V6-R17 5-inch gun assemblies but only 4 are actually needed.
That should be enough to get me started on a good round of airbrush work I think!
-
Bill Plunk
- Posts: 1245
- Joined: Wed Sep 28, 2022 10:18 pm
WIP 07-08-2016
First round of airbrush work got applied today. I used Model Master enamel Flat Black as the primer and pre-shade coat as it would also do double-duty in helping create the hull's boot stripe and also the black turret tops specific for the West Virginia's BatDiv4 markings at Pearl in 1941. The main decks were airbrushed in place to avoid getting paint on their contact surfaces with the main hull. It's a good practice to paint the decks even though the wood veneers are going to overlay them so that any trimming needed with the wood portions doesn't reveal bare plastic underneath. The most time-consuming step was dealing with all the small guns since they had to be airbrushed one at a time with a pair of locking tweezers and set off to the side to dry before tackling the next one.

I masked off the hull red lower hull portion and airbrushed some MM enamel Insignia Red. The #4 turret on the West Virginia was red, so it too was masked off and airbrushed since I had the color already loaded up and ready to go.

Masking tape came off and there were a couple of spots where there had been a little bleed through as well as minor adjustment here and there to the waterline. These were dealt with by strategically re-masking those spots and airbrushing Flat Black to restore the boot stripe area and preserve the pre-shade tone integrity.

I'll let that fully cure up and then will mask off and airbrush the dark gray areas next.
I masked off the hull red lower hull portion and airbrushed some MM enamel Insignia Red. The #4 turret on the West Virginia was red, so it too was masked off and airbrushed since I had the color already loaded up and ready to go.
Masking tape came off and there were a couple of spots where there had been a little bleed through as well as minor adjustment here and there to the waterline. These were dealt with by strategically re-masking those spots and airbrushing Flat Black to restore the boot stripe area and preserve the pre-shade tone integrity.
I'll let that fully cure up and then will mask off and airbrush the dark gray areas next.
-
Bill Plunk
- Posts: 1245
- Joined: Wed Sep 28, 2022 10:18 pm
WIP 07-09-2016
I wasn't very impressed with the display base that was included with the kit...it's the generic dry-dock type of thing and didn't really fit the hull's dimensions well, so I decided to replace it with something a little more substantial. A quick trip to Lowe's and I found a nice drawer knob that would do the trick nicely. It had a good solid weight to it and enough of a footprint to evenly support the model without being too big. I drilled a hole in the hull center, screwed in the retaining bolt and adjusted it to match up with the knob, then used a combination of CA and accelerator to lock the bolt in place. This leaves the lower knob portion removable should I need to do that later on.

I decided to go ahead and secure the main deck in place as there's no real reason to leave them separate. I don't need the turrets to be able to freely rotate after I place them and the wood deck I'll be adding as a slight edge/overhang to it that will overlap nicely, so some careful use of liquid glue and finger pressure got the deck in place. I masked off the tops of the #1, #2, and #4 turrets and the boot stripe demarcation on the main hull before airbrushing MM enamel Gunship Gray.

Once that had dried, I removed the masking tape and checked for spots that needed adjustment. The bootstripe needed refining at the stern, so I reshot some of the Gunship Gray there and also some Flat Black on a midships section that was a little too narrow to get it all sorted out. A quick visual check with the turrets dry-fit in place gives a good idea of how things are coming together. I still need to pick out the blast bags but otherwise it's looking as it should.

Cruising right along!
I decided to go ahead and secure the main deck in place as there's no real reason to leave them separate. I don't need the turrets to be able to freely rotate after I place them and the wood deck I'll be adding as a slight edge/overhang to it that will overlap nicely, so some careful use of liquid glue and finger pressure got the deck in place. I masked off the tops of the #1, #2, and #4 turrets and the boot stripe demarcation on the main hull before airbrushing MM enamel Gunship Gray.
Once that had dried, I removed the masking tape and checked for spots that needed adjustment. The bootstripe needed refining at the stern, so I reshot some of the Gunship Gray there and also some Flat Black on a midships section that was a little too narrow to get it all sorted out. A quick visual check with the turrets dry-fit in place gives a good idea of how things are coming together. I still need to pick out the blast bags but otherwise it's looking as it should.
Cruising right along!
-
Bill Plunk
- Posts: 1245
- Joined: Wed Sep 28, 2022 10:18 pm
WIP 07-11-2016
I'm the unfortunate victim of Murphy's Law...July in El Paso is the worst time for central air conditioning to decide to quit working...especially since the temps are forecast to be 105+ for the rest of the week...and Friday is the soonest I could get a repair guy out. I retreated to my workbench and with the aid of a window unit, get some work done to keep things moving along.
I decided to focus on adding the main deck wood veneers next. The Artwox decks are a virtually near perfect fit, with just some very minor trimming needed on the rear deck portion due to the fact that I'd already installed the piece that connects the two deck halves together. The decks have a clear plastic backing over their adhesive, so it's a little time consuming to remove all the small opening pieces, check the fit, and cut away the extra wood material from the deck sections. Worth the effort though in the end, as it produces a very nice in-scale planked look. The deck edge goes right up against tie-off cleats, so it will provide the added benefit of a little extra support for installing the PE railings I will be adding later on.

I decided to focus on adding the main deck wood veneers next. The Artwox decks are a virtually near perfect fit, with just some very minor trimming needed on the rear deck portion due to the fact that I'd already installed the piece that connects the two deck halves together. The decks have a clear plastic backing over their adhesive, so it's a little time consuming to remove all the small opening pieces, check the fit, and cut away the extra wood material from the deck sections. Worth the effort though in the end, as it produces a very nice in-scale planked look. The deck edge goes right up against tie-off cleats, so it will provide the added benefit of a little extra support for installing the PE railings I will be adding later on.
-
Bill Plunk
- Posts: 1245
- Joined: Wed Sep 28, 2022 10:18 pm
WIP 07-12-2016
More progress in the deck departments to report! After carefully scraping paint from the contact edge, I installed the secondary battery casemates for the 5-inch guns using liquid glue, making sure they conformed to the mounting ridge molded into the deck for that purpose. Then the guns themselves were positioned and glued into place.

While the guns were setting up, I worked on the wood decking for the 02 level deck surface. This one had more complex curves and angles and careful trimming with a sharp #11 blade did the trick to separate it from the wood sheet. The part itself fit beautifully with no modifications required.

With that out of the way, the 02 deck was installed in place over the casemates. It's a pretty tight fit and space, so I applied liquid glue first to the top of the casemates and then the underside of the deck and combined it with finger pressure to get it in place. Some additional strategic glue doses in a couple of spots got it all squared away.

She's starting to take on some familiar lines now!
While the guns were setting up, I worked on the wood decking for the 02 level deck surface. This one had more complex curves and angles and careful trimming with a sharp #11 blade did the trick to separate it from the wood sheet. The part itself fit beautifully with no modifications required.
With that out of the way, the 02 deck was installed in place over the casemates. It's a pretty tight fit and space, so I applied liquid glue first to the top of the casemates and then the underside of the deck and combined it with finger pressure to get it in place. Some additional strategic glue doses in a couple of spots got it all squared away.
She's starting to take on some familiar lines now!
-
Bill Plunk
- Posts: 1245
- Joined: Wed Sep 28, 2022 10:18 pm
WIP 07-14-2016
Work continues with the all-important details picked out on the turrets in the form of the blast bags and adding the catapult to the #3 turret. I also installed the #2 turret barbette in place along with the capstans and bow winches. I airbrushed a coat of Future acrylic floor polish over the hull and turrets so I could apply a pin wash to pop out their details later. This will be given the chance to fully cure overnight before that little adventure begins.

Needing something else to work on, I turned my attention to the superstructure components. These are called out in Steps 7 and 8 and involve quite a few parts, 41, due to the way it all assembles. All of the structures consist of separate panels, so they have to be cleaned-up and built up before the different levels can take shape. Since the top two levels need to be done in Light Gray, I kept them separate to make it easier to airbrush them without having to do some crazy masking and/or try to reach some very tight spaces otherwise. I also left off the pair of 5-inch guns since they've already been painted that go in the tubs to either side of the conning tower and will add them in after the paintwork is done. I drilled out the solid faces on the searchlights and the few portholes present for some added detail improvement.

I did a test-fit to make sure everything stacked up properly as it all has to work together, particularly the post supports for the top level since they fit into small notches on the conning tower level.

The Tom's Modelworks PE set includes a variety of railings but they are in long generic lengths, so they have to be cut to fit as needed. I tried out some of the 2-bar variety for the appropriate areas. They are super delicate and I used CA applied with a knife edge to the railing bases to secure them in position.

I'm fairly impressed with the level of detail achieved in this kit given the scale, should look good under paint.
Needing something else to work on, I turned my attention to the superstructure components. These are called out in Steps 7 and 8 and involve quite a few parts, 41, due to the way it all assembles. All of the structures consist of separate panels, so they have to be cleaned-up and built up before the different levels can take shape. Since the top two levels need to be done in Light Gray, I kept them separate to make it easier to airbrush them without having to do some crazy masking and/or try to reach some very tight spaces otherwise. I also left off the pair of 5-inch guns since they've already been painted that go in the tubs to either side of the conning tower and will add them in after the paintwork is done. I drilled out the solid faces on the searchlights and the few portholes present for some added detail improvement.
I did a test-fit to make sure everything stacked up properly as it all has to work together, particularly the post supports for the top level since they fit into small notches on the conning tower level.
The Tom's Modelworks PE set includes a variety of railings but they are in long generic lengths, so they have to be cut to fit as needed. I tried out some of the 2-bar variety for the appropriate areas. They are super delicate and I used CA applied with a knife edge to the railing bases to secure them in position.
I'm fairly impressed with the level of detail achieved in this kit given the scale, should look good under paint.
-
Bill Plunk
- Posts: 1245
- Joined: Wed Sep 28, 2022 10:18 pm
WIP 07-15-2016
Continuing on from the previous effort on the superstructure, I decided to work on the cage masts as the next element. This is an almost total replacement of the kit's parts in one degree or another for different reasons. The masts themselves were replaced with 3-D printed resin items from Blue Ridge that have the correct hyperbolic shape vs. the cone shape that the kit's PE parts reproduce. The fighting tops in the kit are molded with solid windows, so they were also replaced by 3-D printed items from 3D Model Parts.
The cage mast set includes PE that will work with the different mast shape to recreate the searchlight platform but no railings, so I used some more of the Tom's Modelworks 2-bar railings shaped to fit to address that. That was an exercise in patience as the railings will distort if you just look at them funny. Searchlights were drilled out for some added detail and I also replaced the kit yardarms with PE from either the Tom's Modelworks set or the Blue Ridge set as they were sturdier and more accurate. I did use the kit's PE for the radar set but that's the only piece of kit PE that's in use on these.

Some poster bluetack helped check to see that I had everything lined up properly and playing nice with each other. I had originally planned to leave the mainmast fighting top separate to make life a little easier for painting but with the four yardarms added it's far too delicate and awkward to handle to make that possible.

Next up will be getting the two smoke funnels done and then I think it will be time for some paint work so I can install these components vs. having them vulnerable while laying around the workbench.
The cage mast set includes PE that will work with the different mast shape to recreate the searchlight platform but no railings, so I used some more of the Tom's Modelworks 2-bar railings shaped to fit to address that. That was an exercise in patience as the railings will distort if you just look at them funny. Searchlights were drilled out for some added detail and I also replaced the kit yardarms with PE from either the Tom's Modelworks set or the Blue Ridge set as they were sturdier and more accurate. I did use the kit's PE for the radar set but that's the only piece of kit PE that's in use on these.
Some poster bluetack helped check to see that I had everything lined up properly and playing nice with each other. I had originally planned to leave the mainmast fighting top separate to make life a little easier for painting but with the four yardarms added it's far too delicate and awkward to handle to make that possible.
Next up will be getting the two smoke funnels done and then I think it will be time for some paint work so I can install these components vs. having them vulnerable while laying around the workbench.
-
Bill Plunk
- Posts: 1245
- Joined: Wed Sep 28, 2022 10:18 pm
WIP 07-16-2016
One of the inevitable side-effects of working in 1/700 is that the detail parts tend to be small and that much harder to handle when it comes to painting, so I had to be strategic in deciding what elements I was going to reserve for the airbrush vs. those that I would hand paint. There's plenty of details that go in on the 02 deck and the stern area around the mainmast that were better served with hand painting, so that's where the latest round of effort was focused.
For the mainmast area, I added the movie theater house that sits inside the cage mast as well as the air ventilators, winches, large cranes, and the two 3-inch AA gun tubs.

On the 02 deck level, I added all the air vent ducts and the angled chimney for the galley. The instructions aren't too clear on exactly how the chimney should sit, but after assembling the smoke funnels and test fitting it, I was able to position it correctly. I installed the 4 open mount 5-inch AA guns but held off on the 4 shielded guns since there's a boat support rack that installs inboard of them and it will be much easier to do that before the guns are in place but after the superstructure is in place. It is worth noting that the instructions would have the large rectangular boat rack that sits between the funnels installed before the funnels are in place but that's a little tricky as the funnel collars have to slide under that rack. That means I'll be adding the rack after the funnels are in place to avoid any unnecessary complications.

I still need to assemble the boat cranes and get them ready for airbrushing since they include PE components and I want to maximize the airbrush session when it gets to that point.
For the mainmast area, I added the movie theater house that sits inside the cage mast as well as the air ventilators, winches, large cranes, and the two 3-inch AA gun tubs.
On the 02 deck level, I added all the air vent ducts and the angled chimney for the galley. The instructions aren't too clear on exactly how the chimney should sit, but after assembling the smoke funnels and test fitting it, I was able to position it correctly. I installed the 4 open mount 5-inch AA guns but held off on the 4 shielded guns since there's a boat support rack that installs inboard of them and it will be much easier to do that before the guns are in place but after the superstructure is in place. It is worth noting that the instructions would have the large rectangular boat rack that sits between the funnels installed before the funnels are in place but that's a little tricky as the funnel collars have to slide under that rack. That means I'll be adding the rack after the funnels are in place to avoid any unnecessary complications.
I still need to assemble the boat cranes and get them ready for airbrushing since they include PE components and I want to maximize the airbrush session when it gets to that point.