Trumpeter 1/350 USS Texas BB-35 (2015)

Bill Plunk
Posts: 1245
Joined: Wed Sep 28, 2022 10:18 pm

WIP 10-08-2015

Post by Bill Plunk »

The latest round of effort was another case of a lot of time being consumed by little, but necessary, details. The focus was on getting the details attached to the tripod masts so they could be permanently fixed in position with the rest of the superstructure.

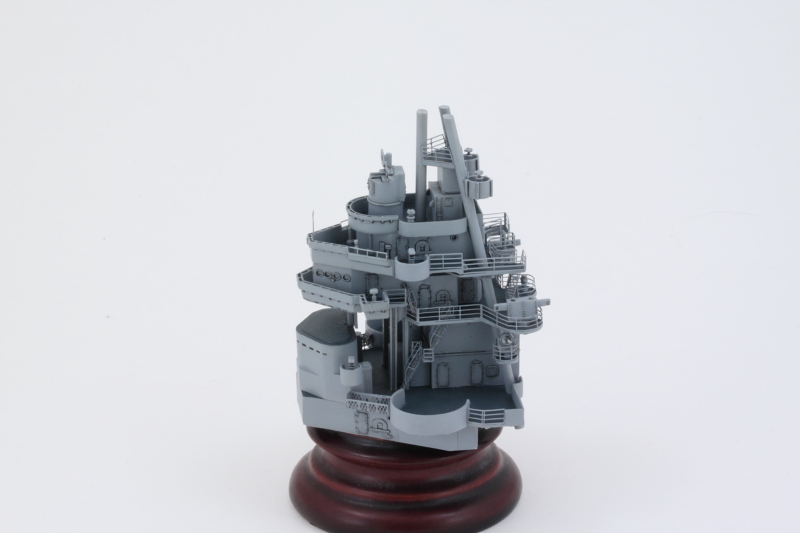
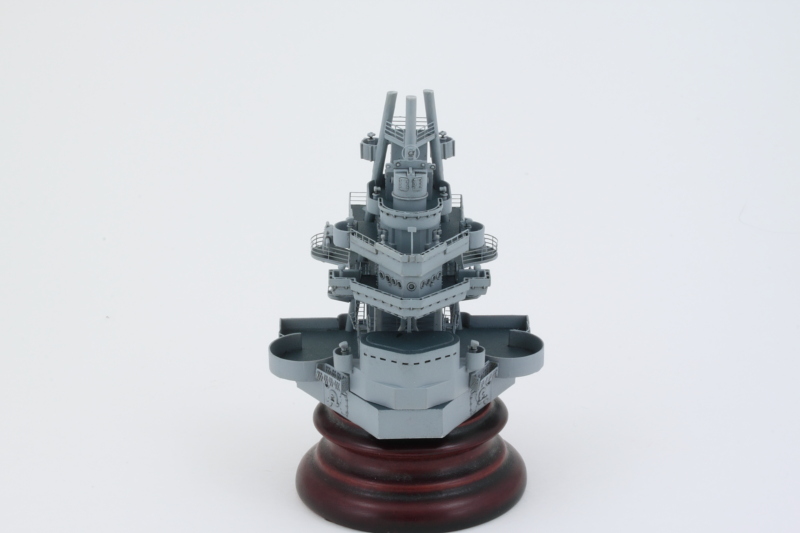
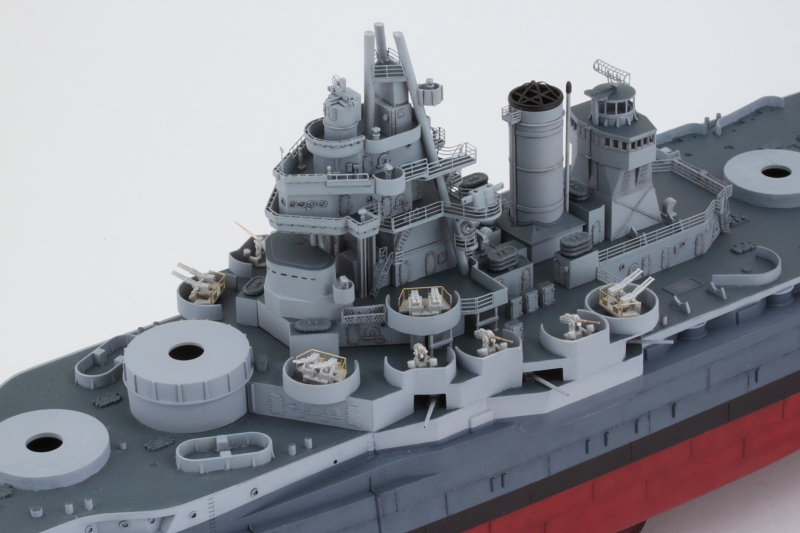
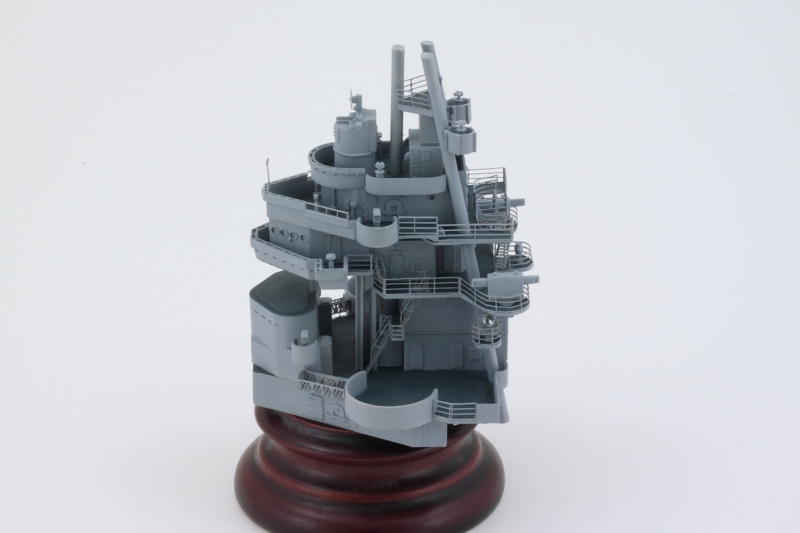
To that end, I added the two lookout stations near the top of the masts as well as the two spotlight stations at the bottom that are called out in Step 12. The whole reason I had waited to fix the masts in position was to ensure that I could get both of those features aligned properly, no easy task as they stick out at different angles relative to each other and different features on the rest of the superstructure.

I had to modify the bases for the searchlights slightly by thinning the rear portion somewhat so they would fit the slots in the mast legs properly. I also drilled out the solid faces of the searchlights so they would have more depth to their finish. A bit of Silver enamel paint did the trick for their reflective inner faces. The railings called out in Step 13 that protect their little platforms were very tricky to shape properly as the two platforms aren't quite the same shape and the railings also interact with the mast legs. I had shaped the railings before I added the platforms to the legs and the railings were gently slipped into position and then glued down with CA. Again, this is a maneuver that would've been virtually impossible IMHO if the superstructure had already been attached to the deck as the instructions would have you do it.

For good measure, I also added the railings and floater net basket PE parts that are called out in Step 13. I had deliberately waited a while to add them as they sit in a spot that gets a lot of handling while adding the other stuff with the superstructure levels. Last but not least, I test fit the superstructure once more on the hull, adjusted the height of the tripod legs slightly, and then secured the legs into a permanent position with the little platform E37 from Step 10. The starboard leg needed a little coaxing to pull into the correct alignment so some patient use of finger pressure was called for to keep it in place until the glue grabbed enough to do the job. The three little sections of railing that are called out in Step 16 were added to top it off.

Image

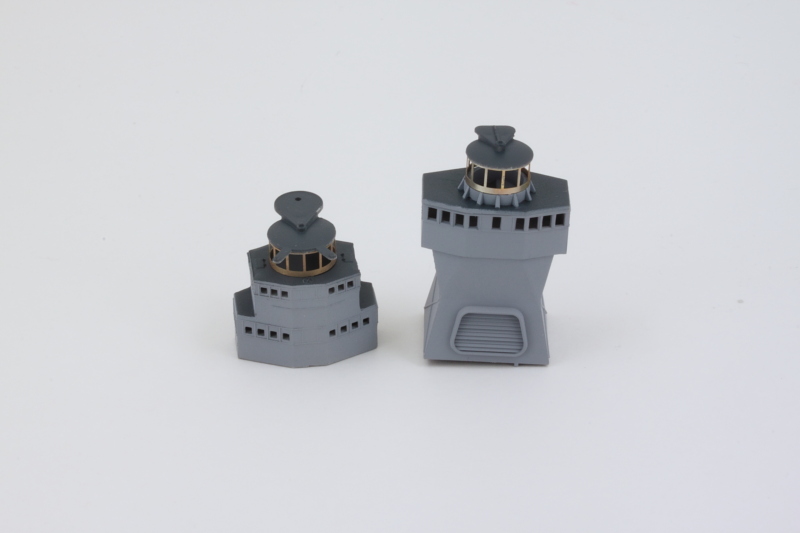
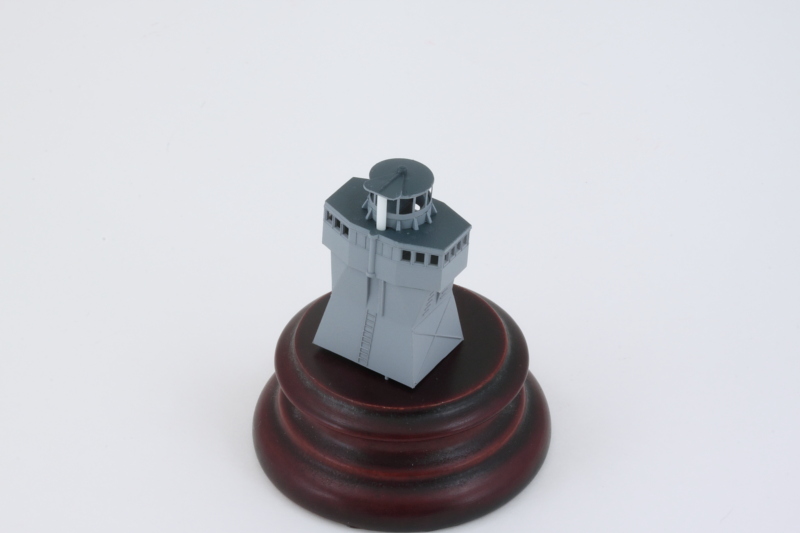
Whew! After all that, I've finally completed all the stuff called for in the first 16 steps of the instructions. Before I had committed to the tripod masts getting locked into place, I had knocked together the main part of the fighting top so I could check one more time that the legs were all lining up properly. Here's how it will look with the hull later on when the top is added.

Image

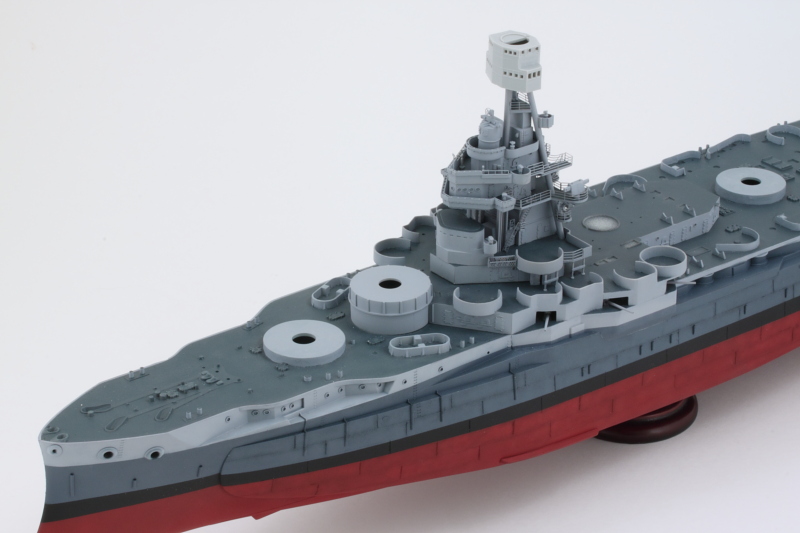
Still a lot more to do on this one, I'm still debating on just how far to go with the fighting top before installing it as it's got a lot of complicated PE and snaggable parts that go into its assembly. Have to give it some thought vs. the other areas of the ship that still need a lot of detail attention.
Bill Plunk
Posts: 1245
Joined: Wed Sep 28, 2022 10:18 pm

WIP 10-09-2015

Post by Bill Plunk »

In keeping with the modular approach I've been taking with the superstructure, I decided to go ahead and give the main structure a dose of Future so I could do some pin washing to bring out its details before it gets installed permanently. It's now curing as we've had a lot of humidity lately so I'll leave it a good 24 hours before I touch it for the pin wash treatment.

In the meantime, I turned my attention to the 02 deck other details. Most of these need a two-tone paint treatment to match up with the Measure 22 scheme, so I went through the instruction Steps 17-22 hunting for the different elements so I could make the most out of the airbrush sessions. Since the Carley floats/rafts were painted to match the Measure 22 patterns wherever they were mounted, I also cleaned them up and created the double and triple stacks where appropriate. Virtually all of the box-like structures were two-part assemblies, so they needed some careful sanding once glued together to remove their join lines. Part of the curse of having good reference photos to work from is that you keep finding stuff that you need to do! :)

Image
Bill Plunk
Posts: 1245
Joined: Wed Sep 28, 2022 10:18 pm

WIP 10-10-2015

Post by Bill Plunk »

With the Future coat fully cured, I set about applying a pin wash to the superstructure. I used a pointed 10/0 brush and used highly thinned Burnt Umber to bring out all the different access doors, details, etc. Went back over it with some clean thinner to tighten it up where needed and then sprayed a coat of MM Lusterless Flat in the spray can to eliminate the Future's residual gloss.

Image

Image

That means the superstructure is now ready for final installation. The only thing missing from the conning tower deck level are the twin 40 mm AA guns that go in the tubs, those will get added after the whole thing is attached to the deck as the tubs have been serving as my main handle point up until now.

I also got the airbrush out and applied the Deck Blue to all the stuff I worked on yesterday. Once that sets up, will mask it off and then airbrush the Haze Gray portions.

Image
Bill Plunk
Posts: 1245
Joined: Wed Sep 28, 2022 10:18 pm

WIP 10-12-2015

Post by Bill Plunk »

As a follow-up to the previous airbrush session, I masked off all the Deck Blue areas and airbrushed the Haze Gray as needed. The secondary tower that sits aft of the funnel had the most complicated surface to deal with, all the others were pretty straightforward. I've been spending plenty of time with my trusty roll of 3M blue painter's tape that's for sure! ;) In anticipation of the session, I went ahead and assembled the funnel tube as called out in Step 26 and carefully sanded down its join seam. Most of it gets hidden by a pair of pipes, but enough of it is still visible that it requires some attention regardless.

Image

The masking tape came off and only a little touch-up was needed in a couple of spots. I applied some Flat Black to the top of the funnel and installed it after also painting the inside of the tube with Flat Black to give it depth and avoid bare plastic showing up beneath it. The little 'starfish' grate comes as a flate piece of PE and getting it bent into shape is an exercise in patience but adds a nice detail. The two front vent pipes on the funnel had solid faces so I drilled those out to give them a little better detail.

Image

Still slogging away on the rest of the 02 deck details a little bit at a time but not enough yet to justify their own photo. The fighting top and secondary tower both need their PE roundhouse structure added along with the tops and antennas as well, plenty to keep me busy!
Bill Plunk
Posts: 1245
Joined: Wed Sep 28, 2022 10:18 pm

WIP 10-13-2015

Post by Bill Plunk »

I didn't have a huge amount of bench time today but did make the most of the hour or two that I could squeeze in. One of the most challenging things in the world of PE IMHO Is turning flat pieces into perfectly round shapes. This is doubly hard when the round shape isn't solid and has to be perfectly round at both top and bottom to fit properly.

Such is the case with the two 'roundhouse' structures that sit atop the fighting top and secondary tower. I decided to tackle them both today and the amount of metal at the top of the PE piece is thinner than at the bottom. As a result, I focused on shaping the bottom thicker part first and then worked on getting the top shaped correctly. Lots of back and forth with a round shaping tool, tweezers, and very careful use of needle nose pliers. I even pressed a tube that holds a finger drill into service since it had almost the exact same diameter on its bottom end. The parts were carefully annealed as well to avoid the thinner parts from incinerating/fragmenting, they are that delicate. Here's the bending arsenal employed.

Image

In order to keep things easier for painting, I only attached the PE to the top parts with CA after dry-fitting them to their respective elements and adding the little half-moon post that supports the deck on the fighting top.

Image

Some careful work with a detail brush and the Optivisor and they were all painted up and permanently added. I used the Gator Grip thin blend to mount them to the bases to give me a little bit more flexibility to ensure their placement vs. using CA. For good measure, I also added the little PE railing and painted it up on the funnel so it could sneak in as a cameo once more. ;)

Image

One thing that kind of jumped out at me is that at the back of the secondary tower there are molded slots/impressions that make it look like something should go there to complete the whole roundhouse/roof arrangement. Sure enough, when I checked reference photos, there should be a support there but for whatever reason Trumpeter doesn't include it in the kit. I hunted over all of the sprues with no luck in finding anything remotely resembling what should go there, so I scratched up a suitable part using a short length of 1.5mm diameter styrene rod. The rod had to be shaped to fit the half-moon impression and accommodate the back of the roundhouse, but was a relatively easy fix. The omission by Trumpeter is an odd one for sure...in all of the follow-on diagrams from Step 26, nothing is shown as occupying that space but yet the molded in slots are clearly there. Maybe someone just forgot the part design completely in the layout? Who knows... :)

Image


Both the fighting top and secondary tower top still need the radar antennas and the fighting top still has a lot more little details that go with it. One step at a time!
Bill Plunk
Posts: 1245
Joined: Wed Sep 28, 2022 10:18 pm

WIP 10-15-2015

Post by Bill Plunk »

Today's efforts focused on getting the various 02 deck level stuff that I've been working on here and there finally pulled together and installed. First up, I permanently attached the superstructure and added the box structure/raft combos called for in Step 19.

Image

That was essential as the rest of the stuff interacts with the rear of the superstructure in Step 22. I also added all of the ammo lockers and ventilators called out in Step 20. The ventilators are molded solid, so I carefully drilled out their openings and shaped them with a square needle file tip. The three smaller ones are particularly prominent and it makes a difference from a detail perspective plus it was a little fun to add just because I could. :) The small PE railing and pair of ladders called out in Step 27 were also added now that everything is able to be connected up with the superstructure.

Image

Last but not least, I worked on the PE radar antenna that sits on top of the secondary tower. It was added to the structure and I did a test fit with the tower and funnel just to be sure everything is playing nice. These are still loose so that I can apply their pin wash treatment separately before final installation as they create some pretty tight/complicated spaces when they are placed on the deck.

Image

Next up will be tackling the railings and ladders that interact between the main deck and this one and then it will be another round of Future and pin wash action before those areas become inaccessible.
Bill Plunk
Posts: 1245
Joined: Wed Sep 28, 2022 10:18 pm

WIP 10-16-2015

Post by Bill Plunk »

Today's efforts are brought to you by the letters P & E and C & A. :) I focused on getting the 02 deck railings and ladders in place for the aft portion of the deck as called for in Step 28. Even though the instructions would have you do this after the funnel, secondary tower, and whale boats are installed, that really makes things a lot tighter in terms of space consideration, so I did it in the reverse. I added the side railings first, then the two ladders at the rear, and finally the last section that includes a pair of floater net baskets. That gave me the most flexibility in ensuring that all those components worked together seamlessly.

EDIT NOTE: Later in the build when working on the #3 turret, it became apparent that the last section of railing + floater net baskets creates a clearance issue for the seaplane catapult that required the railing and baskets to be removed. Don't install these if you want the #3 turret to be posed correctly with the gun barrels centered on the hull. ;)

Image

Image

Now I can apply the Future to the 02 deck, funnel, and tower to get them ready for a pin wash and final install before moving on to the next challenge. :)
Bill Plunk
Posts: 1245
Joined: Wed Sep 28, 2022 10:18 pm

WIP 10-18-2015

Post by Bill Plunk »

After applying some Future via airbrush, I set to work with the Burnt Umber pin wash treatment for the 02 deck, the secondary tower, and the funnel. Same process as that used on the superstructure followed by a coat of Lusterless Flat to knock down the gloss and seal it all in.

Image

Image

The installation of the funnel is a little tricky...the location ring is keyed to the round funnel base itself and not the little boxy structure that surrounds it. I slid the box up a bit, used some liquid glue in the mounting ring on the deck, and made sure the funnel itself was positioned properly before sliding the box back down and permanently gluing it in place with liquid glue. The secondary tower was a piece of cake by comparison and both are now permanently attached to the 02 deck.

Image

Next up will be spending some time with the AA guns that populate this particular area of the hull I think.
Bill Plunk
Posts: 1245
Joined: Wed Sep 28, 2022 10:18 pm

WIP 10-19-2015

Post by Bill Plunk »

For today's effort, I went back in time all the way back to Step 4 in order to work on some of the 3-inch AA guns that go in the tubs around the 02 deck. On the surface this seems like a simple affair but the reality is a little more complicated. The step directs you to make 12 guns but in reality only 10 are needed, so that gave me a couple of spares to play with if necessary. I decided to go ahead and do a test with the Master turned brass replacement barrels and they look a lot better in all respects than the kit parts. The kit guns are too large scale-wise, are molded solid, and don't taper, so I carefully removed the barrel from the breech portion, drilled out a mounting hole with a #78 finger drill, and glued in the replacement barrel with CA. Rinse and repeat for a total of 6 times to get the needed guns for this area.

Image

Now that I had the breech/barrel combos ready, I needed to assemble the rest of the gun mounts. The pedestal supports have a step on the base around the support pin that would cause them to not sit level, so that had to be carefully sanded down with a sanding twig. The swivel pins at the top of the mount are a nice idea but not strong enough to take the force required to push the breech/barrel part into place. The pins invariably snapped off, but enough of a nub was left on either side to still support the gun enough that it wasn't a total disaster. It does mean that the guns would have to be glued in a permanent elevation due to the brass barrel weight.

Once I did that and allowed the guns to set up enough to tolerate some handling, I added the mount side extensions one side at a time to each of the 6 guns. It's important to take some time here as their attachment points aren't large, so I did a kind of merry-go-round process from one gun to the next adding one part at a time to avoid it all coming apart if I tried to do the entire mount assembly per gun in one shot.

Image

Next up will be spending some time on the 6 twin 40mm AA guns that go in the remaining empty tubs. Interestingly it's clear that Trumpeter took a little shortcut here...the two forward tubs have mount holes in them to take a 3-inch gun as was the case on USS New York while the rear tubs have a raised mount peg that's meant for the 40mm gun bases. The middle tub that's part of the conning tower deck has neither! :)
Bill Plunk
Posts: 1245
Joined: Wed Sep 28, 2022 10:18 pm

WIP 10-22-2015

Post by Bill Plunk »

I've been working on getting the 6 quad-40mm guns that populate the tubs around the superstructure. These are 8-part assemblies that are called out in Step 4 and they go together reasonably well but, just like with the 3-inch guns, a 'merry-go-round' approach helps ensure that the parts have a chance to set up a bit to avoid any mishaps. The PE frame/railing that goes around the back has to be bent to shape just so for it to sit properly and also makes the final assembly a little more delicate to handle. The connection points on the elevation mounts aren't perfectly round so if you want the guns to sit level, some modifications would have to be made. I like having mine partly elevated such that they look like they are in action so it wasn't a big deal. You do have to work a little bit to get the barrel pairs elevated together at the right height as they won't naturally sit that way otherwise.

Image

I put the guns into their tubs to ensure that they all sat at pretty much the same elevation height and 'looked right' together in place. I let them sit overnight before handling them any further for painting purposes.

Image

After looking at reference photos, if the guns were stowed they had canvas slip-covers over them that were Deck Blue as were the crew platforms and railings. That meant getting out the airbrush and going to work with it first before hand painting and detailing the rest. The guns themselves and the elevation mounts were Haze Gray and the recoil springs were picked out with MM Metalizer Gunmetal with the help of the Optivisor.

Image

I still need to do some paint work on the 3-inch guns to get them ready for installation as well. There are 4 20mm guns that go into the tubs forward of the 02 deck that I might as well get out of the way too while I'm at it.
Post Reply