Trumpeter 1/350 USS Texas BB-35 (2015)

Bill Plunk
Posts: 1245
Joined: Wed Sep 28, 2022 10:18 pm

WIP 11-22-2015

Post by Bill Plunk »

Not a huge amount of bench time available today but did manage to make some additional progress. First up was the application of a pin wash to the mainmast tripod structure followed by a Lusterless Flat treatment so it will tie in with the rest of the ship.

Image

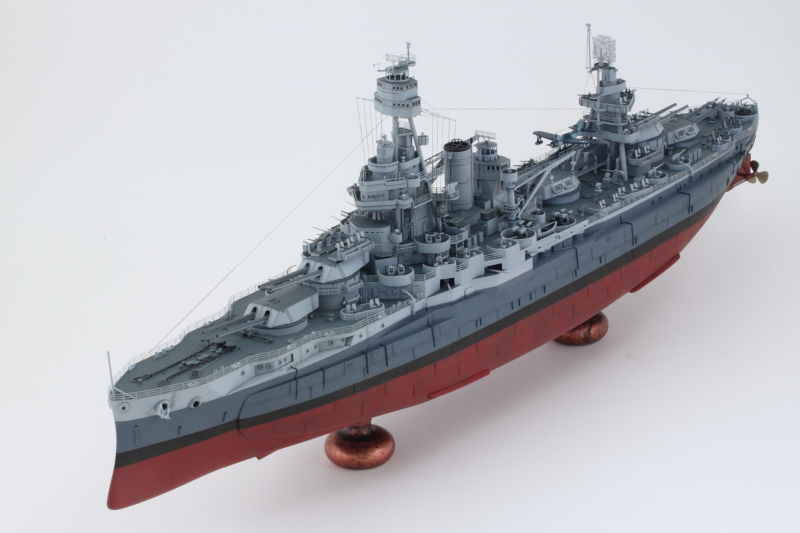
While that was drying, I decided to tackle the yardarm rigging for the foremast. For this task, I used some EZ Line Fine Black elastic thread that I had on hand from my last rigging endeavor on the HMS Dreadnought.

Image

Due to the delicate nature of the yardarm, I wanted to avoid placing too much tension on it so that concern was paramount throughout the process. I cut long lengths of the EZ Line and attached the end first to the yardarm so that they would hang loosely. A dot of CA applied with the tip of a toothpick to the arm itself combined with dipping the end of the EZ Line into some CA accelerator did the trick nicely. I attached only the innermost line first and used tweezers to gauge how long it needed to be and where it should attach on the 03 deck level. Then a small dot of CA was applied via toothpick to the deck and some accelerator brushed onto the loose end of the thread. Using tweezers, the end was positioned in the CA and held for a couple of seconds until it grabbed. Rinse and repeat and before long I had the 10 lines rigged and virtually no stress placed on the yardarm in the process. After the glue had thoroughly dried, I used a 10/0 detail brush to blend the ends of the lines back into the deck and yardarm as needed.

I'm very happy that it worked out as this is a prominent detail that would've been missing otherwise.

Image

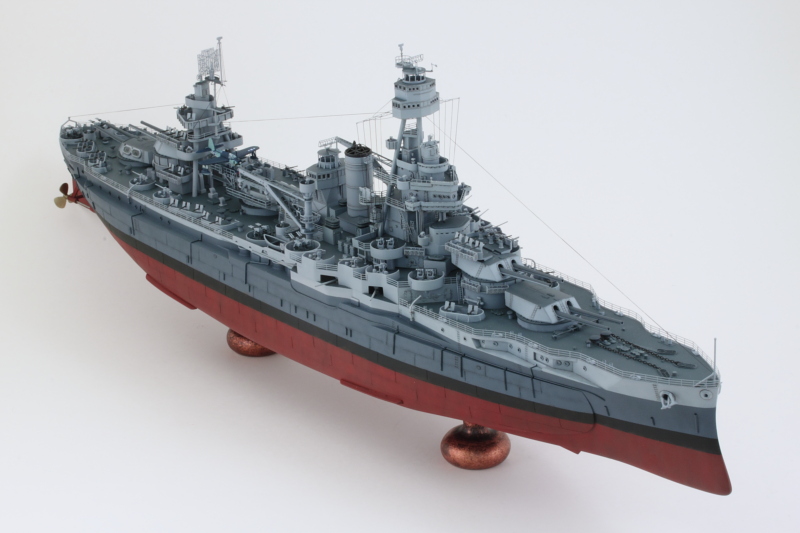
I'm still debating as to when I should run the remaining rigging lines between the two tripod masts and to the bow and stern. I'm thinking it might be best to hold off on doing that until after I get the rest of the guns along with the railings installed. That way I can keep stuff removable and decrease the likelihood of an unfortunate accident in the remaining stages.
Bill Plunk
Posts: 1245
Joined: Wed Sep 28, 2022 10:18 pm

WIP 11-24-2015

Post by Bill Plunk »

One of the more complicated parts of the PE suite on this build is the main deck railings, particularly for the bow areas. The kit provides standard straight lengths of railing for this on the C fret but they don't come with any bend lines, so all the shaping that is needed is up to the builder. :) They are reinforced at several spots with thicker vertical bars so that helps prevent distortions in the shaping process thankfully and makes them less delicate on the whole.

Image

The lengths aren't quite long enough to cover the whole section of deck from the bow up to the 02 deck bulkhead, so I started at the bow first where both sides need to meet and worked my way back from there. Most of the shaping involves curves vs. straight angles so there was a lot of careful tweaking in the various spots to get it right. Once the shape was done, the rails were hand painted with Haze Gray and then carefully glued down with CA a little bit at a time. I used the #11 blade knife tip trick to get glue into tight spots and then carefully pressed the railing down until the CA grabbed before moving on to the next spot.

After both sides were on, some careful touchups were done where needed. I clipped off some small sections of the railing that I had salvaged from the 02 deck area due to the catapult conflict issue and used those to fill the remaining little area that was missing railing due to the short length of the single run sections. The small supply cranes were painted and added as well. Last but not least, I ran the EZ line rigging from the base of the fighting top out to the jack staff to complete the day's effort.

Image

Image

It's worth noting that the railings don't provide any openings for the rope cleats. After shaping the railings, the places where openings would've been had vertical bars running through them, so I elected not to open up the railings as that would've caused some major structural issues with the railing itself if I had. Not a huge thing and something I had been aware of back when I originally fitted the cleats to the deck but had held out a little bit of hope that it might be possible. ;)
Bill Plunk
Posts: 1245
Joined: Wed Sep 28, 2022 10:18 pm

WIP 11-25-2015

Post by Bill Plunk »

Doing my best to knock out the remaining details one at a time! Next up was adding some rigging to the rear tripod mainmast. The fact that the kit doesn't include a yardarm for this like it should complicates things a little but I did the best I could under the circumstances. The toughest part is rigging the extended mast antenna that sticks up above the bed frame radar antenna on the PE platform. It's not a very sturdy setup but adding the rigging helps keep it stable ironically...so if you can pull it off, it helps but getting there is a challenge in its own right. :) I also ran the long diagonal line that connects up the fighting top with the main mast to complete the rigging.

Image

That meant it was time to finally secure the boat cranes. To do that I added glue to their bases and then enlisted some trusty paint bottles to help brace the ends until the glue set so they would stay vertical. The #3 turret was temporarily removed to help facilitate this.

Image

Once the glue had set solid, some touchups with the deck blended them in together and I added the 2nd pair of whaleboats into their racks along with the final set of floater net baskets.


Image

Getting close to the final stretch in terms of the AA guns that need to populate the rear deck tubs and the railings for the stern half of the main deck. Hope everyone has a Happy Thanksgiving tomorrow! :)
Bill Plunk
Posts: 1245
Joined: Wed Sep 28, 2022 10:18 pm

WIP 11-27-2015

Post by Bill Plunk »

Texas is armed to the teeth as you might expect for the end of WW2 type configuration and there are no less than 29 AA gun configurations that need to be installed onto the rear half of the main deck. These are called out in Step 25 for their installation while Step 4 has their individual assembly with the exception of the special swivel mount 3-inch gun that is dealt with in Step 24.

First up were the 3-inch guns that had their barrels replaced with the Master turned brass barrels. I clipped off the styrene barrels past the recoil cylinder with sprue cutters then trimmed back the remaining nub with a #11 blade tip. A #78 microdrill started the mount holes for the barrel pins and a #76 widened it once I had it centered as needed. Some CA and careful alignment and the barrel swap out was complete.

Image

Then the 4 remaining quad-40mm guns were assembled. The bases were done first then the barrels added last to ensure a solid base to work from and get them all aligned at the right elevation.

Image

Then the big batch of 20 guns was left, the individual 20mm guns that go into the tubs all along the outer edge. These were handpainted first and then the PE splinter shields added to complete their assembly.

Image

I just need to do a little bit of airbrush work on the 3-inch and 40mm guns and then I can get all of these added.
Bill Plunk
Posts: 1245
Joined: Wed Sep 28, 2022 10:18 pm

WIP 11-28-2015

Post by Bill Plunk »

Coming down the home stretch now as there's not a whole lot left to do on Texas to get her finished up. First order of business in this session was getting the railings on the stern. This is more easily accomplished without all the guns installed as the instructions would have you do it simply because the lengths of railing provided on the C fret aren't long enough on their own to do it all. This means you have to splice some sections together towards the stern and having room to fiddle with that makes the whole process a lot smoother. I followed the same drill as with the bow railings, shaping them first and then hand painting prior to installing with CA. The #4 and #5 turrets were still movable at this stage as well to help with keeping them out of the way when necessary.

Image

The AA guns that I worked on yesterday got their airbrush treatment with the 40mm guns getting a dose of Deck Blue and then hand painted for the rest of their details. I started with the forward tubs and installed the 40mm and 3-inch guns first so I could get them lined up the way I wanted with tweezers and gentle persuasion. Once they had set, the 20mm guns came next. I then added the small supply cranes and drain pipes that are called out in Step 23 to the hull sides and painted them to match the Measure 22 scheme on the hull as needed.

Now that everything was in place and setting up, I no longer needed the #4 and #5 turrets to be loose so they were glued down into their final positions. As a last added detail, I ran the final stern rigging line using the EZ line and CA combo.

Image

Image

All that's left now is to get the propellers done and installed along with the drive shafts.
Bill Plunk
Posts: 1245
Joined: Wed Sep 28, 2022 10:18 pm

WIP 11-29-2015

Post by Bill Plunk »

While not a huge leap forward, it's still an essential element to cross off the list towards getting Texas finished. Going all the way back to Step 3, I permanently attached the rudder and then added the brass drive shafts for the propellers with some CA added to their bases. The shafts themselves were hand painted with Model Master non-buffing Metalizer Steel. For the propellers, I made sure to keep them separated right vs. left as they are handed and airbrushed them with Model Master non-buffing Metalizer Brass. The propellers were added to the hubs and drive shafts with some CA to complete the installation.

Image

With that done, I airbrushed a coat of Future over the entire lower hull so that it could sit and cure overnight before I add the final weathering touches there. At the same time, I completed one of the most challenging decal markings schemes I've encountered in recent memory. ;)

Image

If all goes to plan, tomorrow will see the final touches added!
Bill Plunk
Posts: 1245
Joined: Wed Sep 28, 2022 10:18 pm

Completion 11-30-2015

Post by Bill Plunk »

Today was a busy and productive day! The best part is always saved for last and this one's no exception. I wanted to add a little bit of weathering to the hull on Texas so I started by applying a dot filter using Model Master enamel Burnt Umber, Leather, and Rust. I worked in small sections, roughly two hull plate sections at a time, and wore a breather mask due to the heavy use of thinner in this type of effort.

Image

After about 2 hours of effort, I had some nice streaking/variation in the hull red.

Image

Next order of business was to apply a pin wash of Burnt Umber to pick out the portholes and other details on the hull exterior. Same drill as always, a 10/0 pointed brush to apply followed by clean thinner to tighten it up where needed.

Image

The propellers were given an overall wash of Burnt Umber to tone down the bright brass look and get them closer to a bronze appearance.

Image

The Kingfisher needed to be attached to the catapult and this is an exercise in patience due to the very small contact surfaces available on both the catapult surface and the bottom of the main float pontoon. I carefully sanded down the bottom of the pontoon a bit to increase the surface area a little and then applied some Gator Grip Thin Blend to the bottom. This wasn't to actually glue it down, but rather to give me a marker on the catapult surface so I knew where to apply the CA. The moment of truth arrived and the Kingfisher was finally home to roost!

Image

Leaving the #3 turret off to avoid fogging up the Kingfisher, I sprayed some MM Lusterless Flat to knock down the remaining gloss from the Future and tie in all of the filter and pin wash treatment. I was careful to do quick light passes and let each one dry before making another to avoid any issues with the EZ line rigging.

Image

The #3 turret was glued down in place permanently to complete the main battery.

Image

All that was left to do was attach the display base supports. These are a pair of nice aged copper drawer knobs that I picked up at my local Lowe's for a song. They were screwed into the lower hull courtesy of the holes I'd drilled way back earlier in anticipation of this moment.

Image

And with that, Texas is done! Hope you enjoyed the voyage with me! :)

Image

Image

Image

Image

Image

Image

Image
Bill Plunk
Posts: 1245
Joined: Wed Sep 28, 2022 10:18 pm

Publication October 2016

Post by Bill Plunk »

This build is also featured in the October 2016 issue of FineScale Modeler Magazine.

Image

It is also included in the FineScale Modeler special issue Build Better Ship Models

Image

Image
Post Reply