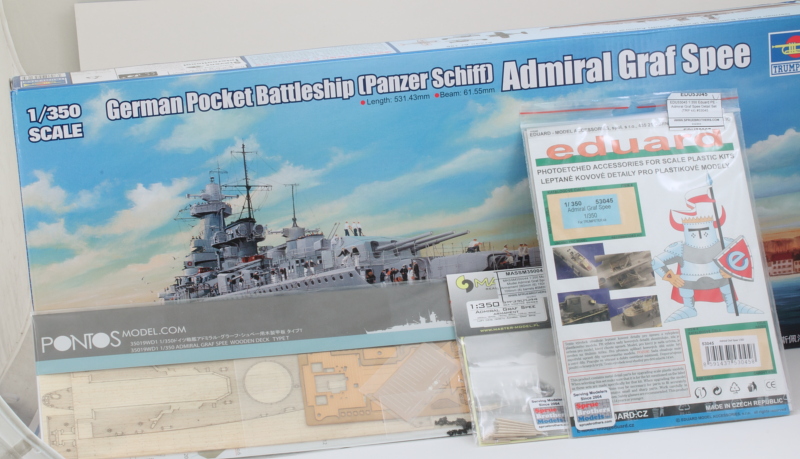
Trumpeter 1/350 German Pocket Battleship (Panzer Schiff) Admiral Graf Spee (2017)
-
Bill Plunk
- Posts: 1245
- Joined: Wed Sep 28, 2022 10:18 pm
Trumpeter 1/350 German Pocket Battleship (Panzer Schiff) Admiral Graf Spee (2017)
Build log for the 1/350 Trumpeter kit #05316 German Pocket Battleship (Panzer Schiff) Admiral Graf Spee using Eduard PE, Master turned brass barrels and Pontos wood deck set.
-
Bill Plunk
- Posts: 1245
- Joined: Wed Sep 28, 2022 10:18 pm
WIP 06-15-2017
Work has begun on getting the hull ready to go and the first order of business is a little tedious but worth it for the result it provides. The portholes along the hull sides aren't molded very deep, so I decided to drill them out with a #70 finger drill to improve their look. The top row was drilled out completely since the plastic is thin there to accommodate the deck plating that will install later. That plate will provide a backing for the opened holes, so no issue there. The bottom row has thicker backing so they were only deepened to avoid creating any see-through problems with the holes on the opposite side.
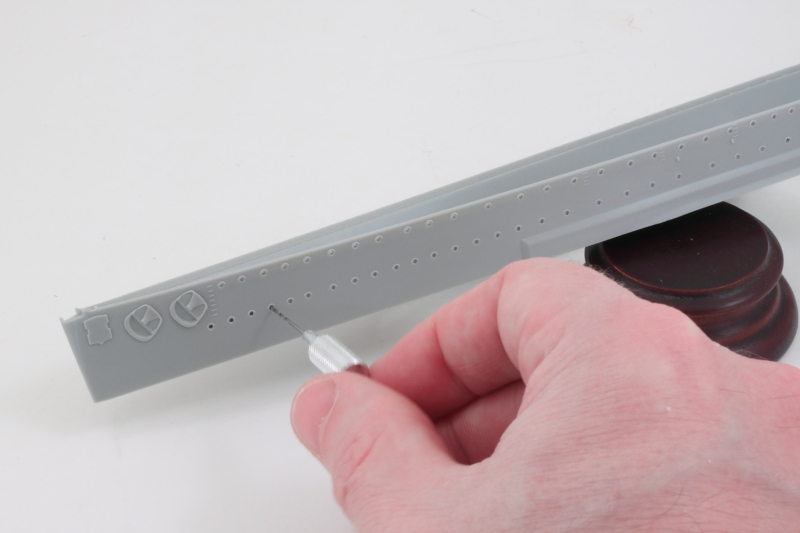
Trumpeter provides the hull separate from the bottom to give the option of either full-hull or waterline construction and that also helps with manipulating the hull and holding it while doing the drill-out work. There are 185 portholes per side, so it's a bit time-consuming to get them all done. The payoff will come in the end with the painting and finishing process though as a test-fit with the deck plate shows that the effort does increase the look of the detail significantly.
One side down, one to go!
-
Bill Plunk
- Posts: 1245
- Joined: Wed Sep 28, 2022 10:18 pm
WIP 06-18-2017
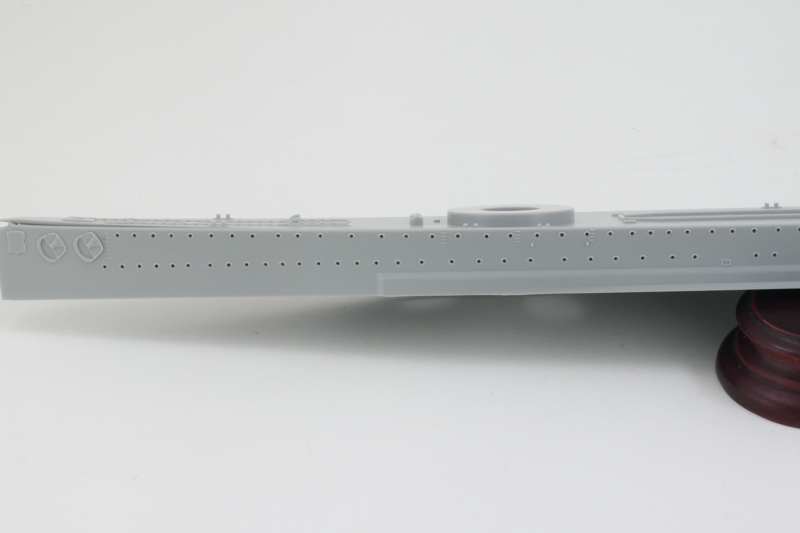
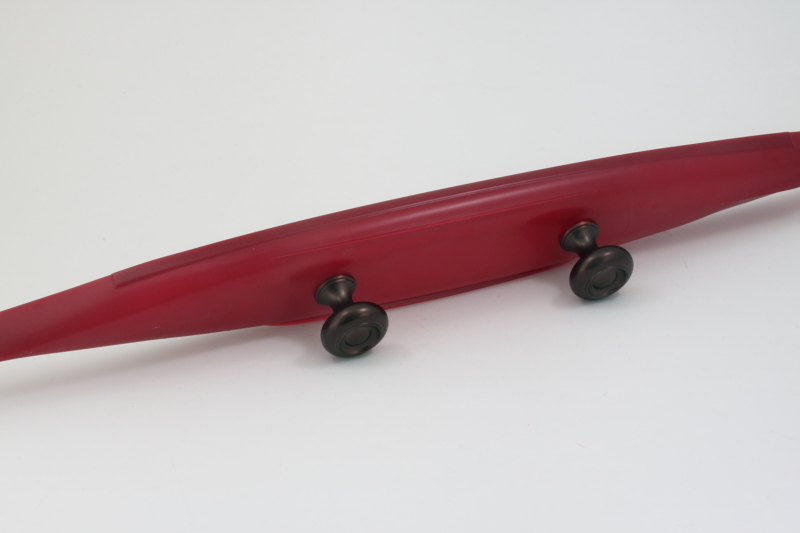
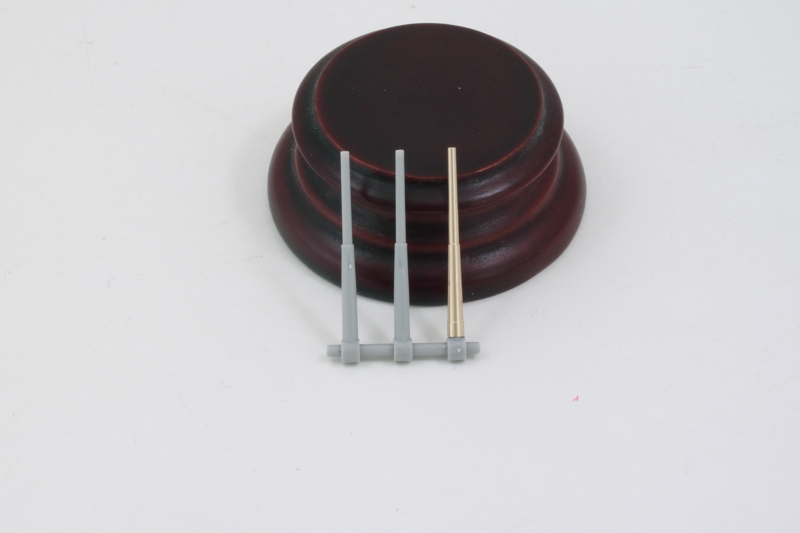
Father's Day provides the perfect excuse to make some more progress on the Graf Spee! I got the other side's portholes drilled out making a grand total of 370 in total and I can honestly say I'm glad to have that over and done with. That meant I could move on to the rest of the lower hull. The kit provides either a waterline or full-hull option and I'm going with the full hull. The kit's included stand leaves something to be desired, so I used a set of bronze drawer knobs from Lowe's instead. Holes were drilled out using a Dremel and similar-sized bit and the holes carefully enlarged with a #11 blade to take the threaded bolts. The bolts and knobs are removable for now to make it easier to paint the hull and will get permanently installed later.

I'm not sure why the Trumpeter instructions wait to the very last step of the build to attach the hull halves together. Even if you were doing the waterline version, it would make sense to have that solid before working with the deck plates and all the other details, but then kit instructions don't always have to be logical! Regardless, I went ahead and attached the hull to the upper portion and dry fit the deck plates so that the rubber bands would have something solid to hold onto and avoid causing any buckling of the top edge while the glue set. The fit of the hull halves is pretty solid, the only areas to watch out for are the bow and stern where there's a little bit of play that can cause things to slide out of sync if you're not careful.
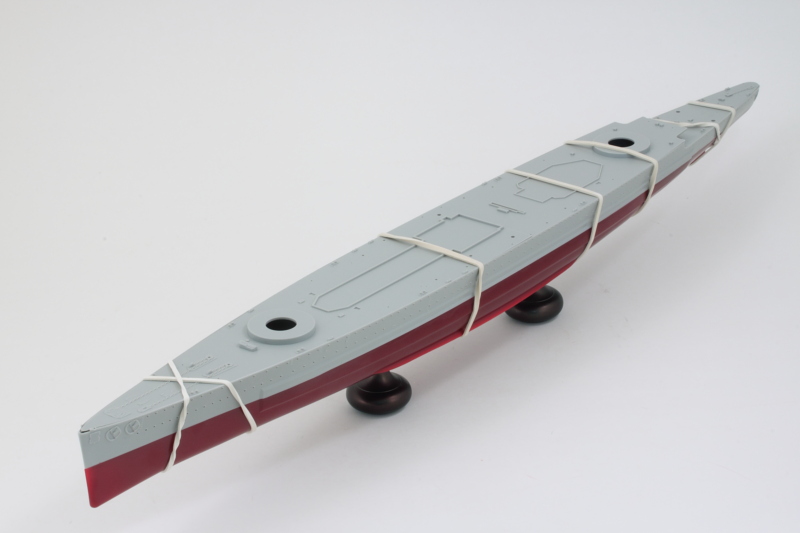
Once the glue has set up, I'll remove the bands and lightly sand the join line to make sure everything is lined up nice and smooth.
I'm not sure why the Trumpeter instructions wait to the very last step of the build to attach the hull halves together. Even if you were doing the waterline version, it would make sense to have that solid before working with the deck plates and all the other details, but then kit instructions don't always have to be logical! Regardless, I went ahead and attached the hull to the upper portion and dry fit the deck plates so that the rubber bands would have something solid to hold onto and avoid causing any buckling of the top edge while the glue set. The fit of the hull halves is pretty solid, the only areas to watch out for are the bow and stern where there's a little bit of play that can cause things to slide out of sync if you're not careful.
Once the glue has set up, I'll remove the bands and lightly sand the join line to make sure everything is lined up nice and smooth.
-
Bill Plunk
- Posts: 1245
- Joined: Wed Sep 28, 2022 10:18 pm
WIP 06-21-2017
After letting the hull set up nice and solid, I removed the rubber bands and the temporary deck plates. Overall the fit and join line of the upper and lower hull are pretty good, it just needed some light sanding to smooth things out along the length.
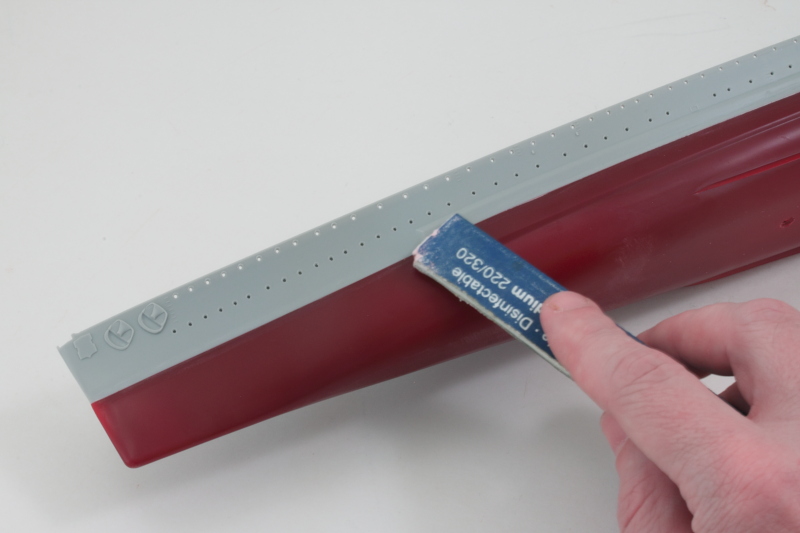
The mold lines on the bottom hull also needed some attention. These were removed using a combination of a #11 blade in the delicate/small areas and sanding.
That cleared the way for the installation of the propeller shafts and mounts at the stern. The support posts are smaller than the cut-outs in the hull for the top mount points so those required a little bit of putty-and-sanding work to fill in but otherwise was uneventful. The rudder was cleaned up and test fit but will not be permanently installed until much later. Experience is a wonderful teacher and rudders invariably get knocked loose during the painting and handling process so it's better to just paint it now and then set it off to the side for safe keeping! The propellers themselves will also be dealt with at later date for similar reasons.
The hull is now ready for the major paint work to begin!
-
Bill Plunk
- Posts: 1245
- Joined: Wed Sep 28, 2022 10:18 pm
WIP 06-24-2017
Ships are always a little different when it comes to the major paint work steps, it's always a case of building a little, paint, build, paint, etc. until it all gets done. This is the first round of that back and forth as the hull represents the largest piece to deal with. I started by airbrushing a primer coat of Model Master enamel Flat Black over the entire hull. This does triple duty as a primer, a pre-shade, and also to help create the boot stripe. Masking tape along the hull top edge prevented any overspray on the deck plate join areas.
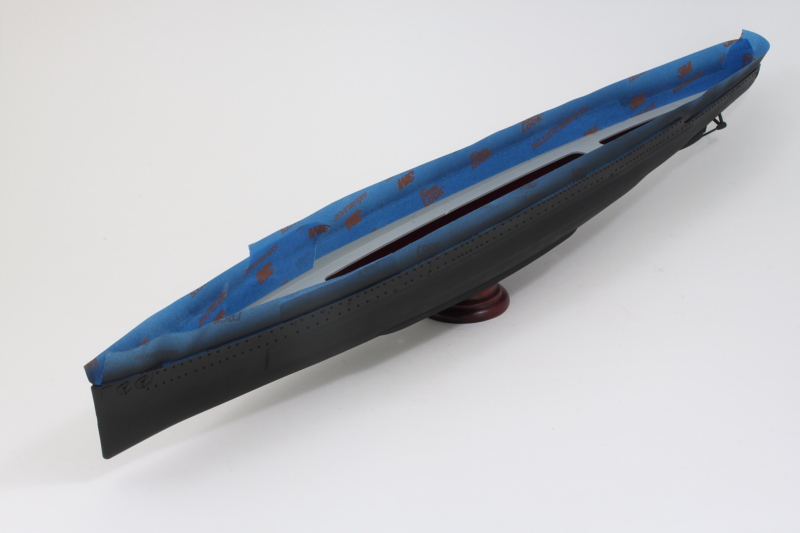
For the hull red, I airbrushed MM enamel Insignia Red over the Flat Black. This is built up using several thin passes and creates some nice tonal variation in the process.

I'll let that set up and then mask the top of the boot stripe so I can spray the gray for the upper hull portion next.
For the hull red, I airbrushed MM enamel Insignia Red over the Flat Black. This is built up using several thin passes and creates some nice tonal variation in the process.
I'll let that set up and then mask the top of the boot stripe so I can spray the gray for the upper hull portion next.
-
Bill Plunk
- Posts: 1245
- Joined: Wed Sep 28, 2022 10:18 pm
WIP 06-25-2017
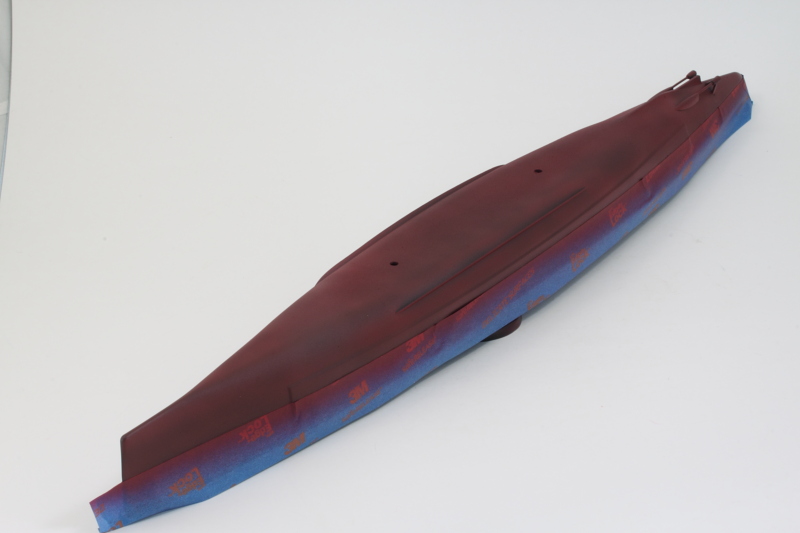
Creating the boot stripe is always a bit of a challenge with ships especially since the hulls curve. To help with that, I used a cutting mat and cut some 2-3mm wide strips of blue painter's tape and used that to mask off the top edge of the stripe. The width was aimed at giving me flexibility around the compound curves, particularly at the stern area, and not the desired width of the stripe per se. The bottom edge had been created earlier with the hull red work, so I was already half way there with the bottom edge. Larger strips masked off the rest of the lower hull to prevent any wayward overspray and I airbrushed some Model Master enamel Medium Gray to create the Dunkelgrau 51 (KM02) that Graf Spee wore in late 1939. Just as with the hull red, the Medium Gray was applied in multiple thin passes to build it up over the Flat Black primer coat.
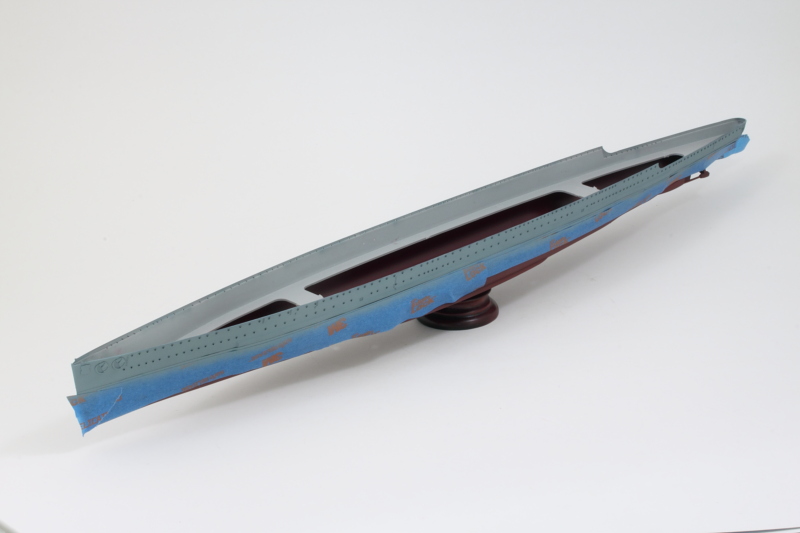
The moment of truth is always when the tape comes off! There was only one section that I needed to redo on the starboard side near the stern, so that was re-masked and some Flat Black airbrushed to solve the issue.
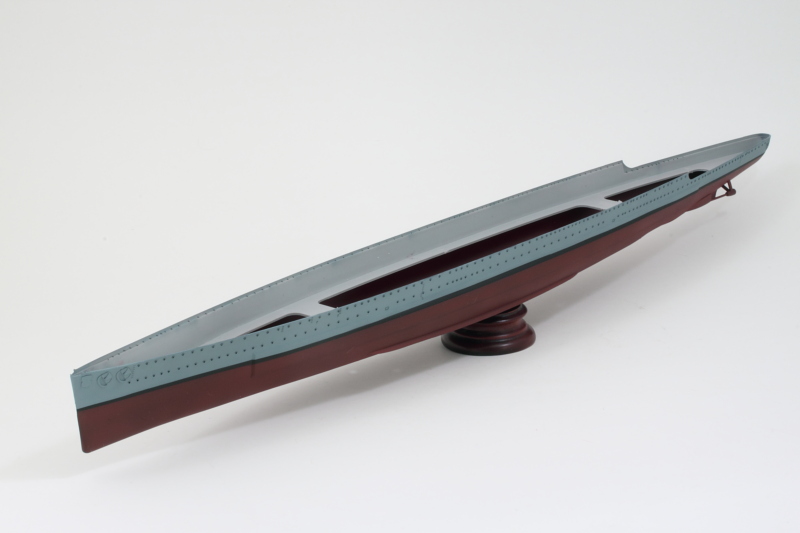
I'll let that cure a bit before adding the last bit in the form of a false bow-wave that was part of Graf Spee's camouflage. That's going to require some careful thought and additional masking so no hurry to get there just yet.
The moment of truth is always when the tape comes off! There was only one section that I needed to redo on the starboard side near the stern, so that was re-masked and some Flat Black airbrushed to solve the issue.
I'll let that cure a bit before adding the last bit in the form of a false bow-wave that was part of Graf Spee's camouflage. That's going to require some careful thought and additional masking so no hurry to get there just yet.
-
Bill Plunk
- Posts: 1245
- Joined: Wed Sep 28, 2022 10:18 pm
WIP 07-01-2017
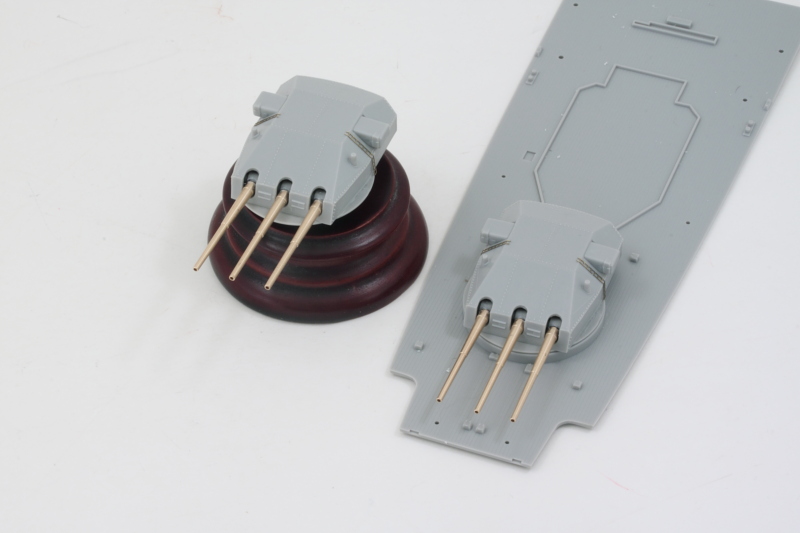
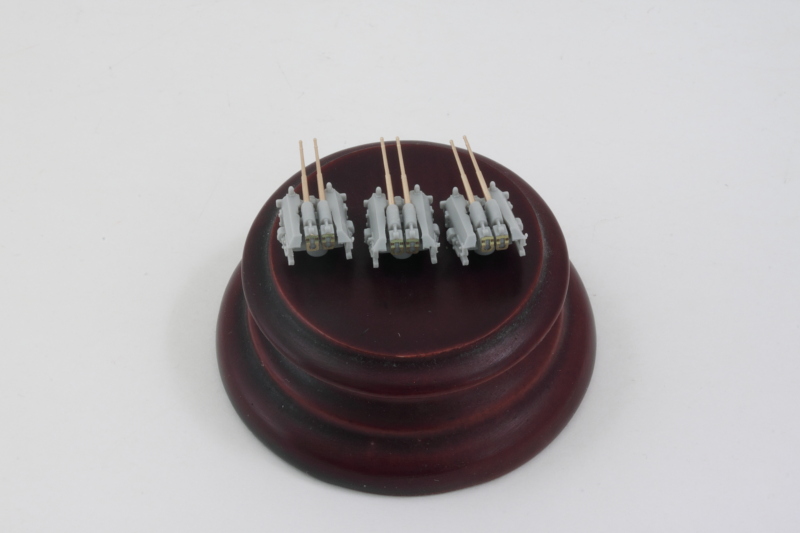
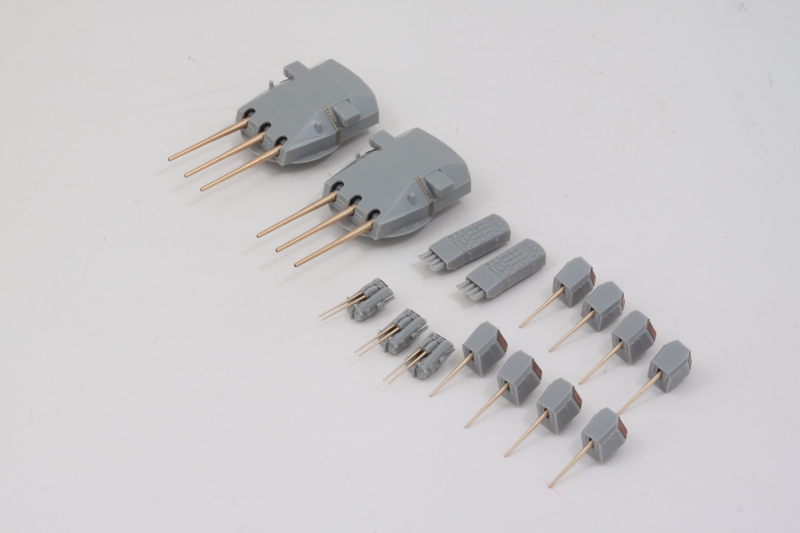
The first couple of steps in the kit's instructions involves working on various details as well as all the ship's AA, secondary, and main gun armament. I decided to tackle the big guns first since I knew they were going to involve the most work to swap out the kit barrels for the brass replacements. The triple mounts have each barrel separate with a single rod that passes through eyes connecting them all together to create the assembly that goes into the turret. The mount pins on the brass barrels would sit inside those 'eyes', so it was necessary to mount the plastic barrels to the rod first. The rod is designed to trap between the turret halves and allow the guns to elevate in unison, so I used the turret parts to help ensure that all 3 guns sat level with its neighbor. The rear portion and rod fit together with some wiggle room, so I had to be very careful with the liquid glue to make sure I didn't glue the rod accidentally to the turret traps in the process.
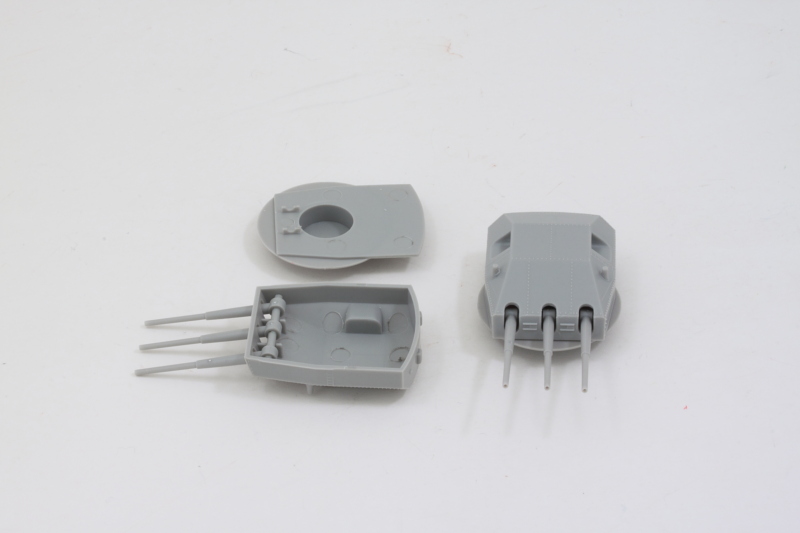
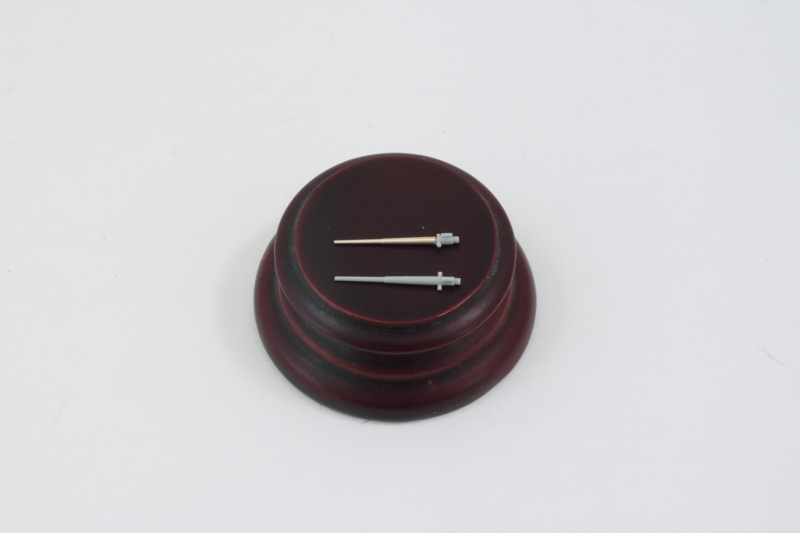
I let the plastic barrels set up overnight before working on replacing them with the brass barrels. I used a pair of sprue cutters to cut away the plastic barrel and lightly sanded the remaining nub that the brass barrel would need to attach to. I used a pin vise and drill bit to open up the 1mm diameter mount hole needed. The brass barrel was dry fit and tested for alignment with the fixed 2 remaining plastic barrels to ensure everything was lined up.
I removed the brass barrel, then repeated the process with the 2nd and 3rd barrels until all three mounts were ready to take their replacements. I used CA gel to give a little work-time and installed one barrel at a time, checking with the turret halves to make sure each one sat level.
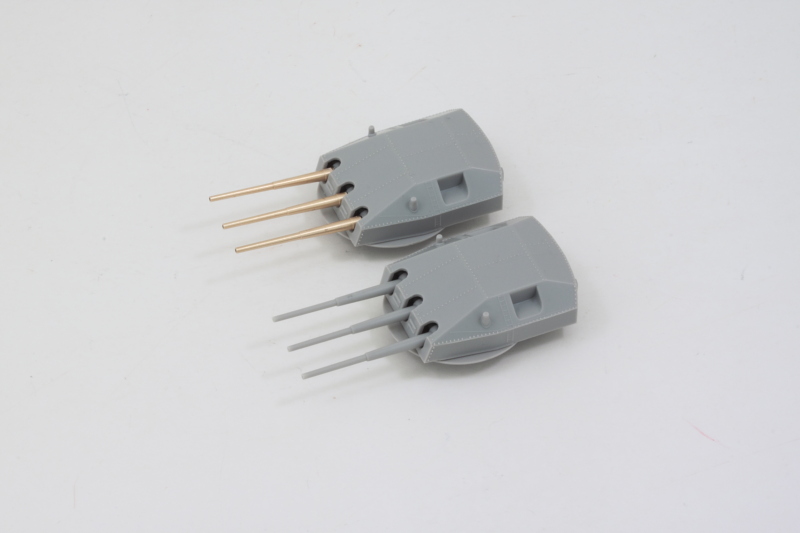
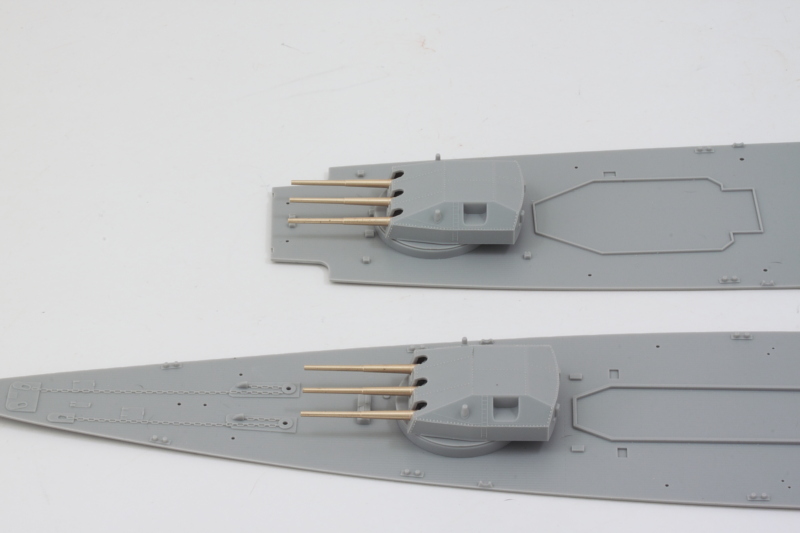
After I had both triple mounts done, I checked them with the decks they would install into to make sure they would sit properly and play nice with their surroundings.
With the barrels done and ready, next I'll work on removing some of the molded-on detail on the turrets themselves that will be replaced with PE parts from the Eduard set and then assembling the turrets all into single units for painting.
I let the plastic barrels set up overnight before working on replacing them with the brass barrels. I used a pair of sprue cutters to cut away the plastic barrel and lightly sanded the remaining nub that the brass barrel would need to attach to. I used a pin vise and drill bit to open up the 1mm diameter mount hole needed. The brass barrel was dry fit and tested for alignment with the fixed 2 remaining plastic barrels to ensure everything was lined up.
I removed the brass barrel, then repeated the process with the 2nd and 3rd barrels until all three mounts were ready to take their replacements. I used CA gel to give a little work-time and installed one barrel at a time, checking with the turret halves to make sure each one sat level.
After I had both triple mounts done, I checked them with the decks they would install into to make sure they would sit properly and play nice with their surroundings.
With the barrels done and ready, next I'll work on removing some of the molded-on detail on the turrets themselves that will be replaced with PE parts from the Eduard set and then assembling the turrets all into single units for painting.
-
Bill Plunk
- Posts: 1245
- Joined: Wed Sep 28, 2022 10:18 pm
WIP 07-02-2017
More progress to report in the guns department. I finished up the main turrets and they are now fully assembled. I removed the molded-on access ladders from the turret sides and replaced them with Eduard PE ladders. The ladders themselves are delicate with bend lines to help conform to the angled turret surfaces. Once shaped, they were installed using liquid glue and gentle pressure with a wooden toothpick to ensure they remained straight until the glue had a chance to grab and hold them. The 11-inch guns remain movable which will come in very handy when it's time to paint and add the camo pattern.
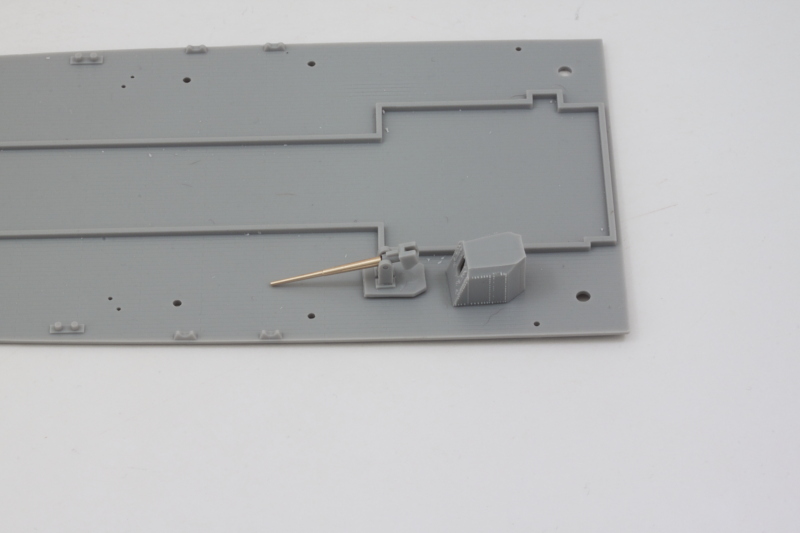
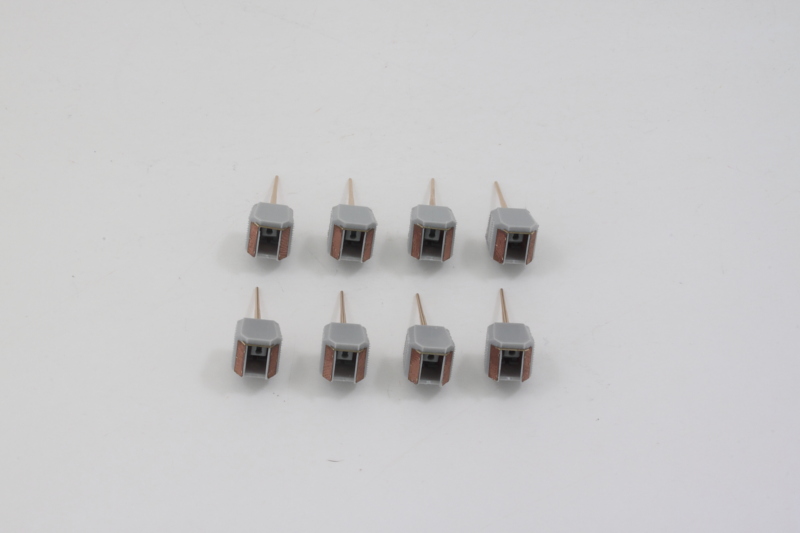
Next up were the secondary battery of 6-inch guns. These are single gun mounts in individual turrets and the kit guns have solid barrels including the mount pins needed to install them to their turret bases. The first step was to surgically remove the barrels right at the mount pins and drill out the remaining area with a #70 finger drill so they could accept the brass barrel replacement. CA gel and patience got that particular job done then just rinse and repeat 7 more times.
Building up the 6-inch guns themselves is a bit more challenging since the two supports for the mount are separate parts that need to go into the turret base. They don't have enough friction on their own to support the mounts pins on the gun barrel and the added weight of the brass barrels compounds that issue. The simple solution was to use the main deck to help support the barrel until the glue had grabbed enough on the supports for them to remain stable.
Then it was a matter of applying some carefully placed liquid glue to the mount pins, sliding the turret top over the gun barrel and into position, then resting the turret on end so that the barrel pointed up to the sky. Careful adjustments with the barrel angle allowed gravity to do the rest until the glue had fully set. I worked out a process that allowed me to work on one turret at a time and then move to the next one whenever needed to allow time for glue to grab. Took about 3 hours in total to get all of the turrets together with matching gun elevations.
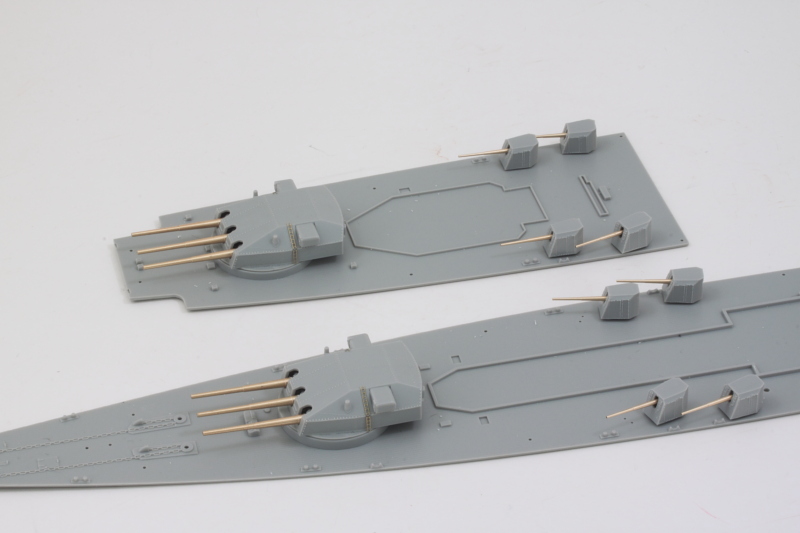
The turrets are only dry fit for now of course. This is just a handy way to place them for an in-progress shot since they have support pins on their undersides. Next up will be tackling the three 10.5cm twin-AA guns and getting them together along with their brass barrels to round out the armament suite of big guns.
Next up were the secondary battery of 6-inch guns. These are single gun mounts in individual turrets and the kit guns have solid barrels including the mount pins needed to install them to their turret bases. The first step was to surgically remove the barrels right at the mount pins and drill out the remaining area with a #70 finger drill so they could accept the brass barrel replacement. CA gel and patience got that particular job done then just rinse and repeat 7 more times.
Building up the 6-inch guns themselves is a bit more challenging since the two supports for the mount are separate parts that need to go into the turret base. They don't have enough friction on their own to support the mounts pins on the gun barrel and the added weight of the brass barrels compounds that issue. The simple solution was to use the main deck to help support the barrel until the glue had grabbed enough on the supports for them to remain stable.
Then it was a matter of applying some carefully placed liquid glue to the mount pins, sliding the turret top over the gun barrel and into position, then resting the turret on end so that the barrel pointed up to the sky. Careful adjustments with the barrel angle allowed gravity to do the rest until the glue had fully set. I worked out a process that allowed me to work on one turret at a time and then move to the next one whenever needed to allow time for glue to grab. Took about 3 hours in total to get all of the turrets together with matching gun elevations.
The turrets are only dry fit for now of course. This is just a handy way to place them for an in-progress shot since they have support pins on their undersides. Next up will be tackling the three 10.5cm twin-AA guns and getting them together along with their brass barrels to round out the armament suite of big guns.
-
Bill Plunk
- Posts: 1245
- Joined: Wed Sep 28, 2022 10:18 pm
WIP 07-03-2017
I managed to get the rest of the guns squared away today and the Optivisor definitely got a full workout in the process. First up were the twin 10.5cm AA gun mounts. I replaced the kit parts' barrels with the Master brass items and this involved removing the plastic barrels from the breech portion, drilling out mount holes with a #74 finger drill, and installing the brass barrels with CA gel. As you can see, there's a huge difference between the brass barrels and the kit parts in terms of accuracy and scale thickness.
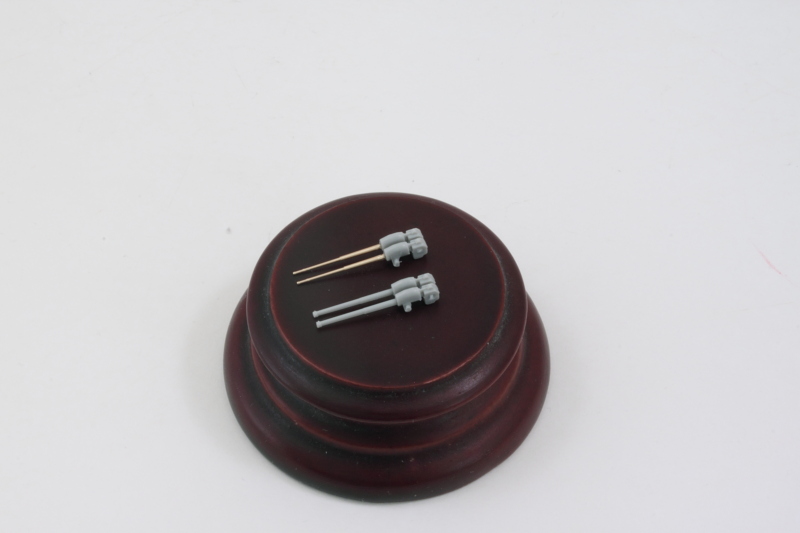
Once the barrels were replaced, the rest of the gun mount assembly was completed. The Eduard set includes some nice detail plates to create the breech block detail that's missing from the kit parts.
Since the 6-inch guns had a chance to set up nice and solid overnight, I returned to them to add their PE details. Each of the turrets is supposed to have a pair of blast doors but the Trumpeter turrets just have a molded in depression line to suggest their presence. The Eduard set addresses this with a pair of doors and a third part that creates the top frame bar across the rear opening.
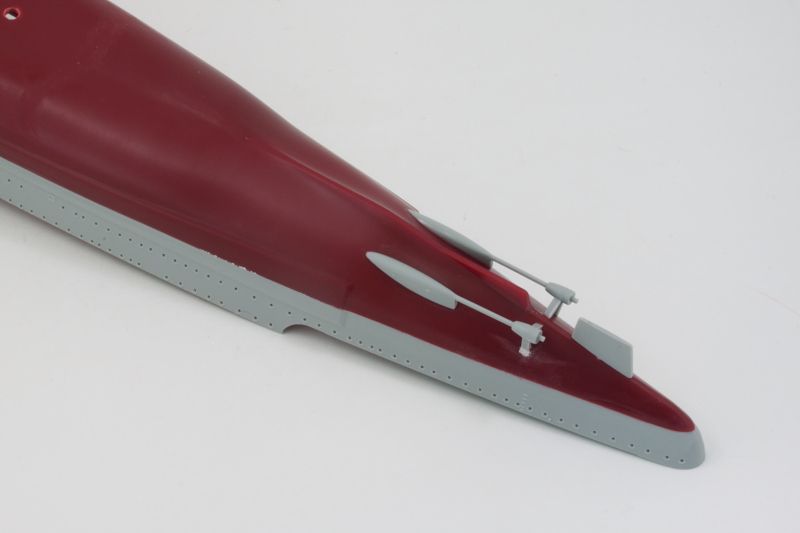
Last but not least, I assembled the torpedo tube mounts that install on the stern to round out the Graf Spee's deadly weaponry complement. She definitely packed a punch!
Next up will be getting the deck plates ready for install and then a round with the airbrush will be in order before they can be added.
Once the barrels were replaced, the rest of the gun mount assembly was completed. The Eduard set includes some nice detail plates to create the breech block detail that's missing from the kit parts.
Since the 6-inch guns had a chance to set up nice and solid overnight, I returned to them to add their PE details. Each of the turrets is supposed to have a pair of blast doors but the Trumpeter turrets just have a molded in depression line to suggest their presence. The Eduard set addresses this with a pair of doors and a third part that creates the top frame bar across the rear opening.
Last but not least, I assembled the torpedo tube mounts that install on the stern to round out the Graf Spee's deadly weaponry complement. She definitely packed a punch!
Next up will be getting the deck plates ready for install and then a round with the airbrush will be in order before they can be added.
-
Bill Plunk
- Posts: 1245
- Joined: Wed Sep 28, 2022 10:18 pm
WIP 07-06-2017
While not a huge update, sometimes it's the little things that take up the most time and attention. Such is the case with getting the deck plates ready for airbrushing before they get installed in the hull and the wood decks added.
First order of business involved removing the molded-on anchor chains since I will be using the Pontos-provided scale chain instead. These crossed over some of the hatch detail, so I used a combination of a #11 blade and a micro chisel to get it gone. The anchor chain ports in the deck were molded solid, so I drilled those out and shaped them with a round needle file to open them up before adding the Eduard PE screen covers.
The Pontos set includes a PE overlay for the bow area and it almost fits as a drop-in. I had to use the Dremel to carefully trim down a slight overhang edge in a couple of spots so it would fit correctly with the hull. Eduard PE vents were added forward of the main gun turret base to add a little extra detail there as well.
Last but not least, I assembled the superstructure element for the stern overhang between the main deck and the torpedo deck. This is a flat panel assembly of 5 different parts and the instructions are a little vague as to how to get them together along with the two deck plates that they join up with. I decided to attach them to the main deck plate since the Pontos wood deck might need a little flexibility when it comes time to install it and it will be much easier to trim it to fit if needed this way.

Next up will be an airbrush session to get the decks and the gun turrets all tidied up.
First order of business involved removing the molded-on anchor chains since I will be using the Pontos-provided scale chain instead. These crossed over some of the hatch detail, so I used a combination of a #11 blade and a micro chisel to get it gone. The anchor chain ports in the deck were molded solid, so I drilled those out and shaped them with a round needle file to open them up before adding the Eduard PE screen covers.
The Pontos set includes a PE overlay for the bow area and it almost fits as a drop-in. I had to use the Dremel to carefully trim down a slight overhang edge in a couple of spots so it would fit correctly with the hull. Eduard PE vents were added forward of the main gun turret base to add a little extra detail there as well.
Last but not least, I assembled the superstructure element for the stern overhang between the main deck and the torpedo deck. This is a flat panel assembly of 5 different parts and the instructions are a little vague as to how to get them together along with the two deck plates that they join up with. I decided to attach them to the main deck plate since the Pontos wood deck might need a little flexibility when it comes time to install it and it will be much easier to trim it to fit if needed this way.
Next up will be an airbrush session to get the decks and the gun turrets all tidied up.