Trumpeter 1/350 German Pocket Battleship (Panzer Schiff) Admiral Graf Spee (2017)

Bill Plunk
Posts: 1245
Joined: Wed Sep 28, 2022 10:18 pm

WIP 07-21-2017

Post by Bill Plunk »

Despite a well-earned detour to see 'Dunkirk' in the theater (thoroughly enjoyed it too!), more progress was made today. This stage of the build is all about the details and you have to be careful in choosing what to install when because of the tight spaces. I got the bridge deck portion's details done including the railings and this one single photo represents about 4 hours of work total. I shaped the railings first before adding any of the details so I had the maximum space to work with then switched around between painting and detailing various pieces and installing them into place. The railings were painted to match the camo pattern after they were attached with CA so that everything lined up like it should.

Image

Next will be doing the same for the boat deck area. These railings are all long single piece lengths with complex shapes and curves so that's going to be the next challenge.
Bill Plunk
Posts: 1245
Joined: Wed Sep 28, 2022 10:18 pm

WIP 07-22-2017

Post by Bill Plunk »

More progress in the details and railings department. The forward area of the boat deck received its railings, hose reels, and small structures that go around the base of the pyramid superstructure.

Image

Speaking of the pyramid, I added all of the access ladders and support railings needed there and also installed the main mast structures. I left the top off of the structure for now as I found it easier to manipulate the pyramid without it in place. That top will get added once the pyramid is installed in place permanently.

Image

Image

I'm debating when to add the pyramid to the main module but will most likely do it after I put in the last set of railings around the AA mounts and smokestack. More detailing fun to come!
Bill Plunk
Posts: 1245
Joined: Wed Sep 28, 2022 10:18 pm

WIP 07-23-2017

Post by Bill Plunk »

Another day, more details! The latest round got the rest of the remaining railings added to the main superstructure module along with the ventilation funnels, ammo lockers for the AA guns, the AA guns themselves, and the pair of fire control stations for the secondary batteries. Left off for now is the base of the smokestack as it still needs its own railing work added and I also need that spot as a handling point due to all the others rapidly disappearing as other items get added. :)

Image

Speaking of, one of those disappeared with the addition of the pyramid superstructure. I added the fighting top along with a pair of small AA guns and the PE rigging elements for the mast spars underneath it. The angled PE rigging had to be cut down to fit properly, Eduard designed them to fit the full length of the kit part but neglected to take into account that a good chunk gets blocked underneath the fighting top, so a quick snip with the angle cutters did the trick before installing them in place.

Image

Last, but not least, I assembled the two-part PE radar antenna and this was a time-consuming exercise mostly because I had to paint the inside and outside of both parts before bending them together completely or there would've been no way to get them fully painted otherwise. It looks 100% better than the solid plastic part the kit provides though, so very worth it. I used Gator Grip Thin Blend to attach the base of the antenna to the direction finder first and let that set up solid before using more thin blend to add the antenna itself onto the base.

Image

On to the smokestack next! Its searchlight deck has a railing that is a single solid PE piece so that's going to be the biggest bending challenge of all I think. :)
Bill Plunk
Posts: 1245
Joined: Wed Sep 28, 2022 10:18 pm

WIP 07-26-2017

Post by Bill Plunk »

One step closer to getting the remaining details done on the superstructure. This time attention turned to the funnel and the searchlight deck that runs around the top. The railing for this deck is a single flat piece of PE which required some very careful shaping with tweezers in several places and a mandrel for the aft curved areas in particular. After the railing was installed with CA, I added the four AA guns and four searchlights to populate the deck. The funnel top was hand painted with MM enamel Flat Black lightened with about 10% Light Gray and then installed on the upper portion of the funnel.

Image

The upper portion was added to the main funnel, clearing the way for the addition of the mast structure that attaches to the funnel top. The Eduard PE set provides a lot of extra detail for this area that the kit parts were missing. Since many of those PE parts overlap to each other, I used Gator Grip Thin Blend to get them all together and allow some flexible work time to ensure they all played nice with each other.

Image

Another round of hand painting with the Flat Black mix and the funnel top and mast now have a unified look.

Image

That clears out all of the major superstructure module elements. Next up I'll deal with the secondary module to get it up to speed as well.
Bill Plunk
Posts: 1245
Joined: Wed Sep 28, 2022 10:18 pm

WIP 07-29-2017

Post by Bill Plunk »

Progress on the Graf Spee reached an important milestone today as the secondary superstructure module received the rest of its details. I bent and shaped the PE railings first, then painted and installed the small AA guns, various lockers, and hose reels in place. The PE railings were painted to match the camo scheme where needed and the large twin-AA gun mount installed in position. It never ceases to amaze me how difficult it becomes to handle these things once the railings are in place, but it's a necessary evil to allow for the inevitable touch-ups needed to create a unified look between the decks and railings.

Image

After conducting a test to see if I could still safely install the main superstructure module in place with the fighting top direction finder and radar antenna installed, I went ahead and added that to the main superstructure module. Both modules now have all of their details with the exception of the ship's boats and cranes on the main module and the floatplane catapult on the secondary module. Those will all get added later once the modules are permanently attached to the ship.

Image

I also did a quick dry-fit test with the hull to see how things are shaping up. It's also a handy way I've found to 'store' the modules and all the gun turrets and keep them out of harm's way. Everything is currently dry-fit only since the next step will be applying some Future to seal up the turrets and superstructure to allow for a pin-wash treatment to bring out the details.

Image

Once the pin-wash is on, I'll add the rigging on the main superstructure module to ensure maximum flexibility for handling during the pin-wash phase.
Bill Plunk
Posts: 1245
Joined: Wed Sep 28, 2022 10:18 pm

WIP 07-30-2017

Post by Bill Plunk »

Not a huge update for today as the build is in one of those 'hurry up and wait' stages. I broke down the superstructure, turrets, and torpedo tubes into separate modules and attached them to wide strips of blue painter's tape for easier handling and then airbrushed a coat of Future to provide a protective barrier for the pin-wash treatment to come. I opted to leave the 6-inch turrets in place on the deck and just turned them out at an angle, essentially turning the hull into a giant holding stand in the process instead of trying to deal with them individually. This had the added bonus of making it easy to also apply the Future to the hull itself in the areas that needed it around the bow and stern for example. That will get a chance to cure for 24 hours as a standard precaution as we've had a good bit of rain lately and humidity levels are higher as a result.

Image

After the bout with the Future, I turned my attention to the floatplane catapult. The Eduard set includes a brass replacement for the solid kit part that requires amputating the compression cylinders from the kit part and adding them to the replacement. I didn't want to do that right away, instead, I tested out getting the brass item bent into shape and fully assembled first and checked how it would fit in the same spot as the kit part. Satisfied that it would play nice and be a significant improvement, the amputation proceeded and the cylinders found a new home courtesy of a sharp #11, some light sanding, and a touch of CA.

Image

Next up will be tackling that pin-wash treatment!
Bill Plunk
Posts: 1245
Joined: Wed Sep 28, 2022 10:18 pm

WIP 08-03-2017

Post by Bill Plunk »

I've been working on the pin-wash phase off and on for a few days mostly because it requires wearing a breather mask due to the thinner fumes involved and the sheer amount of time involved in dealing with all of the raised detail around the ship. I mixed up my own wash using a roughly 90/10 thinner and MM enamel Burnt Umber combination. An 18/0 pointed brush did the trick for applying the wash where needed, especially since in this scale a lot of the detail is very tiny and spaces are tight! I tightened up the wash using the same brush and clean thinner where needed.

Image

The secondary battery turrets got different treatments depending on their location. The forward turrets have one side obscured by the superstructure while the aft turrets have more of the whole turret visible, so I dosed them accordingly. While I was at it, the lower hull boarding ladder rungs and the anchor ports also were picked out.

Image

Each of the superstructure modules was worked over along with the main turrets and torpedo tube units. The funnel unit was worked on separately mostly due to the fact that it's got a ton of detail but not a lot of ways to handle it

Image

It's such a simple process despite the time involved in working over all the little details but well worth it given the detail level molded into the kit parts and all the add-ons from the Eduard set as well. I'll let this sit for a day so I can give it a once-over with fresh eyes to see if there are any adjustments needed before sealing it up with a dull coat. Then it will be time to start on the rigging!
Bill Plunk
Posts: 1245
Joined: Wed Sep 28, 2022 10:18 pm

WIP 08-04-2017

Post by Bill Plunk »

Today was an extremely productive day with a lot of things coming together in the process. First order of business involved applying the kit-supplied decals for the shield placards on the bow and adding the Pontos-supplied dry-transfer draft gauge markings to the hull. I used Solvaset on the decals after trimming their edges close to avoid unnecessary film around the border.

Image

The hull and all of the modules were dosed with Model Master Lusterless Flat in the spray can to knock down the Future's gloss and restore the flat finish to the build.


Image

That cleared the way for the next big challenge, getting the superstructure rigged. I checked a lot of different reference photos in order to ferret out the overall arrangement I wanted to replicate and what order to do it in. I used EZ Line Fine elastic thread and a combination of CA and accelerator to add the lines. The main superstructure module went first and I noticed while checking the reference pics that something about the mast was off. I had added the little cross-brace using the Eduard PE instructions as a guide and it turns out there should be more of the mast sticking up above the brass. I couldn't easily remove the brace and reposition it, so I cheated a bit and used a short length of white styrene rod to extend the mast higher above the brace instead. I also kept all of the modules on their masking tape strips as that made it a lot easier to handle them and avoid contact with the railings and other delicate areas.


Image

The funnel mast got its rigging as did the secondary superstructure. These will get additional rigging later on that connects them up with the main mast on the forward superstructure but I'll do that after I've installed the boats and float-plane to avoid any potential snag issues.


Image

This meant that the modules themselves were largely done, so it was time to install them into position on the main deck. I used regular glue around their bases and the contact ridges since the addition of the wood deck slightly reduces how well they grab onto those areas. The turrets are still dry-fit and movable to allow flexibility when it comes time to add the main hull's railings.

Image

Next up will be boats, cranes, and catapult, oh my! :)
Bill Plunk
Posts: 1245
Joined: Wed Sep 28, 2022 10:18 pm

WIP 08-06-2017

Post by Bill Plunk »

Got to check off one more item from the to-do list this weekend in the form of the ship's boats for the Graf Spee. The boats that the kit provides are nicely done with the exception of the two motor launches that have solid-molded cabins with no windows. Those were cut down and the Eduard PE cabins installed in their place. The Eduard set includes a new cabin floor to compensate for the gaping hole that is left when the solid cabin is removed but it doesn't fit 100% perfectly either, so some white styrene rod softened with liquid glue was used to close up gaps there where needed. I had one small mishap when assembling one of the launches, I pressed down on the little engine hatch cover with a wooden toothpick by mistake and it punched right through it, so a small patch of white sheet styrene was necessary to restore it back to working order. All of the other boats clean up nicely, you just have to keep the two boats that attach to stand-alone davits separate from the rest to avoid any problems there.

Image

Getting the boats painted involved some bach-and-forth work and I opted to do it all by hand instead of trying to use the airbrush. I did the natural wood areas first, applying a base coat 'wood' shade of 50-50 Panzerdunkelgelb/Light Gray with a detail brush. Once dry, I added a thinned wash of enamel Flat Brown to add some more wood-like tone variations and then followed that up with some Raw Umber soft artist pastels applied with a blender brush. Once the wood portions were all done, I hand painted the hulls and trim with Light Ghost Gray so they would match up with the rest of the ship.

Image

I added the boat support rack that spans the two superstructure modules first and while the glue was drying there, installed the motor launches and boats into the racks on the main superstructure module along with the port side support crane that rests up against the one launch. The rest of the boats were added between the structures and voila! It's a lot busier space now than it was before.

Image

Next up will be getting the main cranes done and installed along with the float plane. Checklist is getting smaller!
Bill Plunk
Posts: 1245
Joined: Wed Sep 28, 2022 10:18 pm

WIP 08-07-2017

Post by Bill Plunk »

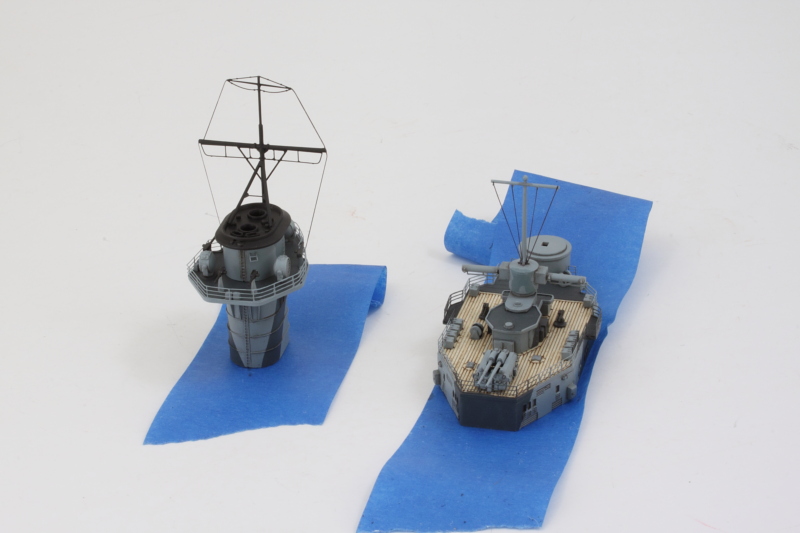
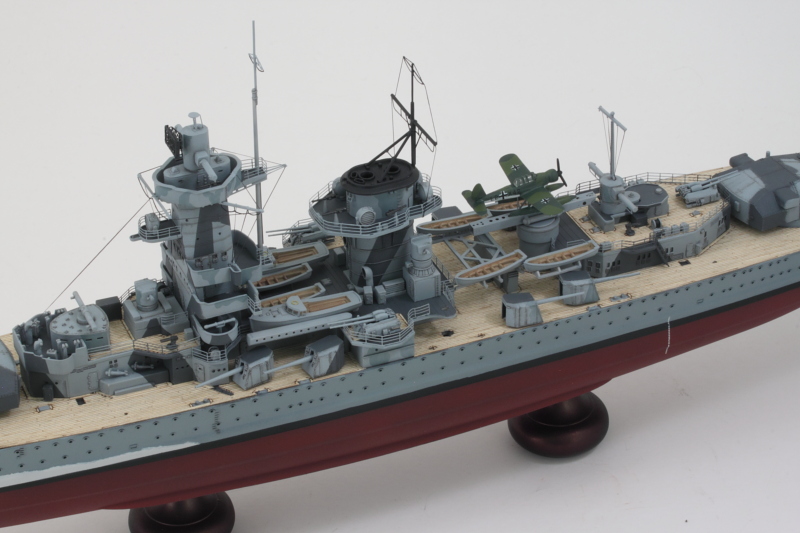
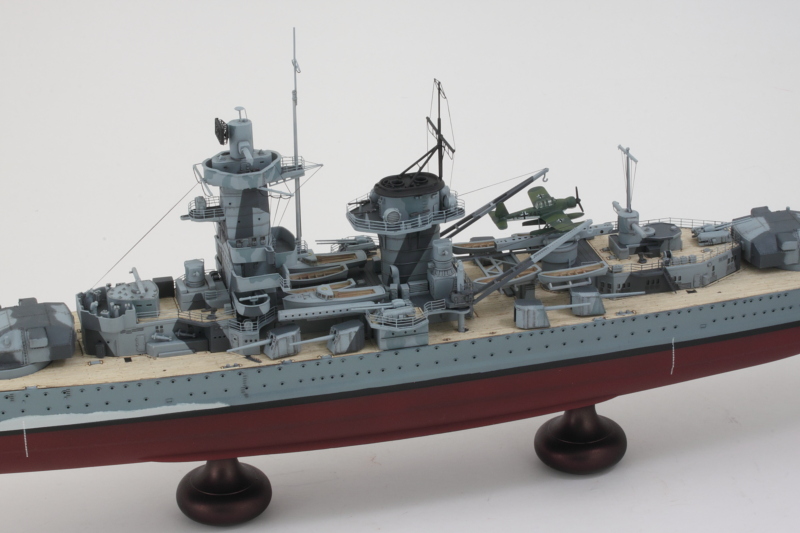
More details checked off the to-do list today! I assembled the Arado 196 floatplane and that itself was a little bit of a challenge. The kit provides the entire plane as a clear sprue with the bottom half as a single piece that includes the tail but the top half is further split into two parts. Getting all three to line up and play nice took some work especially since it's not very big, to begin with. I had to check all the join lines with gray paint first and sand/trim/adjust accordingly to get it all in place. Once that was done, I hand painted the plane's scheme using MM enamel RLM 80 Olivgrun and a lighter green mix that I had sitting around on the bench that was close enough for the splinter pattern. The undersides received a coat of MM enamel flat Light Gray. I used a regular brush to apply some Future, added the decals using Solvaset, and a second coat of Future to seal them in. A dose of Lusterless Flat knocked back the gloss. I hand-brushed Future on the canopy insert as well and then hand-painted the frames with Olivgrun, cleaning up excess where needed with a pointed brush and thinner to tighten it all up.

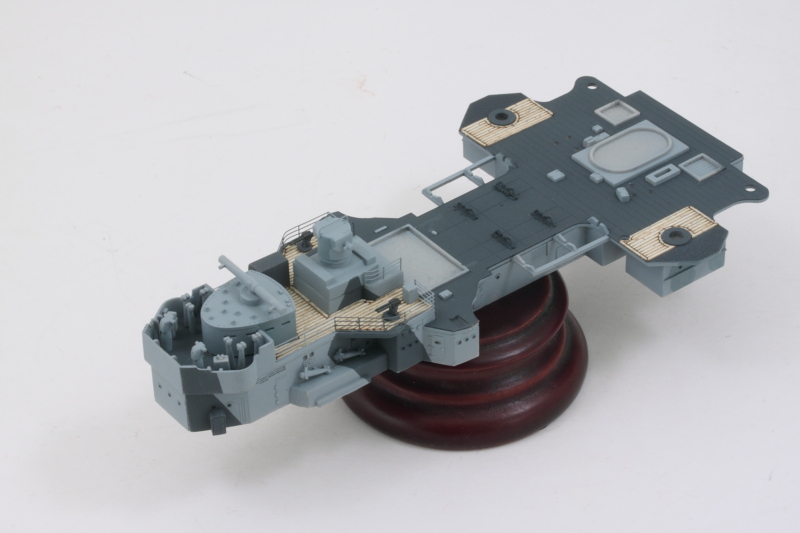
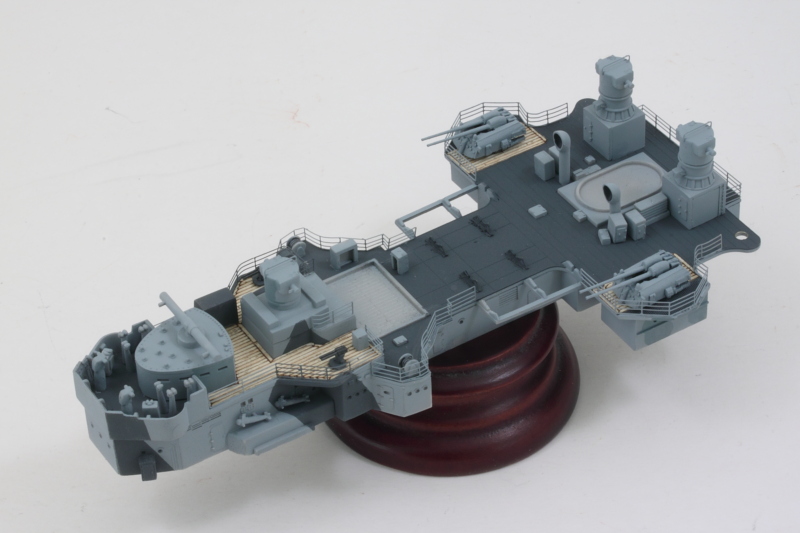
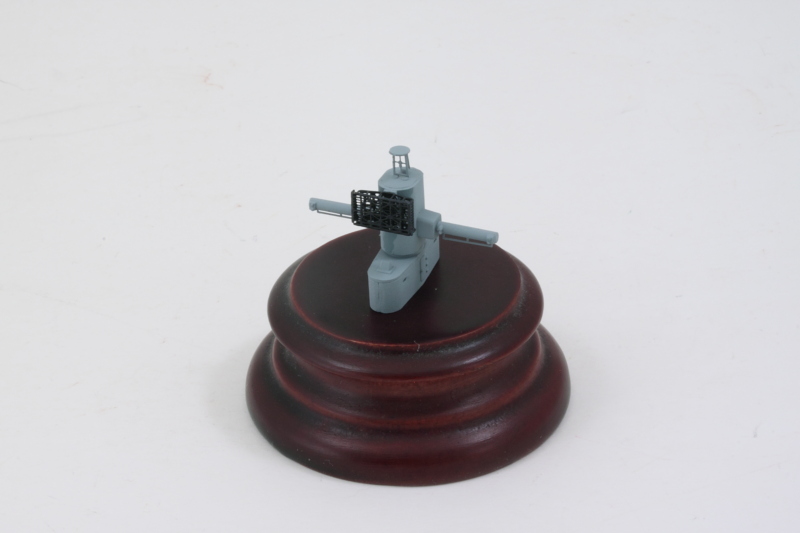
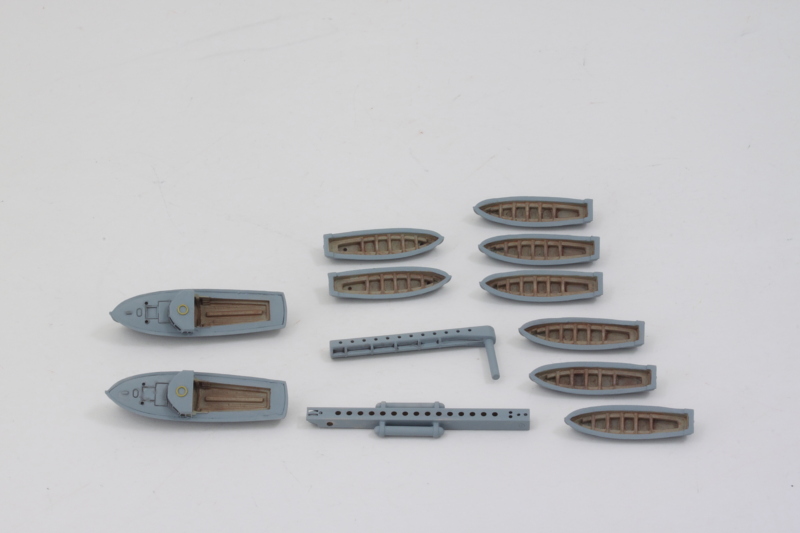
I also built up the rest of the catapult with the plane cradle. Interestingly enough, the Trumpeter kit doesn't include an easy way to install the floatplane onto the catapult and the instructions conveniently ignore this as well...there isn't a diagram that ever shows the plane's installation nor does it appear on the final step illustration or on the finishing guide. Still, they did include the plane, so that's something! Fortunately, the Eduard set addresses this perfectly with the cradle.

Image

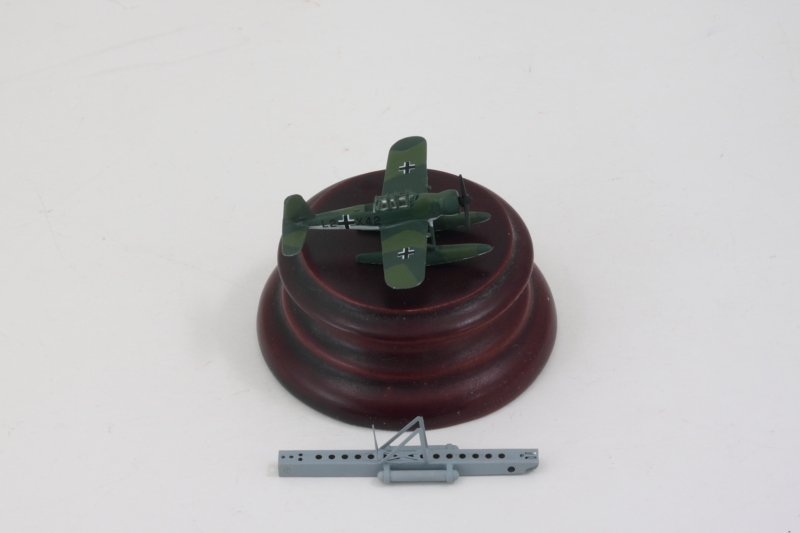
I attached the floatplane to the cradle using CA gel so I could be sure to get it in the right position over the catapult. Once that had set, I used Gator Grip Thin Blend to attach the combined plane and catapult to the superstructure mount.

Image

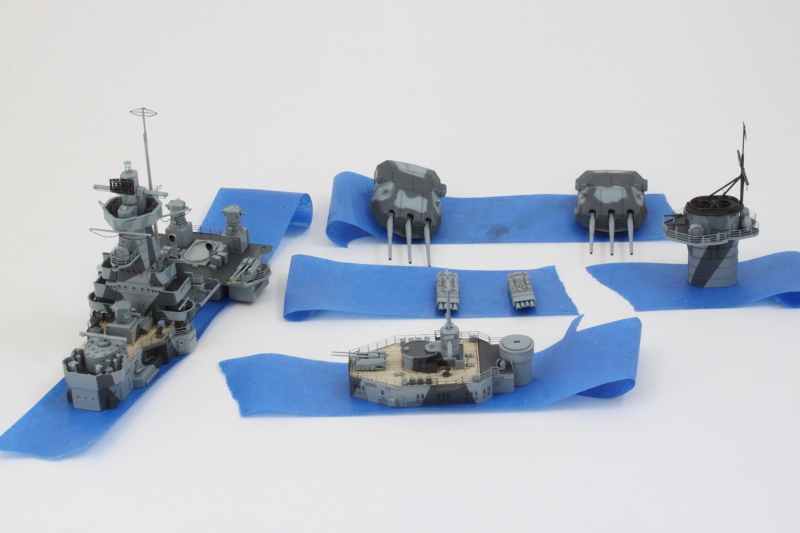
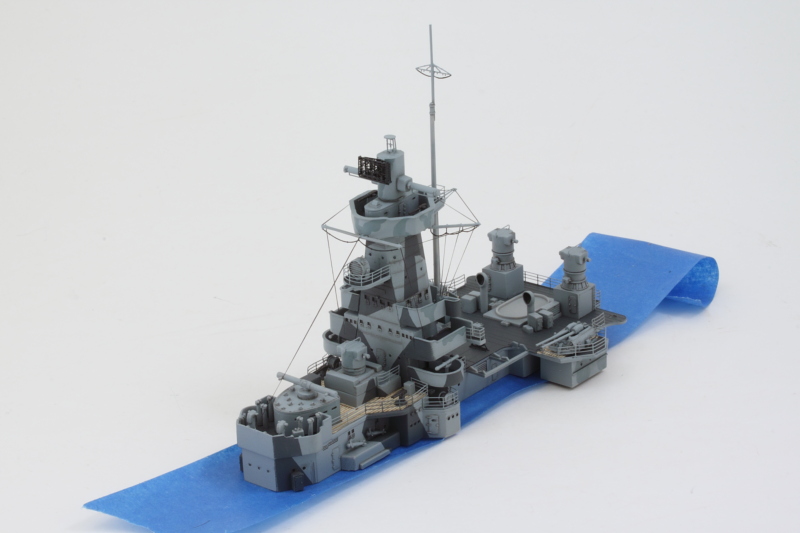
Next up were the two main cranes. These were a bear to get together mostly because the molding on the two halves for the support post portion was less than perfect. I had to use clips to get the halves together and follow that up with sanding and putty to deal with gaps in more than one spot. I added the Eduard PE details for the suspension arm as well as the operator's cage platform. The crane arms snap into place but are very loose and won't hold their position on their own. I used one crane to test fit the correct height/angle in relation to the floatplane and boats and then applied liquid glue to the hinge pins to set it in the right position. The second crane mirrored the first one so that they would form a matching pair.

Image

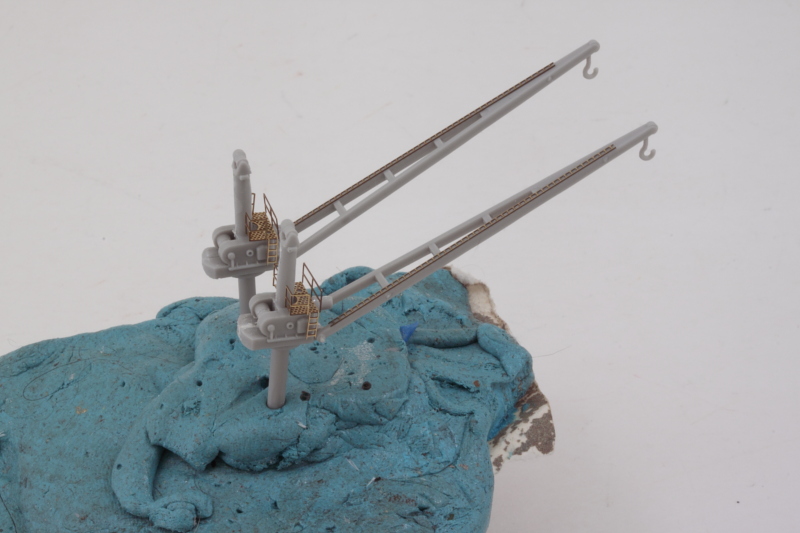
The cranes themselves have different paint patterns depending on which side of the hull they mount to, so I hand painted them accordingly with the Light Ghost Gray and Gunship Gray disruptive pattern. EZ Line provided the suspension cables as well for added detail.

Image

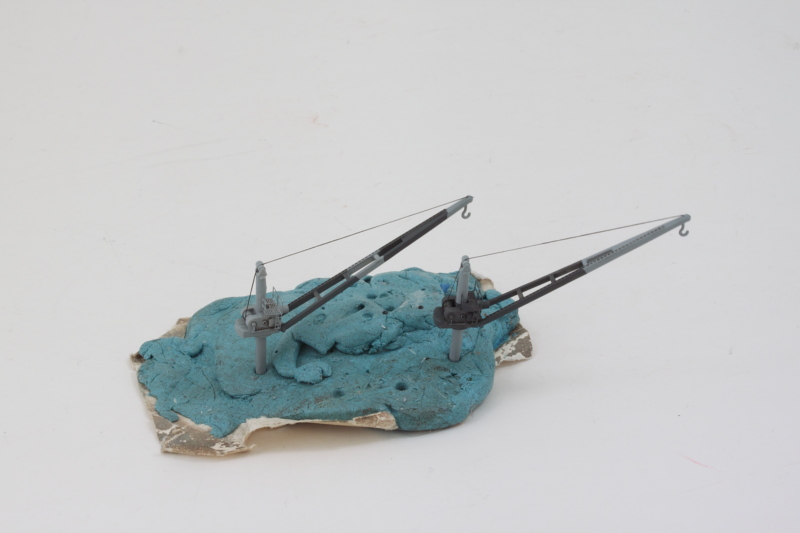
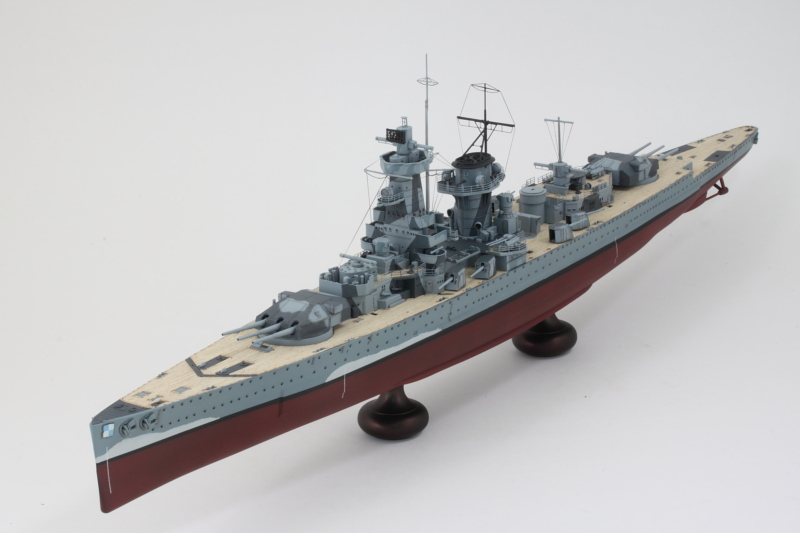
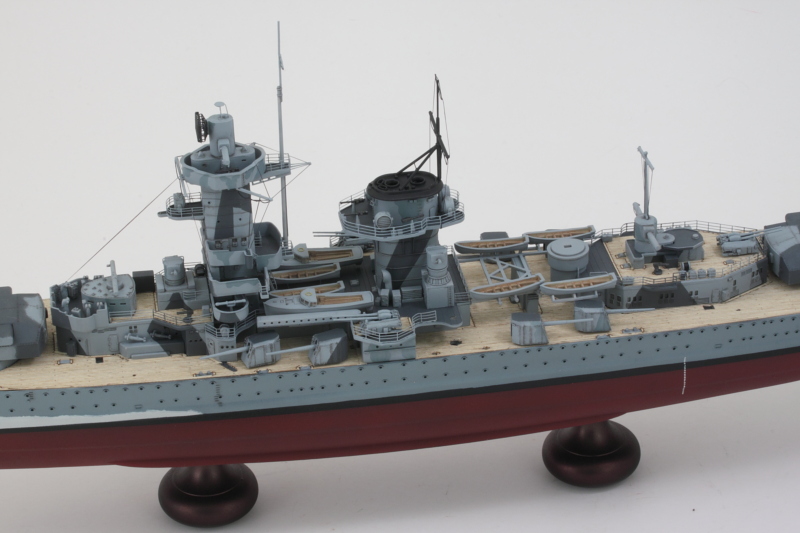
With that done, the cranes took their place alongside the other midship details. They are still movable in the event that I need some room/flexibility when it comes time soon to add the main deck railings in this area.

Image

Checklist is getting a lot shorter!
Post Reply