Dragon Imperial Series StuG III Ausf. G (2007)

Bill Plunk
Posts: 1245
Joined: Wed Sep 28, 2022 10:18 pm

WIP 11-21-2007

Post by Bill Plunk »

Wonderful thing about the Thanksgiving holiday is that it provides some time at the workbench!

My efforts today focused on the tracks as the last remaining item before beginning the weathering and finishing process. The track runs were base coated in Flat Black with the airbrush and then given another coat of MM Non-buffing Metalizer Gunmetal as the first step.

Image

Since track weathering is always an interesting topic that comes up from time to time, I thought I'd take some step-by-step shots to show how I do it. In all of the following photos the track on the right is the one that's received that particular step's treatment while the track on the left is still in the condition from the previous step to show the progression. With the metalizer applied, I dry-brushed Steel over it. The metalizer is very "grabby" and responds to dry-brushing well, and the Steel is laid on somewhat heavy as a foundation to work with the washes and provide a metallic tone to the final finish.

Image

Then a wash of Raw Umber is applied, very carefully to avoid lifting up the Metalizer. Since there's an underlying coat of Flat Black, it's a bit more durable than if it was applied to the bare styrene from my experience. The wash is laid down in quick single passes with a brush. This begins the muting/blending process of the previous dry-brushed Steel as well as creates a foundation for the next wash.

Image

The next wash, applied the same as the previous wash, is Rust.

Image

Because the Rust tends to be a little on the orangeish side, the next step is to dry-brush some Burnt Umber to tone it down.

Image

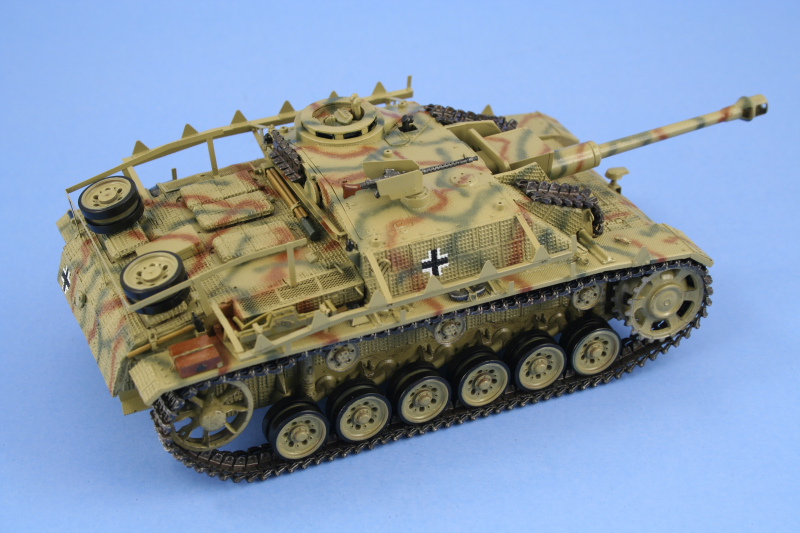
Finally, both tracks were ready to be installed. The weathering process isn't done here, but the rest of the weathering will take place on the vehicle to insure some consistency between the tracks and the rest of the running gear/lower hull.

Image

The tracks were fitted to the sprockets and then installed with the sprockets glued into place and adjusted as needed to produce the desired sag. Earlier I'd also fixed the main gun elevation by gluing the hinge points with liquid glue as well as installed the spare road wheels to the rear engine deck.

Image

At the same time as I'd been working on the tracks, I'd also given the same treatment to the extra armor runs for the front superstructure and the spare run for the rear. These were secured in place with some careful applications of CA gel to the undersides which doesn't provide much in the way of contact surface area, but is just enough for them to attach to the resin zimmerit panels and stay in place, but I'll have to be careful in later weathering stages not to handle them too roughly or they'll shear off.

Image

Image
Bill Plunk
Posts: 1245
Joined: Wed Sep 28, 2022 10:18 pm

WIP 11-23-2007

Post by Bill Plunk »

Almost to the finish line with this one, although not a lot of pics to show for it, some great strides made yesterday and today. I laid down a protective coat of Future using the AB, making sure to get good overall coverage into the waffle pattern since it's got so much added surface area. Once that had completely dried, I let it set for several hours during the day before applying the markings. The kit-supplied decals were definitely showing their age, having yellowed significantly as well as being on the thick side. As a result, I scrounged around in the spares box and found 3 suitable balkenkrueze from a previous build that were the right size and type. These were put in place and liberal doses of Solvaset used to get them to snug down into the waffle pattern. Each one required about 30 minutes or so of careful attention but they all settled in without major problems. One was applied to the rear hull and one each to the sides of the superstructure. Simple but effective.

Image

Image

Throughout the day today I worked on the weathering. Due to the rough surfaces that the zim pattern creates, I modified my normal approach of using "dots" of paint to create variation. Instead of using multiple colors, I used only one, Raw Umber, and did this over the whole vehicle. In essence, this had the effect of a very very thin wash and served as a foundation for a darker wash, also of Raw Umber, that I applied as a pin wash. Between the two steps, the application was done over the space of about 3 hours. I used a 10/0 pointed brush to apply the pin wash, going back over different areas using clean thinner to adjust or remove the excess as I worked my way front to back. Because this lengthy process involves a lot of thinner evaporating, I made sure to wear my breather mask during the whole time in addition to the normal ventilation in my work bench area. For the undersides, I used a larger brush and applied the wash liberally to the lower hull panels and road-wheels as a prep stage before they are weathered further with pigments.

Image

After all this was done, I carefully dry-brushed some of the lightened Dunkelgelb used for the base coat over the markings to fade them in a bit with the rest of the vehicle. Some Burnt Umber was also carefully dry-brushed around the mount points of the schurzen rails to simulate some wear there from the days when the schurzen were mounted.

Image

In the morning I'll apply a sealing Lusterless (Flat) coat using Testor's rattle-can variety and then start in on the pigment weathering for the tracks/running gear/lower hull.
Bill Plunk
Posts: 1245
Joined: Wed Sep 28, 2022 10:18 pm

WIP 11-24-2007

Post by Bill Plunk »

Final steps were cleared today, and first up was the overall application of a Lusterless (Flat) coat applied via rattle-can. Several passes were necessary due to all the surface area and to avoid any heavy build-up. I went back over the whole model and carefully dry-brushed in some Dunkelgelb lightened mix to tone down the washes a bit and then a second Lusterless (Flat) coat applied.

Image

Once that had dried, it was time to apply the pigments to the lower hull/tracks/running gear. I first mixed up some MIG Dark Mud and Europe Dust as a dry powder in an old prescription bottle cap. Mixing them dry insures a more consistent overall tone I've found through trial and error. All of the MIG line of pigments will dry a lighter shade when applied wet than their original dry powder color, always something to bear in mind when trying to get a particular shade.

Image

Then I added ordinary water to the mix and stirred it using a medium size sable brush which will also double as the means of application to the vehicle. It's important to constantly be stirring the mix when applying it as the powder will want to come out of suspension fairly quickly if not careful.

Image

This wet mix is then liberally applied all over the desired areas. I do this with a plastic drop-cloth under the model as it can be a bit messy. It also needs a good place to air-dry for a couple of hours, after which it looks a lot worse than it actually is.

Image

This is then worked on thoroughly with stiff-bristled brushes of different sizes/types to remove the excess and smooth out the overall look.

Image

Later on I'll come back with some Q-tips and carefully clean up the wheels a bit more to get more definition between the tires and hubs.

Next up was some careful dry-brushing with Steel on the track cleat faces to bring them back out.

Image

This one's pretty much done, just need to do some minor adjustments and tomorrow I'll shoot the final set of finished photos when I've got plenty of time to play around with the photo booth.
Bill Plunk
Posts: 1245
Joined: Wed Sep 28, 2022 10:18 pm

Publication April 2010

Post by Bill Plunk »

This build has been published in FineScale Modeler April 2010 Issue on pp. 32-37.

Image
Post Reply