
Dragon Pzkpfw Ausf. N w/Winterketten sPzAbt 502 Leningrad 1943 (2010)
-
Bill Plunk
- Posts: 1245
- Joined: Wed Sep 28, 2022 10:18 pm
Dragon Pzkpfw Ausf. N w/Winterketten sPzAbt 502 Leningrad 1943 (2010)
Build log for Dragon kit #6606 done as an OOB project:
-
Bill Plunk
- Posts: 1245
- Joined: Wed Sep 28, 2022 10:18 pm
WIP 09-03-2010
The build started where it usually does with DML kits, Step 1 deal with the assembly of the road wheels, idlers, sprockets, and return rollers. I didn't follow the step quite 100% since it also calls for the sprockets to be added to the final drive housings and for the idlers to be installed onto their mounts, those elements will be added later. I removed the mold seam on each of the road wheel and return roller halves with a sanding stick prior to their assembly. For the idlers, the kit includes PE inserts to accurately create the rims on the real thing and these inserts were added using liquid glue prior to the idler halves being assembled as directed.

Step 2 begins the work on the lower hull. The hull tub has three prominent stubs on the top edge that need to be removed to avoid problems later on when it's time to mount the fenders. The instructions never indicate this is needed so it's a good thing to take care of at this point vs. waiting until later. This step adds the side escape hatches and their hinges as well as the fender support brackets to both sides.

Step 3 deals primarily with the suspension elements including the torsion bars that are installed on both sides. It's important to insure the bars are aligned properly to avoid having the suspension go out of alignment, so you have to be careful to use the right parts for the respective hull side and make sure that the ends are properly keyed inside the hull to their install points to avoid issues. All of the swing arms were added without problems along with the front and rear shock absorbers and bump stops. The front hull plate, part D11, was also added and it's easy to overlook this if you aren't paying too close attention and are too heavily focused on the suspension process since the step shows it already in place. It's best installed before adding the B13/B14 inserts for the final drive housings to avoid space issues with its fit.
I also went ahead and added the final drive housings and idler mounts to both sides to round out the day's efforts. Even these aren't installed until Step 5, that step also calls for the installation of all the wheels, sprockets, and idlers so it made sense to get it out of the way now.

Day 1 of the 4 day Labor Day weekend has shown some good progress. Let's see what Day 2 brings!
Step 2 begins the work on the lower hull. The hull tub has three prominent stubs on the top edge that need to be removed to avoid problems later on when it's time to mount the fenders. The instructions never indicate this is needed so it's a good thing to take care of at this point vs. waiting until later. This step adds the side escape hatches and their hinges as well as the fender support brackets to both sides.
Step 3 deals primarily with the suspension elements including the torsion bars that are installed on both sides. It's important to insure the bars are aligned properly to avoid having the suspension go out of alignment, so you have to be careful to use the right parts for the respective hull side and make sure that the ends are properly keyed inside the hull to their install points to avoid issues. All of the swing arms were added without problems along with the front and rear shock absorbers and bump stops. The front hull plate, part D11, was also added and it's easy to overlook this if you aren't paying too close attention and are too heavily focused on the suspension process since the step shows it already in place. It's best installed before adding the B13/B14 inserts for the final drive housings to avoid space issues with its fit.
I also went ahead and added the final drive housings and idler mounts to both sides to round out the day's efforts. Even these aren't installed until Step 5, that step also calls for the installation of all the wheels, sprockets, and idlers so it made sense to get it out of the way now.
Day 1 of the 4 day Labor Day weekend has shown some good progress. Let's see what Day 2 brings!
-
Bill Plunk
- Posts: 1245
- Joined: Wed Sep 28, 2022 10:18 pm
WIP 09-04-2010
Progress on Day 2 made great strides and I managed to get quite a bit done. Picking up from yesterday with Step 4, I assembled the rear hull plate and installed the mufflers, tow points, and trailer tow bracket. The trailer tow bracket was a feature added in Sept '42 and the instructions indicate this is an option in the small sub-assembly box and you should use part B29 if you don't want this feature on your vehicle. I used a pin vise to deepen the already hollow exhausts to add to their look. The top four fins/tabs that are parts A6/A5 are a little tricky to fit just right due to the fact that they have a very small contact area on the plate and test fits are crucial with the lower hull tub to get them in the right alignment to avoid problems in Step 6 when the plate is permanently installed into position.

Step 5 calls for all the road wheels and running gear to be installed so that was skipped for now since all that will be added after the hull has been painted.
Step 6 installs the plate from Step 4 and I highly recommend you do this step immediately after Step 4 to avoid possible fit/alignment problems due to the fin alignment I mentioned above. The plate is a snug fit and the fins have to line up perfectly with slots in the hull tub for everything to work out right...and if your fins have set up in the wrong position, it can result in a major headache.
The step also calls for the installation of the rear smoke candle rack in the form of parts B10/11 however if you decide, like me, to mount the turret smoke launchers then the rear rack needs to be omitted. The turret mounted launchers were also a Sept '42 feature so if you go that route you also need to not use part B2 for the angled rear hull overhang plate and use part B28 instead. B2 has the bolts for the rear rack molded on while B28 doesn't...a minor detail but since the kit includes both plates it's possible to maintain that consistency even though the instructions don't indicate any of this as an option.
This step also installs the rear air vent deflectors and the PE mesh screens for those vents. The mesh sits on small raised square tabs so I used CA gel to secure them in place, making sure they were flush to avoid fit problems with B2 or B28. I also needed to use small amounts of putty around the idler mount housings to close up a gap on both sides there, easily done with some Squadron white and a little sanding.


That led to Step 7 which begins work on the fenders starting with the left side fender first. The instruction diagrams incorrectly indicate you should install the small marker lights P2 or A8 but this is an anachronism for the N since those lights weren't installed after June '42 and the fender doesn't actually have the mounts molded there despite what the diagram shows, so just ignore this in the instructions. I installed the Notek light, the fender support brackets, spare wheel mounts, tool box, and rear mud-flaps as instructed. I opted to use the kit-supplied PE part for the rear mud flap latch hook and also added the small PE strip that fits over the air intake cut-out. Since I'm going to be doing this in a whitewash scheme, I left off the fire extinguisher and jack for the time being and will add those along with all the other tools and jack block later.

Step 8 deals with the right side fender and it received similar treatment as the left. Again, the tools were left off until later and I added the antenna tray, opting for the style that had the front foot pointing backwards vs. forward.

Step 9 is a very simple step, it assembles the engine deck hatches and armored vent covers.

Those are then used in Step 10 to assemble the rear engine deck along with all their hinge points. Those hinge points are small and have 2 contact points to clean up on each so you have to be careful to avoid them getting eaten by the carpet monster. The lifting eyes were also added along with the side intakes and their PE grills. The grills were added using Gator Grip glue around the edges to avoid glue potentially clogging the screens and I pre-bent the small bolt tabs to insure they would sit flush against the deck once installed. I used small amounts of liquid glue and pressure with the tip of a wooden toothpick for those tabs to avoid a potential CA mess.
The step provides the choice of mounting the tow cables in their holders or just the empty holders and I opted for the tow cables in position. The cables were cleaned-up and are only dry-fit now, they will be removed and painted separately and permanently installed later on.

Step 11 is another simple step, this time dealing with the roof of the fighting compartment. The option is provided to install the angled shot deflector, part A24, and since this feature wasn't fully phased out until Oct '42, I decided to add it to my vehicle in keeping with the other Sept '42 features I'd been adding. If you decide not to install it, you need to remove the 4 small mount pins molded into the roof, something the instructions don't indicate to do but is obvious to figure out on your own. The three lifting eyes were also installed to round out the step.

Step 12 deals with the hull glacis plate and installs the front crew access hatches. There are two holes that need to be opened up from the underside to take the base of the Vorpanzer armor in a later step, this was done with a pin vise and micro-drill bit. The armored brake vent housings were also added along with the front headlights. I opted to fit the black out covers vs. the clear lenses also provided as parts M1.

Next up will be the rest of the upper hull and tomorrow may also see work start on the turret, have to see how things go!
Step 5 calls for all the road wheels and running gear to be installed so that was skipped for now since all that will be added after the hull has been painted.
Step 6 installs the plate from Step 4 and I highly recommend you do this step immediately after Step 4 to avoid possible fit/alignment problems due to the fin alignment I mentioned above. The plate is a snug fit and the fins have to line up perfectly with slots in the hull tub for everything to work out right...and if your fins have set up in the wrong position, it can result in a major headache.
The step also calls for the installation of the rear smoke candle rack in the form of parts B10/11 however if you decide, like me, to mount the turret smoke launchers then the rear rack needs to be omitted. The turret mounted launchers were also a Sept '42 feature so if you go that route you also need to not use part B2 for the angled rear hull overhang plate and use part B28 instead. B2 has the bolts for the rear rack molded on while B28 doesn't...a minor detail but since the kit includes both plates it's possible to maintain that consistency even though the instructions don't indicate any of this as an option.
This step also installs the rear air vent deflectors and the PE mesh screens for those vents. The mesh sits on small raised square tabs so I used CA gel to secure them in place, making sure they were flush to avoid fit problems with B2 or B28. I also needed to use small amounts of putty around the idler mount housings to close up a gap on both sides there, easily done with some Squadron white and a little sanding.
That led to Step 7 which begins work on the fenders starting with the left side fender first. The instruction diagrams incorrectly indicate you should install the small marker lights P2 or A8 but this is an anachronism for the N since those lights weren't installed after June '42 and the fender doesn't actually have the mounts molded there despite what the diagram shows, so just ignore this in the instructions. I installed the Notek light, the fender support brackets, spare wheel mounts, tool box, and rear mud-flaps as instructed. I opted to use the kit-supplied PE part for the rear mud flap latch hook and also added the small PE strip that fits over the air intake cut-out. Since I'm going to be doing this in a whitewash scheme, I left off the fire extinguisher and jack for the time being and will add those along with all the other tools and jack block later.
Step 8 deals with the right side fender and it received similar treatment as the left. Again, the tools were left off until later and I added the antenna tray, opting for the style that had the front foot pointing backwards vs. forward.
Step 9 is a very simple step, it assembles the engine deck hatches and armored vent covers.
Those are then used in Step 10 to assemble the rear engine deck along with all their hinge points. Those hinge points are small and have 2 contact points to clean up on each so you have to be careful to avoid them getting eaten by the carpet monster. The lifting eyes were also added along with the side intakes and their PE grills. The grills were added using Gator Grip glue around the edges to avoid glue potentially clogging the screens and I pre-bent the small bolt tabs to insure they would sit flush against the deck once installed. I used small amounts of liquid glue and pressure with the tip of a wooden toothpick for those tabs to avoid a potential CA mess.
The step provides the choice of mounting the tow cables in their holders or just the empty holders and I opted for the tow cables in position. The cables were cleaned-up and are only dry-fit now, they will be removed and painted separately and permanently installed later on.
Step 11 is another simple step, this time dealing with the roof of the fighting compartment. The option is provided to install the angled shot deflector, part A24, and since this feature wasn't fully phased out until Oct '42, I decided to add it to my vehicle in keeping with the other Sept '42 features I'd been adding. If you decide not to install it, you need to remove the 4 small mount pins molded into the roof, something the instructions don't indicate to do but is obvious to figure out on your own. The three lifting eyes were also installed to round out the step.
Step 12 deals with the hull glacis plate and installs the front crew access hatches. There are two holes that need to be opened up from the underside to take the base of the Vorpanzer armor in a later step, this was done with a pin vise and micro-drill bit. The armored brake vent housings were also added along with the front headlights. I opted to fit the black out covers vs. the clear lenses also provided as parts M1.
Next up will be the rest of the upper hull and tomorrow may also see work start on the turret, have to see how things go!
-
Bill Plunk
- Posts: 1245
- Joined: Wed Sep 28, 2022 10:18 pm
WIP 09-05-2010
Day 3 was even more productive than yesterday so let's get right to it!
Step 13 starts work on the superstructure for the hull. The front plate received the hull MG34 and while the instructions call for the full assembly of 7 parts, none of the interior details are visible on the finished kit so all you really need to use are parts J20 and J28. The kit also provides an option on the exterior kugelblende ball mount but the correct choice is G31 since it has the ring for the dust cover molded while the other, B3, is smooth/plain. The front plate received the driver's hood in the open position as well as the clear armored glass insert.
The step also deals with the superstructure side panels and provides the option of posing the side ports either open or closed. I opted for closed on both and also added the antenna base but not the antenna itself, will do that much later since I will be replacing the kit antenna with an AM brass one from RB Models.

Step 14 is a very busy and important step since it essentially constructs the entire upper hull from the various components all in one step. I started first with the assembly of the superstructure itself, this consists of a base that is then covered/plated over on all sides except the rear with additional parts for the roof, front, and sides. I used a combination of regular glue due to the large mating surfaces and liquid glue around the edges. Judicious use of finger pressure insured that the excellent weld detail was maintained but the join seams virtually disappeared. I set this off to the side so it could set up nice and solid for a while.

The next part of the step involves the addition of the glacis plate, this was done again with the combo of regular and liquid glue plus finger pressure. I also added part C3, the base of the Vorpanzer armor, now instead of waiting until Step 15 as it's much easier to get it in place at this stage vs. waiting until the entire upper hull was assembled. The fenders came next and these are trickier to get in place than they appear at first glance. The alignment with the fender support brackets has to be just so and there's some tension front to back that has to be ironed out as well. I started gluing at the rear and worked my way forward with each fender until I had them both secured the way I wanted them.

Next came the installation of the superstructure itself and the rear engine deck. The superstructure went in first and finger pressure was again used to get a good join before the engine deck was added.

The step also calls for the installation of the spare track holders. I added the hull nose rack first and then the glacis rack. The glacis rack's position needs to be just so to allow proper clearance between the two spare track runs especially since the spare tracks in this case are the Winterketten, so I used some of the Magic links to test fit the position relative to the front rack. I also used some poster blue-tack putty to mask off the driver's vision block to protect it during the painting and weathering stages to come. That rounded out this very important and involved step which also calls for the track installation but that will come later after painting.

Step 15 is a small step by comparison, it adds the Vorpanzer armor to the hull front. The option is provided to use either styrene or PE parts for the small side portions and the styrene has better detail IMHO, so I used those. The side where the MG34 is located wasn't mounted starting in Sept '42 to allow the dust cover to be fitted, so I left it off on that side for accuracy sake. The top portion of the Vorpanzer is available only as a PE part, so this was removed from the fret and installed with Gator Grip glue to allow for proper positioning. The instruction diagram incorrectly shows the plate aligning all the way to the right over the MG34 mount when in fact it aligns on the opposite side since the notch in the middle has to line up with the lifting eye in the center of the superstructure roof. I also added the missing power conduit for the Notek light using 0.5mm diameter solder bent to shape and secured in place with liquid glue.

Step 16 assembles the commander's cupola. I opted for it to be closed up since I don't have any interest in displaying it open or adding a figure but the kit does provide for clear block inserts and open shutters if you wanted to go that route. It also has very nice molded details on the inside faces of the cupola hatches.

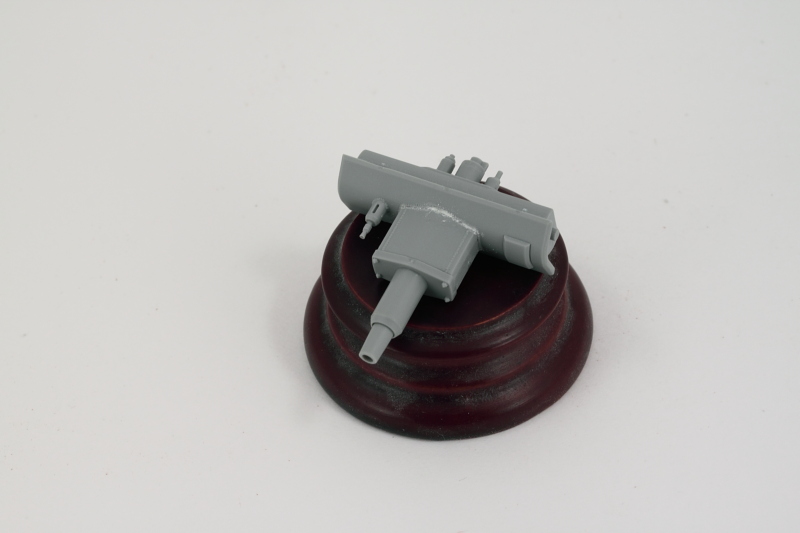
Step 17 begins work on the main gun and assembles the exterior mantlet and recoil housing as a sub-step. I chose the smooth end cap option vs. the bolted type and then added the barrel and interior mantlet portions without problems. The fit of the base of the recoil housing to the exterior mantlet isn't 100% precise so a little bit of putty was needed to fill a small gap on both the top and bottom. This step also calls for the installation of parts E2/E3 which are the elevation trunnions however it's best to wait until the next step to do that especially if you want the gun to remain able to elevate.
Step 18 adds the interior details to the gun including the breech, recoil guards, and spent shell basket. This step also adds the turret face plate to the mantlet and it's here that you should add parts E2/E3, taking care not to get glue on the mount pins. The instructions don't indicate this at all, but if you assemble it this way the gun will remain fully able to elevate but still have enough tension on the pins to hold its position however you pose it.

Step 19 begins work on the turret. The step adds the rear pistol ports and the supports for the rear turret bin. It also adds the frames for the side hatches in the form of parts G18 however the step shows these already installed and is something very easy to overlook if you aren't careful...I missed these the first time around and didn't notice them until Step 21 and it was MUCH harder to install them then of course...still possible but better if you do it in Step 19.
This step also asks you to install the turret fume extractor fan but to do that properly, you need to also install the base of the fan G6 but that isn't called for until Step 21.

Step 20 continues the work for the turret with the assembly of the turret bin and the clean-up of the turret bottom. The commander's chair is also added in this step but since I don't need it and it will only interfere with handling the turret for painting, I left it off. The turret bottom has numerous large ejector post stubs that have to be cut down and then sanded to allow for correct assembly with the turret top in the next step and of course since they are half stubs, the other half is a pin mark depression that would have to be filled and sanded if you were going to display the turret side hatches open.

That of course led me to the promised land of Step 21 which assembled the turret in its entirety from the various components constructed previously. The first order of business is to make sure you add parts G18 if you missed them in the previous step as you will need them before you can add the turret side hatches. Next you need to install the turret front plate to have proper clearance for the gun and spent shell basket to fit inside. This is a little tricky as the mating surfaces for the front plate aren't large, so I used regular glue and held it with finger pressure long enough for the glue to grab and then added the turret bottom to help support it. I used liquid glue around all the join seams and more finger pressure where needed to get a solid join all around the various weld seams.
After that had set up, I added the commander's cupola and rear turret bin followed by the various turret details as called for in the step. The side hatches were added but it's worth noting that the sub-diagram isn't quite accurate...you have to be careful which sides you use parts G19/G24 on in order to get them installed correctly. The key is the small pin molded into the hinge, this is supposed to be at the top so use that as your guide.
Last but not least, the step also provides the option for the turret-mounted smoke grenade launchers or the ordinary lifting eyes. In keeping with my Sept '42 features, I opted for the launchers. The base of the launchers has a d-shaped mounting tab but it's not the right size for the slot on the turret...so that was removed with a #11 blade and glued directly to the turret side. On the real deal the lifting eye was added over the base plate and the instructions include a sub-diagram with this option but neglect to tell you the right parts to use to do this. You need to use parts D26 (base) and D24 (hook) to add this little detail. The catch is that the round pins on the D26 base are slightly narrower than the molded-in openings on the launcher base, so you have to very carefully remove one of the round pins on D26 for it to fit right. Lot of work for a small detail, but the devil's always in the details, right?

Final step is Step 22 that places the turret on the hull in a friction fit. The fit is very loose so keep that in mind when you handle it if you place it and then forget that it's not secured!

Tomorrow will start the exterior paintwork.
Step 13 starts work on the superstructure for the hull. The front plate received the hull MG34 and while the instructions call for the full assembly of 7 parts, none of the interior details are visible on the finished kit so all you really need to use are parts J20 and J28. The kit also provides an option on the exterior kugelblende ball mount but the correct choice is G31 since it has the ring for the dust cover molded while the other, B3, is smooth/plain. The front plate received the driver's hood in the open position as well as the clear armored glass insert.
The step also deals with the superstructure side panels and provides the option of posing the side ports either open or closed. I opted for closed on both and also added the antenna base but not the antenna itself, will do that much later since I will be replacing the kit antenna with an AM brass one from RB Models.
Step 14 is a very busy and important step since it essentially constructs the entire upper hull from the various components all in one step. I started first with the assembly of the superstructure itself, this consists of a base that is then covered/plated over on all sides except the rear with additional parts for the roof, front, and sides. I used a combination of regular glue due to the large mating surfaces and liquid glue around the edges. Judicious use of finger pressure insured that the excellent weld detail was maintained but the join seams virtually disappeared. I set this off to the side so it could set up nice and solid for a while.
The next part of the step involves the addition of the glacis plate, this was done again with the combo of regular and liquid glue plus finger pressure. I also added part C3, the base of the Vorpanzer armor, now instead of waiting until Step 15 as it's much easier to get it in place at this stage vs. waiting until the entire upper hull was assembled. The fenders came next and these are trickier to get in place than they appear at first glance. The alignment with the fender support brackets has to be just so and there's some tension front to back that has to be ironed out as well. I started gluing at the rear and worked my way forward with each fender until I had them both secured the way I wanted them.
Next came the installation of the superstructure itself and the rear engine deck. The superstructure went in first and finger pressure was again used to get a good join before the engine deck was added.
The step also calls for the installation of the spare track holders. I added the hull nose rack first and then the glacis rack. The glacis rack's position needs to be just so to allow proper clearance between the two spare track runs especially since the spare tracks in this case are the Winterketten, so I used some of the Magic links to test fit the position relative to the front rack. I also used some poster blue-tack putty to mask off the driver's vision block to protect it during the painting and weathering stages to come. That rounded out this very important and involved step which also calls for the track installation but that will come later after painting.
Step 15 is a small step by comparison, it adds the Vorpanzer armor to the hull front. The option is provided to use either styrene or PE parts for the small side portions and the styrene has better detail IMHO, so I used those. The side where the MG34 is located wasn't mounted starting in Sept '42 to allow the dust cover to be fitted, so I left it off on that side for accuracy sake. The top portion of the Vorpanzer is available only as a PE part, so this was removed from the fret and installed with Gator Grip glue to allow for proper positioning. The instruction diagram incorrectly shows the plate aligning all the way to the right over the MG34 mount when in fact it aligns on the opposite side since the notch in the middle has to line up with the lifting eye in the center of the superstructure roof. I also added the missing power conduit for the Notek light using 0.5mm diameter solder bent to shape and secured in place with liquid glue.
Step 16 assembles the commander's cupola. I opted for it to be closed up since I don't have any interest in displaying it open or adding a figure but the kit does provide for clear block inserts and open shutters if you wanted to go that route. It also has very nice molded details on the inside faces of the cupola hatches.
Step 17 begins work on the main gun and assembles the exterior mantlet and recoil housing as a sub-step. I chose the smooth end cap option vs. the bolted type and then added the barrel and interior mantlet portions without problems. The fit of the base of the recoil housing to the exterior mantlet isn't 100% precise so a little bit of putty was needed to fill a small gap on both the top and bottom. This step also calls for the installation of parts E2/E3 which are the elevation trunnions however it's best to wait until the next step to do that especially if you want the gun to remain able to elevate.
Step 18 adds the interior details to the gun including the breech, recoil guards, and spent shell basket. This step also adds the turret face plate to the mantlet and it's here that you should add parts E2/E3, taking care not to get glue on the mount pins. The instructions don't indicate this at all, but if you assemble it this way the gun will remain fully able to elevate but still have enough tension on the pins to hold its position however you pose it.
Step 19 begins work on the turret. The step adds the rear pistol ports and the supports for the rear turret bin. It also adds the frames for the side hatches in the form of parts G18 however the step shows these already installed and is something very easy to overlook if you aren't careful...I missed these the first time around and didn't notice them until Step 21 and it was MUCH harder to install them then of course...still possible but better if you do it in Step 19.
This step also asks you to install the turret fume extractor fan but to do that properly, you need to also install the base of the fan G6 but that isn't called for until Step 21.
Step 20 continues the work for the turret with the assembly of the turret bin and the clean-up of the turret bottom. The commander's chair is also added in this step but since I don't need it and it will only interfere with handling the turret for painting, I left it off. The turret bottom has numerous large ejector post stubs that have to be cut down and then sanded to allow for correct assembly with the turret top in the next step and of course since they are half stubs, the other half is a pin mark depression that would have to be filled and sanded if you were going to display the turret side hatches open.
That of course led me to the promised land of Step 21 which assembled the turret in its entirety from the various components constructed previously. The first order of business is to make sure you add parts G18 if you missed them in the previous step as you will need them before you can add the turret side hatches. Next you need to install the turret front plate to have proper clearance for the gun and spent shell basket to fit inside. This is a little tricky as the mating surfaces for the front plate aren't large, so I used regular glue and held it with finger pressure long enough for the glue to grab and then added the turret bottom to help support it. I used liquid glue around all the join seams and more finger pressure where needed to get a solid join all around the various weld seams.
After that had set up, I added the commander's cupola and rear turret bin followed by the various turret details as called for in the step. The side hatches were added but it's worth noting that the sub-diagram isn't quite accurate...you have to be careful which sides you use parts G19/G24 on in order to get them installed correctly. The key is the small pin molded into the hinge, this is supposed to be at the top so use that as your guide.
Last but not least, the step also provides the option for the turret-mounted smoke grenade launchers or the ordinary lifting eyes. In keeping with my Sept '42 features, I opted for the launchers. The base of the launchers has a d-shaped mounting tab but it's not the right size for the slot on the turret...so that was removed with a #11 blade and glued directly to the turret side. On the real deal the lifting eye was added over the base plate and the instructions include a sub-diagram with this option but neglect to tell you the right parts to use to do this. You need to use parts D26 (base) and D24 (hook) to add this little detail. The catch is that the round pins on the D26 base are slightly narrower than the molded-in openings on the launcher base, so you have to very carefully remove one of the round pins on D26 for it to fit right. Lot of work for a small detail, but the devil's always in the details, right?
Final step is Step 22 that places the turret on the hull in a friction fit. The fit is very loose so keep that in mind when you handle it if you place it and then forget that it's not secured!
Tomorrow will start the exterior paintwork.
-
Bill Plunk
- Posts: 1245
- Joined: Wed Sep 28, 2022 10:18 pm
WIP 09-06-2010
I managed to find a reference pic of #116 in whitewash scheme and I was hoping that it would end up being consistent with the disruptive pattern seen on the Tiger's also assigned to sPzAbt 502. I wasn't disappointed, the pic below is from Trojca's Sdkfz 141 Pzkpfw III and is posted for discussion purposes only. This is going to help immensely in terms of how and where I apply the whitewash treatment.
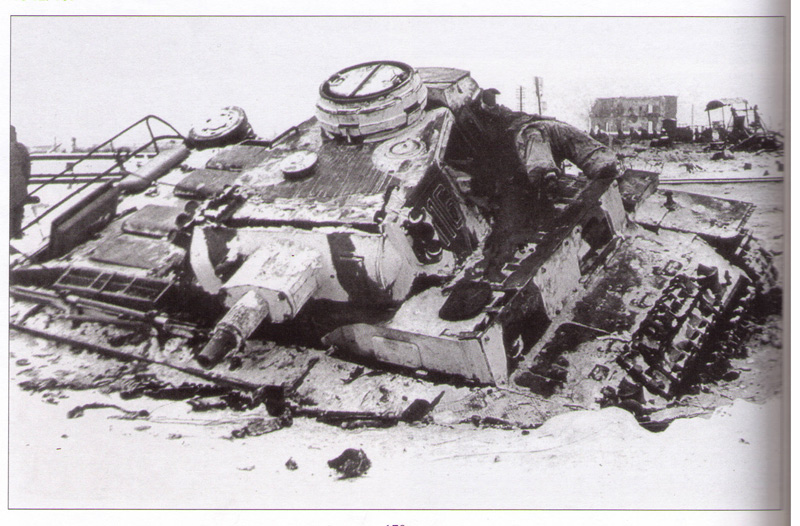
It also showed me that the side plate on the Vorpanzer next to the hull MG34 was in place, so I went back and added that to my build for consistency sake. One more example of "never say never" when it comes to dates of changes in production vehicles since it clearly has the Sept '42 smoke launchers on the turret but still has the side plate which was also no longer fitted in Sept '42. Perfect case of exception to the rule I suppose and why it's always a good idea to look for reference photos if you're building a specific vehicle, fortunately it was very easy to add the plate in before painting. Also of note for the curious, 116 isn't shown as outfitted with Winterketten at the time of this photo and there's a field-mod rack on the engine deck for those looking to add more "unique" characteristics to this base kit.

Now it's off to the spray booth, more updates to come later today.
It also showed me that the side plate on the Vorpanzer next to the hull MG34 was in place, so I went back and added that to my build for consistency sake. One more example of "never say never" when it comes to dates of changes in production vehicles since it clearly has the Sept '42 smoke launchers on the turret but still has the side plate which was also no longer fitted in Sept '42. Perfect case of exception to the rule I suppose and why it's always a good idea to look for reference photos if you're building a specific vehicle, fortunately it was very easy to add the plate in before painting. Also of note for the curious, 116 isn't shown as outfitted with Winterketten at the time of this photo and there's a field-mod rack on the engine deck for those looking to add more "unique" characteristics to this base kit.
Now it's off to the spray booth, more updates to come later today.
-
Bill Plunk
- Posts: 1245
- Joined: Wed Sep 28, 2022 10:18 pm
WIP 09-06-2010
Final day of the Labor Day holiday for me and it was all about the paint work. Spent about 5 hours in and around the spray booth so it was a very productive day. First up was the prep work, I mounted all the wheels, return rollers, sprockets, and idlers on toothpicks with poster blue tack to make it easier to handle them for painting. I also happened to have on hand a Quick Wheels mask for the Pz III Smart Kit family and decided to use it vs. my usual circle template method.

I also created a handy little handle for the turret in the form of a cut down cardboard tube from a paper towel roll. The diameter of the tube was almost a perfect match, just needed to crimp the end a little bit to create a tight friction fit. The turret, hull, and all the wheels were given a primer coat of Model Master enamel Italian Dark Brown by airbrush. This insures I don't have any bare plastic areas, primes the PE used, and also allows me to check seams and putty work before committing to the base color.

Next up was the application of the base color, I used MM enamel Panzer Schwarzgrau for the Panzer Gray.

I also painted the road wheels and return rollers, using MM enamel Gunmetal for the rubber portions and then spraying the base color using the Quick Wheel mask. This is the first time I've used one for a full vehicle set and have to say it did go "quick" just as the name implies and provided an excellent demarcation between the wheel hub and rubber rim.

Now came the interesting part...the application of the whitewash pattern. I first used small "worms" of poster blue tack putty to mask off the areas I wanted to remain in panzer gray and had to speculate on some portions of the pattern since the one pic only shows so much of the vehicle. The whitewash was added using MM enamel Flat White by airbrush, using pre-shading techniques to keep the finish uneven and still allow some of the panzer gray base color to show through to varying degrees in places.

I then removed the blue-tack and cleaned up some of the flat white over spray in places. I checked the pattern with the turret in place and decided the hull sides and front needed a little more whitewash to look "right", so I added those portions to get it to this point.


Of course this is just a foundation, there's still a lot more work to do with the finish in following steps. It will get to sit until next weekend when work will resume on the "normal" schedule.
I also created a handy little handle for the turret in the form of a cut down cardboard tube from a paper towel roll. The diameter of the tube was almost a perfect match, just needed to crimp the end a little bit to create a tight friction fit. The turret, hull, and all the wheels were given a primer coat of Model Master enamel Italian Dark Brown by airbrush. This insures I don't have any bare plastic areas, primes the PE used, and also allows me to check seams and putty work before committing to the base color.
Next up was the application of the base color, I used MM enamel Panzer Schwarzgrau for the Panzer Gray.
I also painted the road wheels and return rollers, using MM enamel Gunmetal for the rubber portions and then spraying the base color using the Quick Wheel mask. This is the first time I've used one for a full vehicle set and have to say it did go "quick" just as the name implies and provided an excellent demarcation between the wheel hub and rubber rim.
Now came the interesting part...the application of the whitewash pattern. I first used small "worms" of poster blue tack putty to mask off the areas I wanted to remain in panzer gray and had to speculate on some portions of the pattern since the one pic only shows so much of the vehicle. The whitewash was added using MM enamel Flat White by airbrush, using pre-shading techniques to keep the finish uneven and still allow some of the panzer gray base color to show through to varying degrees in places.
I then removed the blue-tack and cleaned up some of the flat white over spray in places. I checked the pattern with the turret in place and decided the hull sides and front needed a little more whitewash to look "right", so I added those portions to get it to this point.
Of course this is just a foundation, there's still a lot more work to do with the finish in following steps. It will get to sit until next weekend when work will resume on the "normal" schedule.
-
Bill Plunk
- Posts: 1245
- Joined: Wed Sep 28, 2022 10:18 pm
WIP 09-12-2010
This weekend's efforts focused in on the overall finish as well as the details for the exterior. I gave a lot of thought to how I wanted to approach the overall finish and decided that a layered effect was going to give me the results I wanted. That of course meant I had to think through the various layers and when/how they should be applied. The first layer already existed of course with the base colors and patterns laid down previously, so the next layer needed to modify those. The panzer gray was the area that I started with first and I mixed up a roughly 30/70 paint/thinner wash of MM enamel Flat White and applied this over all the panzer gray portions with a #2 square tipped shader brush. I didn't want the wash to go on too heavy since I was applying this on an unprotected surface so I tried to avoid loading the brush too heavily with wash and didn't use repetitive strokes. Since the vehicle had sat for a week, the enamel paints had thoroughly cured so I wasn't worried about paint lifting but still exercised care all the same.

Even with care there were a few areas where the wash accumulated heavier than I liked but not to worry, the next step would allow for that to be taken care of. The next step was to attack the white portions of the finish, this was done using the same #2 brush but instead of a wash I used dry-brushing to achieve the result needed. Working slowly, I dry brushed MM enamel Panzer Schwarzgrau, using mostly downward strokes with hardly any paint left on the brush, emphasizing the effort more in places that would've received heavier wear.


With that out of the way, I added the road wheels and return rollers to both sides and let it sit off to the side and thoroughly set up. You can see now how much the original panzer gray contrasts with the revised finish, the wheels will get their turn in a bit so as to better match the rest of the vehicle.

I worked on all the exterior details next, removing all the various tools and fender equipment from the sprues and cleaning them up. The jack is the trickiest of the bunch as it has no less than 10 parts required for itself and the mounts to the fender. The key with the jack is to make sure that the "foot" (either A45 or A47 depending on your choice) is partly extended as one of the mount brackets depends on that to install properly and it's a good idea to check just how far to extend it by test fitting on the fender along with the fire extinguisher to avoid issues with overall placement. I had deliberately held off installing the jack and FE to allow for easier painting and weathering of that portion of the fenders even though they are finished in hull color.
All of the tools were detailed by hand using MM non-buffing Metalizer Gunmetal followed by a light dry-brushing of MM enamel Steel for their metal portions. Those with wood handles were painted with a tan base color followed by a wash of thinned enamel Leather and a dusting of Burnt Umber artist pastels. The wire cutters had their Bakelite handles painted with MM enamel Italian Dark Brown and the rubber end caps painted with MM enamel Gunmetal. I also used the air brush to paint and detail the spare road wheels, the rubber portions were painted first with MM enamel Gunmetal and a circle template used to paint their inner hubs with Italian Dark Brown to simulate the red oxide primer. The Quick Wheel template used earlier doesn't allow for the inner hubs, only the outer hubs, but I did use it to finish the outer hubs in Panzer Gray to round out things in that department.
I also thinned the DML molded-on tool clamp handles using the very tip of a new #11 blade and a square needle file to give them a more in-scale appearance. For the gun cleaning rods, I used a #78 finger drill to open up the threaded end of the second rod to match the pin on the first rod for added detail. Last but not least, the rear engine deck tow cables were painted and installed. Now that the road wheels and return rollers were set, I gave them the same Flat White wash treatment to blend them in with the rest of the hull.


Next up is the tracks, there's 108 links per side provided (only about 92 are actually needed, the rest are spares) and each one of the Magic track links has some clean up needed in the form of raised ejector marks and a small nub on the guide horns that have to be taken care of before they can be assembled. It's tedious/repetitive but necessary and is the final step/detail before I move on to the markings and final weathering stages.
Even with care there were a few areas where the wash accumulated heavier than I liked but not to worry, the next step would allow for that to be taken care of. The next step was to attack the white portions of the finish, this was done using the same #2 brush but instead of a wash I used dry-brushing to achieve the result needed. Working slowly, I dry brushed MM enamel Panzer Schwarzgrau, using mostly downward strokes with hardly any paint left on the brush, emphasizing the effort more in places that would've received heavier wear.
With that out of the way, I added the road wheels and return rollers to both sides and let it sit off to the side and thoroughly set up. You can see now how much the original panzer gray contrasts with the revised finish, the wheels will get their turn in a bit so as to better match the rest of the vehicle.
I worked on all the exterior details next, removing all the various tools and fender equipment from the sprues and cleaning them up. The jack is the trickiest of the bunch as it has no less than 10 parts required for itself and the mounts to the fender. The key with the jack is to make sure that the "foot" (either A45 or A47 depending on your choice) is partly extended as one of the mount brackets depends on that to install properly and it's a good idea to check just how far to extend it by test fitting on the fender along with the fire extinguisher to avoid issues with overall placement. I had deliberately held off installing the jack and FE to allow for easier painting and weathering of that portion of the fenders even though they are finished in hull color.
All of the tools were detailed by hand using MM non-buffing Metalizer Gunmetal followed by a light dry-brushing of MM enamel Steel for their metal portions. Those with wood handles were painted with a tan base color followed by a wash of thinned enamel Leather and a dusting of Burnt Umber artist pastels. The wire cutters had their Bakelite handles painted with MM enamel Italian Dark Brown and the rubber end caps painted with MM enamel Gunmetal. I also used the air brush to paint and detail the spare road wheels, the rubber portions were painted first with MM enamel Gunmetal and a circle template used to paint their inner hubs with Italian Dark Brown to simulate the red oxide primer. The Quick Wheel template used earlier doesn't allow for the inner hubs, only the outer hubs, but I did use it to finish the outer hubs in Panzer Gray to round out things in that department.
I also thinned the DML molded-on tool clamp handles using the very tip of a new #11 blade and a square needle file to give them a more in-scale appearance. For the gun cleaning rods, I used a #78 finger drill to open up the threaded end of the second rod to match the pin on the first rod for added detail. Last but not least, the rear engine deck tow cables were painted and installed. Now that the road wheels and return rollers were set, I gave them the same Flat White wash treatment to blend them in with the rest of the hull.
Next up is the tracks, there's 108 links per side provided (only about 92 are actually needed, the rest are spares) and each one of the Magic track links has some clean up needed in the form of raised ejector marks and a small nub on the guide horns that have to be taken care of before they can be assembled. It's tedious/repetitive but necessary and is the final step/detail before I move on to the markings and final weathering stages.
-
Bill Plunk
- Posts: 1245
- Joined: Wed Sep 28, 2022 10:18 pm
WIP 09-16-2010
This is a rare mid-week update vs. the normal pattern of the weekend updates but since the tracks were the last real item remaining, I've been working on them slowly a little bit at a time. After cleaning up the links, I went ahead and assembled them one track side at a time. I formed the bottom run first, adding enough links to go up and over the sprocket and idler and let those fully set up. The runs were then painted with MM non-buffing Metalizer Gunmetal, dry-brushed with enamel Steel, and given a wash of enamel Burnt Umber. Then I quickly assembled the top run, painted and weathered it, then inserted it over the return rollers while the run was still pliable enough to bend without breaking. The sprockets and idlers were added next and then the fixed run assembled earlier joined with the top run to complete the whole track. Even though the instructions call for 94 links, I only used 93 as I didn't want that much sag on the top runs.
The sprocket teeth and contact surfaces on the idlers were detailed with non-buffing Metalizer Steel and the same Flat White wash used earlier applied to them so they would match the rest of the vehicle.

The instructions also give you diagrams for the option of spacing out the ice sprags at intervals of either every 3, 4, or 5 links. I spaced mine at every 3 but didn't install them along the entire run. The top run and, of course the bottom run, aren't visible so I just added them at the front and rear and kept the rest as spares for possible use on future builds. I also detailed the rear Notek convoy light with Tamiya Clear Green for the lenses.

Once the main track runs were done, I could take stock of how many spare links I had left over and assembled the two spare runs. I used 7 links for one run and 14 links for the other for a total of 21 links. There aren't enough spares left from one side or the other to do all the spares required so the mix-and-match is needed. I added the missing pin detail on the end links for each run using small pieces of 0.5mm diameter styrene rod. For the front links, I created the open pin holes by drilling the links out with a #76 finger drill.
These links were also base coated with non-buffing Metalizer Gunmetal but were only lightly dry-brushed with Steel followed by a wash of thinned enamel Rust. This was followed by additional dry-brushed enamel Burnt Umber to finish the look I wanted. The runs were then carefully glued into place in their respective racks.


Now the vehicle will get a sealing coat of Future and its on to the markings and final weathering.
The sprocket teeth and contact surfaces on the idlers were detailed with non-buffing Metalizer Steel and the same Flat White wash used earlier applied to them so they would match the rest of the vehicle.
The instructions also give you diagrams for the option of spacing out the ice sprags at intervals of either every 3, 4, or 5 links. I spaced mine at every 3 but didn't install them along the entire run. The top run and, of course the bottom run, aren't visible so I just added them at the front and rear and kept the rest as spares for possible use on future builds. I also detailed the rear Notek convoy light with Tamiya Clear Green for the lenses.
Once the main track runs were done, I could take stock of how many spare links I had left over and assembled the two spare runs. I used 7 links for one run and 14 links for the other for a total of 21 links. There aren't enough spares left from one side or the other to do all the spares required so the mix-and-match is needed. I added the missing pin detail on the end links for each run using small pieces of 0.5mm diameter styrene rod. For the front links, I created the open pin holes by drilling the links out with a #76 finger drill.
These links were also base coated with non-buffing Metalizer Gunmetal but were only lightly dry-brushed with Steel followed by a wash of thinned enamel Rust. This was followed by additional dry-brushed enamel Burnt Umber to finish the look I wanted. The runs were then carefully glued into place in their respective racks.
Now the vehicle will get a sealing coat of Future and its on to the markings and final weathering.
-
Bill Plunk
- Posts: 1245
- Joined: Wed Sep 28, 2022 10:18 pm
WIP 09-18-2010
Made great progress since the last update and the first order of business was to get the decal markings on. I applied a sealing coat of Future acrylic floor polish by airbrush and let that dry for a couple of hours before applying the decals. Each decal was treated with Walther's Solvaset to insure it snugged down tight to the surface and didn't silver. Once the decals were set, a 2nd coat of Future was applied to seal them in and protect them from the next steps in the weathering process.


I let the 2nd Future coat cure overnight and this morning I applied a light filter/wash of thinned enamel Raw Umber using a round 00 sable brush. This reduced some of the starkness on the whitewash areas and also served to tie the overall finish and decals together.

This was followed by a pin wash of enamel Burnt Umber applied with a 10/0 pointed brush to bring out all the various detail areas, weld seams, etc. Excess wash was cleaned up/adjusted using the same brush and some clean thinner.

The entire vehicle was sprayed with Testors Lusterless Flat in the spray can to seal everything in and remove any remaining vestiges of gloss from the Future coats. I mixed up a dry powder combination of Mig Pigments Russian Earth and Dark Mud and then added tap water with a drop of dish washing soap mixed in to break the surface tension to create a wet slurry mixture. This mixture was applied with a sable brush over the lower hull, tracks, and running gear and then allowed to air dry.

Excess pigment was then removed using first a series of stiff bristled brushes and then followed-up with a combination of dry and wet Q-tip ends until I had the look I wanted.

I'll give it a once over again in the morning to make sure I didn't miss anything or make any adjustments before calling this one done.
I let the 2nd Future coat cure overnight and this morning I applied a light filter/wash of thinned enamel Raw Umber using a round 00 sable brush. This reduced some of the starkness on the whitewash areas and also served to tie the overall finish and decals together.
This was followed by a pin wash of enamel Burnt Umber applied with a 10/0 pointed brush to bring out all the various detail areas, weld seams, etc. Excess wash was cleaned up/adjusted using the same brush and some clean thinner.
The entire vehicle was sprayed with Testors Lusterless Flat in the spray can to seal everything in and remove any remaining vestiges of gloss from the Future coats. I mixed up a dry powder combination of Mig Pigments Russian Earth and Dark Mud and then added tap water with a drop of dish washing soap mixed in to break the surface tension to create a wet slurry mixture. This mixture was applied with a sable brush over the lower hull, tracks, and running gear and then allowed to air dry.
Excess pigment was then removed using first a series of stiff bristled brushes and then followed-up with a combination of dry and wet Q-tip ends until I had the look I wanted.
I'll give it a once over again in the morning to make sure I didn't miss anything or make any adjustments before calling this one done.
-
Bill Plunk
- Posts: 1245
- Joined: Wed Sep 28, 2022 10:18 pm
Completion 09-19-2010
After letting this one sit overnight I came back to it with fresh eyes and made a few more adjustments to the pigments on the lower hull, removed the masking on the driver's vision port and touched up the paint there, and then it was off to the photo booth for the walk around shots.


