
Italeri Sdkfz 10/5 Demag D7 w/Flak 38 (2010)
-
Bill Plunk
- Posts: 1245
- Joined: Wed Sep 28, 2022 10:18 pm
Italeri Sdkfz 10/5 Demag D7 w/Flak 38 (2010)
Build log using Italeri kit #35371 Demag D7 with Flak 38, Eduard PE, Model Kasten workable tracks and sprockets, DML's kit #6288 for the Flak 38, and a Griffon aluminum and brass barrel for the DML kit.
-
Bill Plunk
- Posts: 1245
- Joined: Wed Sep 28, 2022 10:18 pm
WIP 05-02-2010
One of the surprising things about this particular project is just how simple it is on one level but also complex on another. The Italeri kit consists of just three sprues and one is devoted almost entirely to the Flak 38 which I'll be replacing with the DML kit. As such, construction is pretty straightforward even with the addition of some of the Eduard items to dress up the detail level a bit here and there.
I got started right off the bat with Step 1 which deals with the assembly of the interior. Quite a bit of the Eduard set is devoted to improving this area although I opted to stay with the styrene molded dashboard instead of replacing it wholesale with the Eduard stuff. The PE didn't have the same 3-D value so I selectively used different parts to add detail where the styrene parts were missing for the most part. The transmission axles received their PE upgrades and I added the missing driver's and passenger's floorboards along with the driver's pedals. The Eduard set included a fire extinguisher bracket for the driver's side but the Italeri kit doesn't include an FE so I scrounged one from the spares bin and cleaned it up to work with the bracket.

Step 2 was a two-parter, the first part dealt with the underside of the hull and the front end suspension. I filled the ejector marks present with Squadron White putty and sanded them down. Since I store my completed builds in a multi-shelf display case, the undersides are visible otherwise it's something that could be skipped if you're so inclined. I added the suspension elements after cleaning up their prominent mold seams, taking care to make sure the axle sat level.

The second half of the step calls for the installation of the interior into the lower hull along with the rear hull plate and tow hook. I also drilled out the two holes in the fender as directed and removed the thick molded on support bracket in preparation for the replacement PE items to be added later.
I also completed Step 3 at this point since it was a relatively simple one that added the sliding panels for both the driver and passenger sides along with their slide rails. I left the steering column off for now to make it easier to paint the interior and will install it later.

Step 4 adds the supports for the engine compartment hood and mounts for the windshield. I installed the windshield without glue to allow it to swing up and down and also left out the clear glass parts which will be installed much later. I removed the thick tabs on the side of the windshield that are meant to mate up with the armored cab styrene parts. Since I will be using the Eduard parts, they weren't needed and would've been in the way if not dealt with.

Step 5 adds the side stowage box and the engine exhaust covers as well as the engine compartment hood. The hood has a very thick over-scale hinge molded on one half of the hood, this was removed with a sharp #11 blade and sanded smooth. The hood parts were glued into position and once set, the Eduard PE hinge added using liquid glue to secure it in the proper alignment. I also added the Eduard PE hinge hooks in place of the kit parts and filled the mount holes with putty prior to the PE parts being glued in place with CA gel. This step also installs the front radiator grill, the tow hooks, and the remaining elements of the front end suspension to round things out.

I skipped Steps 6 and 7 since they deal with the suspension and tracks and I'm not quite ready to deal with that just yet. Step 8 installs them along with the front wheels but also includes the installation of the armored cab plates so that's what I worked on next. The Eduard set provides the armored cab as a single large piece that needs to be folded to the right angles and has separate multiple add-on parts for the sliding visors. These were tricky to add as the brackets have sliding edges to allow the plates to move but I instead glued them down in the closed position to avoid complications. I also added the angled reinforcement brackets to round out the cab assembly.

Test fits with the cab showed that I needed to make some additional modifications to allow for proper clearance. The first was the need to cut down the molded on detail just below the hinge point for the windshield on either side. This would've been much easier to accomplish if I'd known about it before installing them to the hull but I was still able to get it done. The windshield wipers were also in the way so these were cut off and replaced with the Eduard items. I also noticed that a gap between the side supports and the dashboard would've remained visible so this was filled with putty and sanded smooth to fix. With the PE cab dry-fit in place, I applied liquid glue to the hinge points on the windshield and let it dry in place to fix it at the proper angle.
I also filled in the large mount hole for the Notek light on the left hand fender with putty and replaced the light mount with the Eduard PE items. The light itself was cut down to free it from the styrene mount and the base sanded down so it would sit at the correct height. The molded on shovel mount was also removed since it wasn't present on this variant and the fender area in question sanded smooth.
I also installed the main headlights from Step 9 and opened up their black-out covers with a finger drill to give it a more realistic appearance.

That brought me back to the cab which was installed using a combination of Gator Grip glue where it made contact with the windshield and windshield support sides and liquid glue along the fenders where it made contact there due to the small surface contact area.

It was a very productive weekend, next up will be the remaining front details like the mirrors/turn signals and the fender rifle holders before turning to the rear gun platform and Flak 38.
I got started right off the bat with Step 1 which deals with the assembly of the interior. Quite a bit of the Eduard set is devoted to improving this area although I opted to stay with the styrene molded dashboard instead of replacing it wholesale with the Eduard stuff. The PE didn't have the same 3-D value so I selectively used different parts to add detail where the styrene parts were missing for the most part. The transmission axles received their PE upgrades and I added the missing driver's and passenger's floorboards along with the driver's pedals. The Eduard set included a fire extinguisher bracket for the driver's side but the Italeri kit doesn't include an FE so I scrounged one from the spares bin and cleaned it up to work with the bracket.
Step 2 was a two-parter, the first part dealt with the underside of the hull and the front end suspension. I filled the ejector marks present with Squadron White putty and sanded them down. Since I store my completed builds in a multi-shelf display case, the undersides are visible otherwise it's something that could be skipped if you're so inclined. I added the suspension elements after cleaning up their prominent mold seams, taking care to make sure the axle sat level.
The second half of the step calls for the installation of the interior into the lower hull along with the rear hull plate and tow hook. I also drilled out the two holes in the fender as directed and removed the thick molded on support bracket in preparation for the replacement PE items to be added later.
I also completed Step 3 at this point since it was a relatively simple one that added the sliding panels for both the driver and passenger sides along with their slide rails. I left the steering column off for now to make it easier to paint the interior and will install it later.
Step 4 adds the supports for the engine compartment hood and mounts for the windshield. I installed the windshield without glue to allow it to swing up and down and also left out the clear glass parts which will be installed much later. I removed the thick tabs on the side of the windshield that are meant to mate up with the armored cab styrene parts. Since I will be using the Eduard parts, they weren't needed and would've been in the way if not dealt with.
Step 5 adds the side stowage box and the engine exhaust covers as well as the engine compartment hood. The hood has a very thick over-scale hinge molded on one half of the hood, this was removed with a sharp #11 blade and sanded smooth. The hood parts were glued into position and once set, the Eduard PE hinge added using liquid glue to secure it in the proper alignment. I also added the Eduard PE hinge hooks in place of the kit parts and filled the mount holes with putty prior to the PE parts being glued in place with CA gel. This step also installs the front radiator grill, the tow hooks, and the remaining elements of the front end suspension to round things out.
I skipped Steps 6 and 7 since they deal with the suspension and tracks and I'm not quite ready to deal with that just yet. Step 8 installs them along with the front wheels but also includes the installation of the armored cab plates so that's what I worked on next. The Eduard set provides the armored cab as a single large piece that needs to be folded to the right angles and has separate multiple add-on parts for the sliding visors. These were tricky to add as the brackets have sliding edges to allow the plates to move but I instead glued them down in the closed position to avoid complications. I also added the angled reinforcement brackets to round out the cab assembly.
Test fits with the cab showed that I needed to make some additional modifications to allow for proper clearance. The first was the need to cut down the molded on detail just below the hinge point for the windshield on either side. This would've been much easier to accomplish if I'd known about it before installing them to the hull but I was still able to get it done. The windshield wipers were also in the way so these were cut off and replaced with the Eduard items. I also noticed that a gap between the side supports and the dashboard would've remained visible so this was filled with putty and sanded smooth to fix. With the PE cab dry-fit in place, I applied liquid glue to the hinge points on the windshield and let it dry in place to fix it at the proper angle.
I also filled in the large mount hole for the Notek light on the left hand fender with putty and replaced the light mount with the Eduard PE items. The light itself was cut down to free it from the styrene mount and the base sanded down so it would sit at the correct height. The molded on shovel mount was also removed since it wasn't present on this variant and the fender area in question sanded smooth.
I also installed the main headlights from Step 9 and opened up their black-out covers with a finger drill to give it a more realistic appearance.
That brought me back to the cab which was installed using a combination of Gator Grip glue where it made contact with the windshield and windshield support sides and liquid glue along the fenders where it made contact there due to the small surface contact area.
It was a very productive weekend, next up will be the remaining front details like the mirrors/turn signals and the fender rifle holders before turning to the rear gun platform and Flak 38.
-
Bill Plunk
- Posts: 1245
- Joined: Wed Sep 28, 2022 10:18 pm
WIP 05-08-2010
Today was a very productive day at the workbench so an update is in order! Picking up from where I left off last time, I continued with the details for the front half of the vehicle. I assembled and installed the fender mounted rifle cases as called for in Step 11 and added the missing hinge detail courtesy of the Eduard PE set. The hinge strips were carefully aligned with the opening gap at the front and then glued in place using liquid glue and careful pressure with a toothpick. Some of the contact points with the fender weren't precise/solid, so I used small amounts of Squadron White putty to fill their gaps and sanded it down carefully after the putty had dried.
I also completed the details left over from Step 9 in the form of the turn signal indicators and driver's mirror. The molded on indicators were cut away and replaced with the much better detailed Eduard PE items and the mirror was added using a length of brass rod and the Eduard mirror pieces. For the passenger side, I had to carefully remove the ejector mark on the inside of the spot light housing with a round needle file to round things out.


That brought me back to Step 11 which deals with the rear deck where the Flak 38 mounts. The underside had some ejector marks that would be visible on the finished build so these were filled with putty and sanded smooth. I removed the molded on portion of the rear Notek light mount and added the Eduard PE mud flaps for both sides. The kit-supplied Notek light was installed using the Eduard mount bracket and some CA gel to insure it stayed put for the long haul. This step also called for some locating holes on the underside to be opened up to take parts that hold the Flak 38 base in position but a quick check of the DML base against the Italeri base showed that the dimensions are different so I didn't open up the holes and will add those parts later once I have the gun built and know where they are supposed to go.

The rear deck was installed along with the front bracing rail and side connectors to complete the step.

That brought me to Step 12 which deals with the assembly of the fold-down side extenders that create the fighting platform for the gun crew. Instead of using the kit-supplied vinyl mesh, I used the Eduard mesh and installed it using liquid glue due to the fragile nature of the mesh and the tight fit to the kit parts.
The Italeri instructions contain an error here in that the instruction diagrams show the installation of the side ammo cans with the slant facing towards the front of the vehicle. I wasn't paying too close attention and assembled things as the diagrams indicated but it didn't look right when I took the pic.

A quick check of references showed I had them backwards so some careful effort with liquid glue was necessary to gently pry them off and switch them around to face the correct directions on both sides and on the rear panel. Once they had set up sufficiently, I installed the panels in the raised position as called for in Step 16.

Next up will be the Flak 38 itself.
I also completed the details left over from Step 9 in the form of the turn signal indicators and driver's mirror. The molded on indicators were cut away and replaced with the much better detailed Eduard PE items and the mirror was added using a length of brass rod and the Eduard mirror pieces. For the passenger side, I had to carefully remove the ejector mark on the inside of the spot light housing with a round needle file to round things out.
That brought me back to Step 11 which deals with the rear deck where the Flak 38 mounts. The underside had some ejector marks that would be visible on the finished build so these were filled with putty and sanded smooth. I removed the molded on portion of the rear Notek light mount and added the Eduard PE mud flaps for both sides. The kit-supplied Notek light was installed using the Eduard mount bracket and some CA gel to insure it stayed put for the long haul. This step also called for some locating holes on the underside to be opened up to take parts that hold the Flak 38 base in position but a quick check of the DML base against the Italeri base showed that the dimensions are different so I didn't open up the holes and will add those parts later once I have the gun built and know where they are supposed to go.
The rear deck was installed along with the front bracing rail and side connectors to complete the step.
That brought me to Step 12 which deals with the assembly of the fold-down side extenders that create the fighting platform for the gun crew. Instead of using the kit-supplied vinyl mesh, I used the Eduard mesh and installed it using liquid glue due to the fragile nature of the mesh and the tight fit to the kit parts.
The Italeri instructions contain an error here in that the instruction diagrams show the installation of the side ammo cans with the slant facing towards the front of the vehicle. I wasn't paying too close attention and assembled things as the diagrams indicated but it didn't look right when I took the pic.
A quick check of references showed I had them backwards so some careful effort with liquid glue was necessary to gently pry them off and switch them around to face the correct directions on both sides and on the rear panel. Once they had set up sufficiently, I installed the panels in the raised position as called for in Step 16.
Next up will be the Flak 38 itself.
-
Bill Plunk
- Posts: 1245
- Joined: Wed Sep 28, 2022 10:18 pm
WIP 05-09-2010
Made quite a bit of progress today but didn't quite get the Flak 38 complete. The DML kit is a detailed one with lots of little parts so it took longer than I thought it might...which is often the case!
I started in on Step 4 of the DML kit since the first three steps deal with odds and ends like the spare barrels case, ammunition can, etc. that I won't be using on this build. I assembled the base and added the three circular foot rests as well as the gunner's seat. I was very careful in cleaning up the attachment points for the base to preserve the very fine weld seam that DML molded around the base since that's supposed to be there for accuracy sake.

That in turn led me to Step 7, skipping steps 5-6 since they deal with the towing trailer, and the Flak 38 barrel. I realized when I opened up the Griffon barrel that it was actually the shorter KwK 38 barrel and not the longer Flak 38 barrel so swapped it out for an Armorscale one I had in the stash that was destined for a different project and was able to keep on truckin'. I cut down the one-piece styrene barrel and drilled out a hole to take the mount pin on the aluminum replacement barrel. This was glued in place with CA gel and the brass flash suppressor added as well. I left the gun separate to facilitate painting and detailing and will install it later after the rest of the gun has been painted.
This step also assembles the base portions of the gun mount and adds the movable splinter shield. I made an attempt to use the kit-provided brass parts but they didn't work out too well due to the limited amount of contact space available to glue them in place with enough strength to hold so I ended up with the styrene parts instead.

Step 8 assembled the side frames for the gun mount and was a complex step with a lot of parts. I opted for the Eduard PE one-piece splinter shield for the gunner's sight vs. the DML 3-part shield since the Eduard part had the same level of detail and was simpler to use.

That brought me to Step 9 where everything would come together and a choice on the gun elevation had to be made. A test fit in the bed of the Sdkfz 10 showed that a 0 degree elevation wouldn't quite work due to the height of the armored cab so I went with the 20 degree option and used the designated parts to achieve that. You'll notice that there's a gap at the base where the frames meet the turntable plate, that's because I haven't glued down the frames yet since it's easier to paint and detail it separate from the base. The fit is a pretty good friction fit so it was solid enough to allow for all the installations to take place and insure it was aligned properly.
The most delicate part of this step is the assembly of the gun sight and installation at the proper elevation. It was a slow process of assemble a couple of parts, wait for the glue to dry, then assemble a couple more. It's a very delicate assembly in the end so patience was key. I did drill out the eyepiece on the direct fire sight with a finger drill to add a little more detail before installing it next to the Flakvisier electronic sight.


A test fit to show how it would look in the bed reveals just how tight a fit it was to mount these on the Sdkfz 10. I haven't yet decided if I'm going to mount the main splinter shields or not as reference pics show them both with and without the shields in place. I'm leaning towards fitting them for the main reason of having more "canvas" for the camo scheme but not sure if it's going to make it seem too crowded...have to think about it. I also need to fit the spent shell catcher basket before the gun will be fully complete...but that's for next weekend!

I started in on Step 4 of the DML kit since the first three steps deal with odds and ends like the spare barrels case, ammunition can, etc. that I won't be using on this build. I assembled the base and added the three circular foot rests as well as the gunner's seat. I was very careful in cleaning up the attachment points for the base to preserve the very fine weld seam that DML molded around the base since that's supposed to be there for accuracy sake.
That in turn led me to Step 7, skipping steps 5-6 since they deal with the towing trailer, and the Flak 38 barrel. I realized when I opened up the Griffon barrel that it was actually the shorter KwK 38 barrel and not the longer Flak 38 barrel so swapped it out for an Armorscale one I had in the stash that was destined for a different project and was able to keep on truckin'. I cut down the one-piece styrene barrel and drilled out a hole to take the mount pin on the aluminum replacement barrel. This was glued in place with CA gel and the brass flash suppressor added as well. I left the gun separate to facilitate painting and detailing and will install it later after the rest of the gun has been painted.
This step also assembles the base portions of the gun mount and adds the movable splinter shield. I made an attempt to use the kit-provided brass parts but they didn't work out too well due to the limited amount of contact space available to glue them in place with enough strength to hold so I ended up with the styrene parts instead.
Step 8 assembled the side frames for the gun mount and was a complex step with a lot of parts. I opted for the Eduard PE one-piece splinter shield for the gunner's sight vs. the DML 3-part shield since the Eduard part had the same level of detail and was simpler to use.
That brought me to Step 9 where everything would come together and a choice on the gun elevation had to be made. A test fit in the bed of the Sdkfz 10 showed that a 0 degree elevation wouldn't quite work due to the height of the armored cab so I went with the 20 degree option and used the designated parts to achieve that. You'll notice that there's a gap at the base where the frames meet the turntable plate, that's because I haven't glued down the frames yet since it's easier to paint and detail it separate from the base. The fit is a pretty good friction fit so it was solid enough to allow for all the installations to take place and insure it was aligned properly.
The most delicate part of this step is the assembly of the gun sight and installation at the proper elevation. It was a slow process of assemble a couple of parts, wait for the glue to dry, then assemble a couple more. It's a very delicate assembly in the end so patience was key. I did drill out the eyepiece on the direct fire sight with a finger drill to add a little more detail before installing it next to the Flakvisier electronic sight.
A test fit to show how it would look in the bed reveals just how tight a fit it was to mount these on the Sdkfz 10. I haven't yet decided if I'm going to mount the main splinter shields or not as reference pics show them both with and without the shields in place. I'm leaning towards fitting them for the main reason of having more "canvas" for the camo scheme but not sure if it's going to make it seem too crowded...have to think about it. I also need to fit the spent shell catcher basket before the gun will be fully complete...but that's for next weekend!
-
Bill Plunk
- Posts: 1245
- Joined: Wed Sep 28, 2022 10:18 pm
WIP 05-15-2010
Today was a very productive day at the bench. Picking up from last time, I finished off the remaining details for the Flak 38 in the form of the splinter shields and the spent shell catcher. The splinter shields are provided as pre-bent brass parts in the DML kit but unfortunately they aren't bent at the right angle, so some adjustments had to be made to allow them to fit properly to the mounts and other parts that are added to them. Finger pressure was all that was required and multiple test fits until I got it just right did the trick. The shields were glued in position using CA gel to provide the required strength to hold their weight.
The spent shell catcher was also assembled using the DML provided PE mesh and pre-formed half-moon brass parts for the lower half of the basket. DML designed the mesh for the circular part to fit inside the frame holder when it should really go around the outside to be accurate but there's no easy way to fix that so I let it go. The brass mesh was annealed over a gas flame to give it the required flexibility to fit into position with the outer mesh portion that joins the basket with the circular half the toughest to shape and form. I eventually got it to work but took a lot of patience and gentle forming/shaping to avoid damaging the mesh in the process.


A quick check in the back of the Skdfz 10 showed that everything fit properly and there weren't any clearance issues related to the shields.

That led me to the last remaining item, the suspension and road wheels. I removed all the track road wheels from the sprues and sanded down their mold seams. The inner wheels were assembled while the outer ones were left unassembled to allow for painting prior to installation. The front steering wheels were also assembled, taking care to align the tread pattern correctly for the zig-zag tread. I used liquid glue to get a solid join all around the tire and once the glue had dried, sanded it with a sanding stick to remove the seam and also show some use/wear.

Adding the suspension for the tracked portion was very simple since the suspension arms are molded in place on panels that install to either side of the lower hull. Prior to installing them, I made the necessary modifications to fit the MK white metal replacement drive sprockets by cutting down the mount pin with sprue cutters. I also removed the molded on idler mount with a #11 blade and used a drill bit to drill out a hole to take the idler mounts included in the MK set to allow the idler to be positionable for track tensioning later. The mount is only dry fit for now to facilitate that.

A quick test with the road wheels and front steering wheels showed that the suspension will play nice later on without any modifications needed. The back end of the vehicle will get lifted into a level set with the front once the tracks are added so I'm all set.

Tomorrow, weather permitting, I should be able to start the paint work.
The spent shell catcher was also assembled using the DML provided PE mesh and pre-formed half-moon brass parts for the lower half of the basket. DML designed the mesh for the circular part to fit inside the frame holder when it should really go around the outside to be accurate but there's no easy way to fix that so I let it go. The brass mesh was annealed over a gas flame to give it the required flexibility to fit into position with the outer mesh portion that joins the basket with the circular half the toughest to shape and form. I eventually got it to work but took a lot of patience and gentle forming/shaping to avoid damaging the mesh in the process.
A quick check in the back of the Skdfz 10 showed that everything fit properly and there weren't any clearance issues related to the shields.
That led me to the last remaining item, the suspension and road wheels. I removed all the track road wheels from the sprues and sanded down their mold seams. The inner wheels were assembled while the outer ones were left unassembled to allow for painting prior to installation. The front steering wheels were also assembled, taking care to align the tread pattern correctly for the zig-zag tread. I used liquid glue to get a solid join all around the tire and once the glue had dried, sanded it with a sanding stick to remove the seam and also show some use/wear.
Adding the suspension for the tracked portion was very simple since the suspension arms are molded in place on panels that install to either side of the lower hull. Prior to installing them, I made the necessary modifications to fit the MK white metal replacement drive sprockets by cutting down the mount pin with sprue cutters. I also removed the molded on idler mount with a #11 blade and used a drill bit to drill out a hole to take the idler mounts included in the MK set to allow the idler to be positionable for track tensioning later. The mount is only dry fit for now to facilitate that.
A quick test with the road wheels and front steering wheels showed that the suspension will play nice later on without any modifications needed. The back end of the vehicle will get lifted into a level set with the front once the tracks are added so I'm all set.
Tomorrow, weather permitting, I should be able to start the paint work.
-
Bill Plunk
- Posts: 1245
- Joined: Wed Sep 28, 2022 10:18 pm
WIP 05-16-2010
Today's weather was absolutely gorgeous and perfect for painting so I was able to get quite a bit done. Before I could start though I had to deal with something that had been bugging me for a while but which I didn't figure out until this morning. The gunner's sight splinter shield wasn't lining up correctly with the sight and I realized it was due to the different dimensions on the Eduard shield vs. the DML kit parts. I assembled the DML shield using the 3 parts and 4 hinges that hold it together and replaced the Eduard shield to correct the issue and give myself some peace of mind.


Compare this new shot to the last one from yesterday and you can see the huge difference it makes.

With that out of the way I proceeded directly to the garage and starting the paint work. First up was the application of a primer coat of MM enamel Italian Dark Brown. The Flak 38 was painted separately of course but it makes for a better shot to show it in the bed.

The base coat was next using a 50-50 mix of MM enamel Light Gray/Panzer Dunkelgelb applied in thin mist coats to slowly build it up over the primer coat.

Then came the camo pattern. I applied it freehand using a pic in Spielberger's Halftracks and Variants for inspiration. For the Olivgrun I applied MM enamel Khaki by airbrush first then added the Rotbraun using a 50-50 mix of MM enamel Leather/Military Brown. I went back over things with the base coat color to correct some over-spray here and there and then thinned the base coat color still in the cup to wash-like consistency and sprayed a mist coat from about 12 inches away to tie the scheme together a bit. The scheme will of course get more attention during the weathering phases when the time comes. The mesh portions were the trickiest, I used strips of blue painter's tape to mask the bed and allow for better visibility on how the scheme looked for those areas.

I also got all of the road wheels painted. I used my normal method of mounting the wheels on toothpicks with blobs of poster blue-tack putty for easier handling. They were primered just like the vehicle and the rubber portions sprayed by air brush using MM enamel Gunmetal. The hubs were painted using a draftsman's circle template and the base coat color. I also added a little detail in the form of the missing valve stems to the front steering wheels by means of a short length of styrene rod glued in place with regular glue and cut down to the right length prior to painting.

Now the real fun will begin, all the detail painting for the interior, the gun, etc. are still to come!
Compare this new shot to the last one from yesterday and you can see the huge difference it makes.
With that out of the way I proceeded directly to the garage and starting the paint work. First up was the application of a primer coat of MM enamel Italian Dark Brown. The Flak 38 was painted separately of course but it makes for a better shot to show it in the bed.
The base coat was next using a 50-50 mix of MM enamel Light Gray/Panzer Dunkelgelb applied in thin mist coats to slowly build it up over the primer coat.
Then came the camo pattern. I applied it freehand using a pic in Spielberger's Halftracks and Variants for inspiration. For the Olivgrun I applied MM enamel Khaki by airbrush first then added the Rotbraun using a 50-50 mix of MM enamel Leather/Military Brown. I went back over things with the base coat color to correct some over-spray here and there and then thinned the base coat color still in the cup to wash-like consistency and sprayed a mist coat from about 12 inches away to tie the scheme together a bit. The scheme will of course get more attention during the weathering phases when the time comes. The mesh portions were the trickiest, I used strips of blue painter's tape to mask the bed and allow for better visibility on how the scheme looked for those areas.
I also got all of the road wheels painted. I used my normal method of mounting the wheels on toothpicks with blobs of poster blue-tack putty for easier handling. They were primered just like the vehicle and the rubber portions sprayed by air brush using MM enamel Gunmetal. The hubs were painted using a draftsman's circle template and the base coat color. I also added a little detail in the form of the missing valve stems to the front steering wheels by means of a short length of styrene rod glued in place with regular glue and cut down to the right length prior to painting.
Now the real fun will begin, all the detail painting for the interior, the gun, etc. are still to come!
-
Bill Plunk
- Posts: 1245
- Joined: Wed Sep 28, 2022 10:18 pm
WIP 05-23-2010
Due to unforeseen work obligations yesterday I wasn't able to get in any bench time until today, so that means that progress of course wasn't as dramatic this weekend as it might have been.
I was still able to get some work in on the details. I started on the front cab area and picked out all the various details there. The gear shifts and parking brake had their metal handles painted with MM Non-buffing Metalizer Gunmetal and their knobs/grips painted with enamel Gunmetal. Same thing was done for the steering wheel. The seats were base coated with Italian Dark Brown and then dry-brushed with alternating passes of my tan-like "wood" mix, enamel Gunmetal, enamel Leather, and then one more pass of the "wood" mix. All of the dunkelgelb areas were given a light wash of Burnt Umber to show grime and wear and then some of the 50-50 light gray/dunkelgelb mix dry-brushed over it where appropriate to blend things back in a bit. I also stippled some enamel Burnt Umber to simulate scuffing/scraping on the rigid armor plates and then stippled more base coat over that to blend it in as well.

The dashboard dials were also picked out using a combination of Light Gray, Flat Black, and Gunmetal where appropriate. I applied a pin wash of Burnt Umber to help provide some depth and pick out more of the detail as well.

I also detailed and installed the 6 Kar98 rifles for the crew. These all had to have some modifications done in terms of trimming down the stocks, removing the trigger guards, etc. in order to allow them to fit into their holders since I didn't install them the way the instructions wanted. This is no big deal as only the end 1/3 or so is visible, so all the trimming is hidden away inside the case. The rifles' wood portions were painted with MM enamel Leather and the metal portions with Non-buffing Metalizer Gunmetal. The metal portions were very lightly dry-brushed with Steel and then both the wood and metal portions given a dusting of black artist pastels to darken the look a bit. The rifles were then maneuvered into position in both cases and glued in place with strategic doses of liquid glue.

The rest of the day's time went towards detailing the Flak 38 although I didn't get it quite finished. The gun barrel was base coated with Non-Buffing Metalizer Gunmetal and lightly dry brushed with Steel before getting permanently installed in position. A loaded 2.0cm magazine was painted and detailed the same as the barrel and then glued into position once the gun barrel had set up. I also detailed the Flakvisier electronic sight by painting the housing with enamel Gunmetal and detailing the sight screen by applying a layer of enamel Silver paint followed by a 2nd layer of Tamiya Clear Green.
The dials and indicator windows were picked out on the control box using Light Gray for the windows and enamel Gunmetal for the knobs. I also painted the leather seat back cushion for the gunner using the same method as the seat's in the cab to round things out for the day.

Now it's off to see the series finale of Lost!
I was still able to get some work in on the details. I started on the front cab area and picked out all the various details there. The gear shifts and parking brake had their metal handles painted with MM Non-buffing Metalizer Gunmetal and their knobs/grips painted with enamel Gunmetal. Same thing was done for the steering wheel. The seats were base coated with Italian Dark Brown and then dry-brushed with alternating passes of my tan-like "wood" mix, enamel Gunmetal, enamel Leather, and then one more pass of the "wood" mix. All of the dunkelgelb areas were given a light wash of Burnt Umber to show grime and wear and then some of the 50-50 light gray/dunkelgelb mix dry-brushed over it where appropriate to blend things back in a bit. I also stippled some enamel Burnt Umber to simulate scuffing/scraping on the rigid armor plates and then stippled more base coat over that to blend it in as well.
The dashboard dials were also picked out using a combination of Light Gray, Flat Black, and Gunmetal where appropriate. I applied a pin wash of Burnt Umber to help provide some depth and pick out more of the detail as well.
I also detailed and installed the 6 Kar98 rifles for the crew. These all had to have some modifications done in terms of trimming down the stocks, removing the trigger guards, etc. in order to allow them to fit into their holders since I didn't install them the way the instructions wanted. This is no big deal as only the end 1/3 or so is visible, so all the trimming is hidden away inside the case. The rifles' wood portions were painted with MM enamel Leather and the metal portions with Non-buffing Metalizer Gunmetal. The metal portions were very lightly dry-brushed with Steel and then both the wood and metal portions given a dusting of black artist pastels to darken the look a bit. The rifles were then maneuvered into position in both cases and glued in place with strategic doses of liquid glue.
The rest of the day's time went towards detailing the Flak 38 although I didn't get it quite finished. The gun barrel was base coated with Non-Buffing Metalizer Gunmetal and lightly dry brushed with Steel before getting permanently installed in position. A loaded 2.0cm magazine was painted and detailed the same as the barrel and then glued into position once the gun barrel had set up. I also detailed the Flakvisier electronic sight by painting the housing with enamel Gunmetal and detailing the sight screen by applying a layer of enamel Silver paint followed by a 2nd layer of Tamiya Clear Green.
The dials and indicator windows were picked out on the control box using Light Gray for the windows and enamel Gunmetal for the knobs. I also painted the leather seat back cushion for the gunner using the same method as the seat's in the cab to round things out for the day.
Now it's off to see the series finale of Lost!
-
Bill Plunk
- Posts: 1245
- Joined: Wed Sep 28, 2022 10:18 pm
WIP 06-06-2010
Work comittments last weekend made it impossible for me to get in any time until today but fortunately I was able to make the most of it. I still needed to attend to several detail areas and the first order of business was the tracks.
The Italeri link-and-length tracks just aren't up to the desired level of detail and accuracy so these were replaced with the Model Kasten workable track set I mentioned at the start of the build. The MK set recommends 43 links per side and this worked out perfectly with a test fit for both sides. Both runs were assembled using a "daisy chain" method of assembling the links in pairs and then joining the pairs into lengths of 4s, the 4s into 8s, etc. until I had a full run together. The key is to be sparing with the glue on the cap blocks and in the end you get a nice set of workable tracks.

Of course with the tracks done that meant it was also time to install the road wheels and steering wheels on the vehicle itself. I cleaned up some of the overspray on the sprockets by hand on the rubber blocks and also detailed the sprocket teeth holders for the rubber rollers. All of the wheels were installed in place with regular glue and the idlers left movable to allow for track tensioning. As a "pre-weathering" step I also lightly stippled some enamel Burnt Umber on the lower hull sides and on the road wheels and sprockets to simulate light wear and scuffing from dirt, rocks, etc.

The bed of the vehicle also got some attention since it was getting close to the time for the Flak 38 to be permanently installed. I took a multi-layered approach here with the first layer being some stippled enamel Burnt Umber, the second layer an overall wash of enamel Raw Umber, then stippled and dry-brushed base color (50/50 Light Gray and Panzer Dunkelgelb), with the last layer being some stippled enamel Raw Sienna in the areas where the crew would step/walk while manning the gun.

That brought me back to the tracks which were painted with MM Non-buffing Metalizer Gunmetal, then dry-brushed with enamel Steel, and given an overall wash of thinned enamel Burnt Umber. Once the wash had dried, I picked out the rubber cap blocks with enamel Gunmetal. The tracks were then installed on both sides and the idlers tensioned to the desired level and then glued into place to avoid movement later on.


There were a couple of details that I still needed to address on the Flak 38 so those came next. I detailed the sight movement arms using the same metalizer Gunmetal as before and also added the 2 spare/ready 2.0cm ammunition magazines to the tray on the gun mount. These were painted and detailed the same as the magazine that's loaded in the gun and I made sure to face one out so I could show off the detail of the molded-in rounds. The exposed round was painted with MM non-buffing Metalizer Brass to round things out.

With the gun fully detailed, it was time to install it permanently into the vehicle bed. Since the dimensions of the DML gun base varied from that of the Italeri-supplied gun, some slight modifications were required. I had to remove the molded on locking pin on the rear portion of the locking mechanism for it to fit properly over the base of the gun. The two front jack stands also had to be carefully positioned to line up properly and hold the base in line with the rear. Once I got that out of the way, I applied some regular glue carefully to the three "feet" on the gun base and set it in place.

I also detailed the front suspension a bit by base coating the various elements with non-buffing Metalizer Gunmetal and then following that up with a Burnt Umber wash vs. leaving it all in the base color.

Next up will be sealing it all up and starting in on the weathering so this one's getting closer to the finish line!
The Italeri link-and-length tracks just aren't up to the desired level of detail and accuracy so these were replaced with the Model Kasten workable track set I mentioned at the start of the build. The MK set recommends 43 links per side and this worked out perfectly with a test fit for both sides. Both runs were assembled using a "daisy chain" method of assembling the links in pairs and then joining the pairs into lengths of 4s, the 4s into 8s, etc. until I had a full run together. The key is to be sparing with the glue on the cap blocks and in the end you get a nice set of workable tracks.
Of course with the tracks done that meant it was also time to install the road wheels and steering wheels on the vehicle itself. I cleaned up some of the overspray on the sprockets by hand on the rubber blocks and also detailed the sprocket teeth holders for the rubber rollers. All of the wheels were installed in place with regular glue and the idlers left movable to allow for track tensioning. As a "pre-weathering" step I also lightly stippled some enamel Burnt Umber on the lower hull sides and on the road wheels and sprockets to simulate light wear and scuffing from dirt, rocks, etc.
The bed of the vehicle also got some attention since it was getting close to the time for the Flak 38 to be permanently installed. I took a multi-layered approach here with the first layer being some stippled enamel Burnt Umber, the second layer an overall wash of enamel Raw Umber, then stippled and dry-brushed base color (50/50 Light Gray and Panzer Dunkelgelb), with the last layer being some stippled enamel Raw Sienna in the areas where the crew would step/walk while manning the gun.
That brought me back to the tracks which were painted with MM Non-buffing Metalizer Gunmetal, then dry-brushed with enamel Steel, and given an overall wash of thinned enamel Burnt Umber. Once the wash had dried, I picked out the rubber cap blocks with enamel Gunmetal. The tracks were then installed on both sides and the idlers tensioned to the desired level and then glued into place to avoid movement later on.
There were a couple of details that I still needed to address on the Flak 38 so those came next. I detailed the sight movement arms using the same metalizer Gunmetal as before and also added the 2 spare/ready 2.0cm ammunition magazines to the tray on the gun mount. These were painted and detailed the same as the magazine that's loaded in the gun and I made sure to face one out so I could show off the detail of the molded-in rounds. The exposed round was painted with MM non-buffing Metalizer Brass to round things out.
With the gun fully detailed, it was time to install it permanently into the vehicle bed. Since the dimensions of the DML gun base varied from that of the Italeri-supplied gun, some slight modifications were required. I had to remove the molded on locking pin on the rear portion of the locking mechanism for it to fit properly over the base of the gun. The two front jack stands also had to be carefully positioned to line up properly and hold the base in line with the rear. Once I got that out of the way, I applied some regular glue carefully to the three "feet" on the gun base and set it in place.
I also detailed the front suspension a bit by base coating the various elements with non-buffing Metalizer Gunmetal and then following that up with a Burnt Umber wash vs. leaving it all in the base color.
Next up will be sealing it all up and starting in on the weathering so this one's getting closer to the finish line!
-
Bill Plunk
- Posts: 1245
- Joined: Wed Sep 28, 2022 10:18 pm
WIP 06-13-2010
Another weekend has come and gone and I managed to make some good progress at the bench. The first order of business was sealing the base coat to protect it during the weathering process by applying a coat of Future acrylic floor polish via airbrush. I decided not to apply any decals to this one so I let the coat set overnight before moving on.

First step in the weathering process was the application of an overall wash of enamel MM Raw Umber using a round 0 sable brush.

This was followed by the application of dot filters using small dots of enamel Flat White, Raw Sienna, Panzer Olivgrun, and the base-coat Dunkelgelb/Light Gray mix. The dots were applied with a spotter brush and then blended together using repeated strokes with a square tipped brush. The square brush was lightly dampened with clean thinner and touched to a paper towel to wick away the excess and the brush cleaned periodically to avoid a heavy paint build-up.

Here you can see a "before and after" shot with the portion of the hood on the left with the filters applied and the area on the right still waiting its turn for the application. I work in small sections at a time and wear a breather mask to avoid prolonged exposure to the thinner fumes.

The dot filter process was applied to the rest of the vehicle to round out this step.

Next I applied a pin wash of enamel Burnt Umber to bring out some of the details. The pin was was applied with a pointed 10/0 brush and excess wash cleaned up or adjusted where needed using the same brush and clean thinner along the way.

Next up will be the pigment weathering for the tracks and lower hull, this one's almost to the finish line.
First step in the weathering process was the application of an overall wash of enamel MM Raw Umber using a round 0 sable brush.
This was followed by the application of dot filters using small dots of enamel Flat White, Raw Sienna, Panzer Olivgrun, and the base-coat Dunkelgelb/Light Gray mix. The dots were applied with a spotter brush and then blended together using repeated strokes with a square tipped brush. The square brush was lightly dampened with clean thinner and touched to a paper towel to wick away the excess and the brush cleaned periodically to avoid a heavy paint build-up.
Here you can see a "before and after" shot with the portion of the hood on the left with the filters applied and the area on the right still waiting its turn for the application. I work in small sections at a time and wear a breather mask to avoid prolonged exposure to the thinner fumes.
The dot filter process was applied to the rest of the vehicle to round out this step.
Next I applied a pin wash of enamel Burnt Umber to bring out some of the details. The pin was was applied with a pointed 10/0 brush and excess wash cleaned up or adjusted where needed using the same brush and clean thinner along the way.
Next up will be the pigment weathering for the tracks and lower hull, this one's almost to the finish line.
-
Bill Plunk
- Posts: 1245
- Joined: Wed Sep 28, 2022 10:18 pm
Completion 06-20-2010
Picking up from where I left off last weekend, this round's efforts focused on the pigment weathering for the running gear and lower hull. I mixed up a dry powder concoction using Mig Dark Mud, Europe Dust, Light Dust, and Rubble Dust until I had the shade I wanted. This was converted into a wet mixture using regular tap water with a drop of dish-washing soap added to break up the surface tension. The wet mix was applied to the desired areas using a round 0 sable brush and then allowed to air dry.

While wearing a dust/sanding mask to avoid inhaling the fine pigment particles, I carefully removed the excess pigment using stiff bristled brushes and wet and dry q-tips to adjust the level to where I wanted it.

That left me with just a couple of odds and ends to take care of, the first of which was the installation of the clear windshield parts for the driver's cab. These were added using careful applications of liquid glue around their edges and gentle pressure with tweezers. I also added the mirror detail using Echelon peel-and-stick Sdkfz 251 silver mirror parts.

As it just so happened, those same peel-and-stick silver mirrors were the same diameter as the spot light housing on the opposite side, so I added one there as well for the reflector portion of the inside of the light. The lens portion was added using a drop of Testors Window Maker/Clear Glue applied with a toothpick.

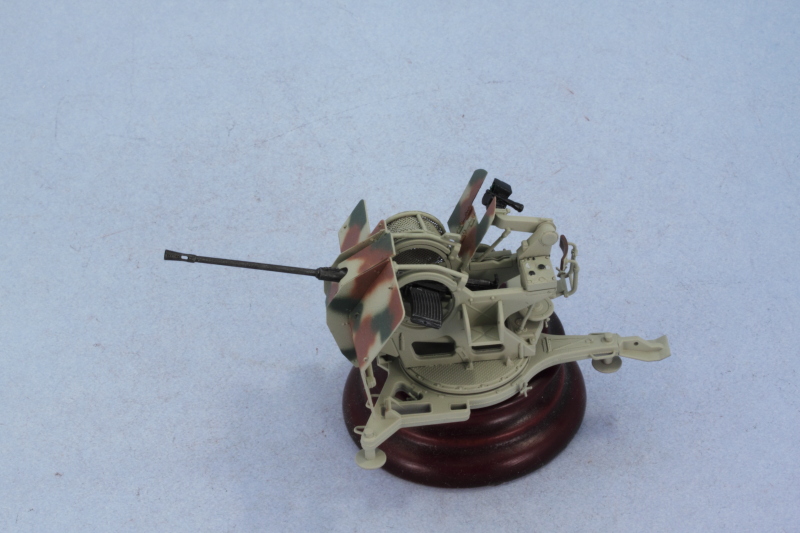
That was the last thing needed so I reset the white balance on the camera and took the final walk-around shots to close this one out on the books.


While wearing a dust/sanding mask to avoid inhaling the fine pigment particles, I carefully removed the excess pigment using stiff bristled brushes and wet and dry q-tips to adjust the level to where I wanted it.
That left me with just a couple of odds and ends to take care of, the first of which was the installation of the clear windshield parts for the driver's cab. These were added using careful applications of liquid glue around their edges and gentle pressure with tweezers. I also added the mirror detail using Echelon peel-and-stick Sdkfz 251 silver mirror parts.
As it just so happened, those same peel-and-stick silver mirrors were the same diameter as the spot light housing on the opposite side, so I added one there as well for the reflector portion of the inside of the light. The lens portion was added using a drop of Testors Window Maker/Clear Glue applied with a toothpick.
That was the last thing needed so I reset the white balance on the camera and took the final walk-around shots to close this one out on the books.