Dragon Pzkpfw VI Ausf. E Sdkfz 181 Tiger I Late Production 3-in-1 (2013)

Bill Plunk
Posts: 1245
Joined: Wed Sep 28, 2022 10:18 pm

WIP 11-24-2013

Post by Bill Plunk »

Despite the minor disruptions yesterday, there was a planned effort on the program that dealt with getting the markings on. First up was a sealing coat of Future to protect the paint work from the weathering stages. This was allowed to air-dry for about an hour or so and then the markings were applied. The kit-supplied markings provide the turret numbers as individual numbers so you can create your own chosen vehicle, mine is 213. Decals were treated with multiple passes of Solvaset and gentle prodding with a wooden toothpick where necessary to ensure they settled down correctly into the zim pattern. This is a time-consuming process that involves lots of waiting for the Solvaset to do its work. If you rush it, you can easily damage a decal beyond repair so lots of hurry-up-and-wait involved.

Image

Image

Image

In between some of those hurry-up-and-wait sessions, I worked on the road wheels some more. They had gotten the Future treatment as well so I had the chance to apply a pin wash of enamel Burnt Umber to bring out their details before installation.

Image

With the decals set and ready to go, the wheels were installed on both sides and a 2nd sealing coat of Future applied to get things ready for the weathering stages ahead.

Image

The Future will be allowed to fully cure for at least 24 hours before moving on. Since this is a holiday week, expect more updates sooner rather than later hopefully.
Bill Plunk
Posts: 1245
Joined: Wed Sep 28, 2022 10:18 pm

WIP 12-01-2013

Post by Bill Plunk »

Weathering process is under way with the Tiger, the first step being the application of an overall wash of MM enamel Raw Umber.

Image

This was followed by a dot filter process using MM enamel Flat White, Raw Sienna, and Panzer Dunkelgelb.

Image

Image

Some additional blending and fading was added by dry-brushing the 50/50 base coat mix using a wide square-tip brush.

Image

Image

Then a pin wash using MM enamel Burnt Umber to bring out more of the details.

Image

After touching up the pin wash a bit, everything was sealed in with a dull coat using MM Lusterless Flat in the spray can. The remaining clear parts were detailed and added for the turret and hull crew periscopes.

Image

Image

Next up will be working on the pigment weathering for the tracks and hull.
Bill Plunk
Posts: 1245
Joined: Wed Sep 28, 2022 10:18 pm

WIP 12-15-2013

Post by Bill Plunk »

Made a lot of progress in the weathering process with the Tiger. This round of effort focused on the pigment weathering. First up were the tracks. I applied a wet mixture of Mig Productions Dry Mud pigment combined with tap water (adding a drop of dishwashing soap to break the surface tension) and applied with a brush.

Image

This is allowed to air dry and looks a bit of a mess, but the next step corrects that. Using a round stiff-bristled brush, I adjusted the dried pigments working one link at a time.

Image

This treatment is applied to both sides of the track run to get the overall effect.

Image

Then it was the hull and suspension's turn. Same approach but the wet mix here is Dark Mud pigments and has a couple extra steps involved.

Image

Excess pigment is removed with a larger brush vs. the one used on the tracks.

Image

More pigment is removed/adjusted using Q-tips, dry for the most part but using wet ones were the pigment was more stubborn.

Image

Until finally the end result is achieved, producing a nice layered result working off the earlier washes, scuffing/chipping, etc.

Image

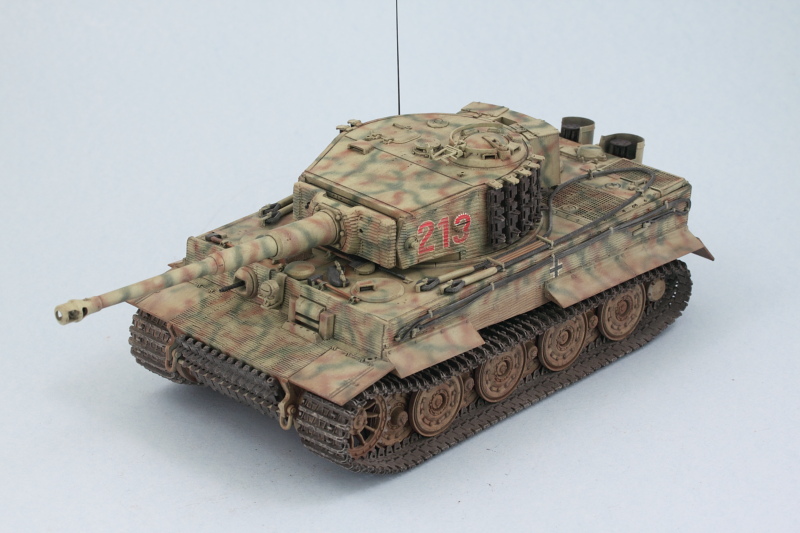
Then it was time to mount the tracks. The sprockets and idler were added and the tracks installed to both sides.

Image

Image

And that's where the Tiger sits for now, just a few small details to work on as the last elements to complete it.

Image
Bill Plunk
Posts: 1245
Joined: Wed Sep 28, 2022 10:18 pm

Completion 12-20-2013

Post by Bill Plunk »

Managed to get the finishing touches in on the Tiger and get it across the finish line. First things first though, the remaining details included some additional pigment treatment for the running gear and fenders. I applied some dry Mig Light Dust pigments to further blend in the previous efforts and tone down the reddish effects a bit as well as tie things back in with the rest of the vehicle.

Image

Using the same pigments and approach, I also added some dust tones to the spare tracks on the turret and the hull tools/equipment.

Image

The turret was added back to the hull for the final time to allow the antenna to be added. Once that was installed, it was no longer possible to remove the turret due to the clearance issues with rotating the turret to the other side to line up the tab/notches in the hull...so that's why this was saved to the very end. An RB Models brass antenna filled the role here and was detailed with MM non-buffing Metalizer Gunmetal.

Image

After a few minor tweaks here and there, it was off to the photo booth for the walk-arounds.

Image

Image

Image

Image

Image

Image
Bill Plunk
Posts: 1245
Joined: Wed Sep 28, 2022 10:18 pm

Publication September 2016

Post by Bill Plunk »

This project has been published in the FineScale Modeler's September 2016 '100 Years of Tanks' Special Issue.

Image

Image
Post Reply